After almost
a year of not feeling like sewing any of my historical dresses, I FINALLY broke
through the wall a little bit. My inspirations that have been wiggling their
fingers at me have been mostly plaid fabrics and I did an excellent job of
collecting plaids in both silk taffetas and cotton. Those dress ideas ranged
from 1830s-1890. The hard part was deciding WHICH dress I would make, and for
what?
For what,
pretty much answered itself. At this point, nothing. Which meant I could make
anything. Next was what would get the most wear? For me, its mid-1880s. In a
spurt of enthusiasm last October, I had made a fitting muslin from the Truly
Victorian #466, Alexandra 1887 bodice. So, I decided, ok, I made that, but does
it still fit? You know, Covid weight. After a bout of being sick, I lost that
extra weight, so I didn’t have to worry about it as much. That ended up also
deciding on what to start first.
I had this
lovely orange, blue and red plaid medium weight cotton blend fabric, and I
could pull out the colors in it for my accents, and after wavering back and
forth on the vest color, I decided on a navy or royal blue to contrast with it.
Next up was
my favorite part, looking for ideas. This blue plaid dress was my original favorite
but I only had 5 yards of my plaid, so I could only make the skirt or overskirt
in that. Later when I finally got around to cutting fabric, I forgot I was
going to do the bodice in the solid blue and instead cut it out of the plaid.
So, the dress decided to be a plaid bodice, plaid overskirt, and I had to go
buy more solid royal blue for the skirt. Sometimes the dress or the fabric
tells you what it wants to be.
I started
working on ideas for the trimming so it didn’t look like a cookie cutter
pattern, and came across this from a fashion magazine, where I noticed the
large buttons going down the lower portion of the jacket. I have some pretty
antique Victorian black glass buttons that are 1” across but only have 4, with
a 5th mismatched one. Although I have used mismatched glass buttons
in the past because no one looks that close.
But then I
needed 14 buttons for the vest closure. I would love to use these 1/2” antique
blue glass buttons. I have 19 of them, and the gold edge picks up the gold in
my fabric. Except they don’t look well next to the bigger black ones, so I’m at
a standstill with buttons. I may go shopping for 2 more large black ones, and
just used some small black glass buttons. That can wait until the end though.
Then a few
days later I went back to searching online on etsy with a different idea of
using metal buttons, specifically antique brass ones. This seller had multiple
ones and I ordered 2 sets of 10. They’re described as having cabuchon settings
where you can put a colored stone in the center, but I think I like them plain.Back to my
planning stage and what to make the lapels with? I tested doing my lapels in a
blue silk taffeta but it didn’t go well with the color of the blue cotton vest.
I asked for suggestions on the Truly Victorian Pattern Sewist group on
Facebook, and one lady had made her dress with a similar plaid, plus the blue
vest. I noticed her lapels were a dark orange to match the plaid. (btw, notice
her watch chain at the waist and watch pocket going to the side of her bodice?).
My plaid has
a brick-red thin stripe in it and that’s what I decided to do my lapels
in. These photos just have a piece of
the blue fabric in the middle faking the vest.
I had a
boo-boo moment sewing the lapels. I first sewed up the royal blue taffeta one,
and had it pinned on the edges so I could press it. Then I decided to make one
from a brick-red silk dupioni instead. I sewed that up and was about to pin it
and then remembered I needed to under-stitch the seam allowance. I totally
forgot about that on the blue one, and it makes a huge difference on how crisp
the edge is. You open up the two pieces flat, topstitch the seam allowance to
the facing side, close to the seam line. Cut your usual notches in the seam
allowance as needed. The turn it right side out, pin and press. It holds the
lining flatter and looks so beautiful. This can and should also be done on the
collar and cuffs.
I finally
got my bodice sewn together, after a little hiccup where I couldn’t remember
how to sew the vest portion into the bodice around the neckline (where the
white line is in the photo) or stop at the top of the side (where the red line
is). I thought I could see how to do it but wasn’t quite sure. I got a
confirmation on the Truly Victorian group that I was thinking correctly that I
stop at the top of the red line. The rest will be part of sewing the collar on
where the vest attaches to the bodice.
I sewed up
the collar and placed it around the neckline but it was about 3” shorter. If I
wrap the collar around my neck, I have a 1” overlap, and I plan on using a bar
pin as my jewelry there and that only needs to butt together. I have three
antique bar pins to choose from. But until I get up the enthusiasm to put on my
corset, and try on the bodice, I won’t know if it really will fit. So, I’m
setting that aside for a while.
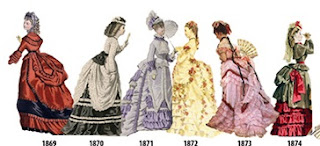
Since I’d
played with the bodice for two weeks, I went on to sewing up my overskirt, using
the Truly Victorian #364, 1886 Autumn overskirt. This takes 4 1/2 yds of
fabric. And that back piece is as wide as a queen bed! I’ve been exhausted just
handling it. And now I see I also have to cut out a lining for that. Ugh. I
started with sewing the center front and two side pieces together that make the
draping from side to side, and pleated the sides up.
I pinned it
on my dress-form to see what it looked like and it wasn’t impressing me. First
off, the front panel is way too long for my height, and I had even shortened it
by 8” when I cut it because I didn’t have quite enough fabric. It was bunching
out on the sides like a 18th century panier, or like pocket hoops
under it. I may be doing a deep hem on it once I see how long it is on me.
Eventually I
saw what I was doing wrong. I wasn’t pulling it up and to the center back like
I should. So, before I taking any length off the front, I’m going to first see
what happens when I do this correctly. *I just adjusted mine, and I think its
still too long, especially for my height.
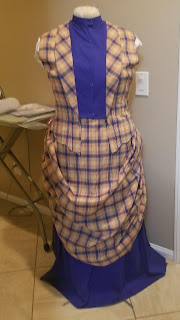
**I am again
rethinking the vest on this. It looks off to me with so much blue, and I think
I like it being shorter like the sample photo I did earlier where it stopped
closer to my waist.
I’m now
considering changing out the red lapels for matching plaid fabric like the fashion
plate here in brown plaid, and making the lapels a bit narrower since I don’t
have a wide chest. Good thing it’s still in construction mode.
At about the
same time I was planning my trims, I was also looking for hat ideas. I found a
couple I liked but didn’t want them out of straw since this is an Autumn dress.
I could steam a straw one to make it the correct curve on the brim, but I think
I may make one out of buckram. And I kind of like the idea of covering it in
brown velvet. I’m pretty sure I still have some in my stash too.
Finding
a hat pattern was a little harder. But I’ve narrowed it down to one by 1886,
the Impressionist hat pattern https://www.1886location.com/shop/Victorian-c46748871 , which has the curved front already but might
need a higher crown, OR Truly Victorian #551 with the short crown, if I can
curve that point. I have both patterns so I need to play with them a bit.
Last week I
went to a sewing workshop with four other ladies. My plan was to put the bodice
on, have it checked for fit, and see if my collar was going to work. Then I was
going to cut out the skirt, and sew that up. What happened was we spent a good
part of the day chatting about sewing, doing some show & tell with some
antique clothing, and then looking at ideas. By the end of the day, we had
worked out how to do the pleating on the back peplum of my bodice, and I cut
out the skirt and sewed up the side seams. It wasn’t a lot accomplished in
sewing but it was a good day well spent talking with friends in person again.
I got home
and suddenly I was sidetracked by petticoats and crinolines. I haven’t done
anything with those other than talk and plan but I think the enthusiasm is
coming back.
In the
meantime, I have continued hand-sewing some 1830s pelerines, and sold my first
one. These are more time-consuming sewing them than my simpler Regency kerchiefs,
but it gives me something to do while I binge-watch all those programs on
Netflix.
~~~~Val~~~~