This is a photo diary of my costuming "travels"; where I've learned and struggled to make historical costumes for myself. They're not always pretty, but always fun, most of the time. And I want to share with others what I learn along the way. **You can find me on Facebook, https://www.facebook.com/Time-Traveling-in-Costume-640703499399817/ or have my posts delivered to your email by signing up at the lower part of the right column.**


About Me

My photo
HI, my name is Val. I'm a member of Costumer's Guild West in Los Angeles, Dean of 2018 & 2024 Costume College; Past President of the San Diego Costume Guild, member of Orange County Costume Guild, and a representative of the San Diego History Center. I also put on historical fashion shows for various groups. I make my own historical costumes but don't sell any unless I get tired of one.The eras I've made so far are 1770 up to 1918. My favorite is the 1880s bustle.

Followers

Saturday, November 28, 2009

A collection of previous costumes PART I

Since I didn’t really keep a written record of my sewing on previous costumes, but did take some in-progress pictures sometimes, I have enough to at least do a couple posts with a conglomeration of costumes I’ve made in the past
In my costuming beginnings, I was lucky to get the dress done in a year in time to wear but I also tended to leave them plain. Well, that’s changed. I’m trying to give myself more time to finish a gown ahead of time, and then I can spend more time trimming it. I found that decorating the cake got a lot more attention than just baking it until it was done.
I’m now in what I call my 2nd stage of costuming. I’ve worked out some fitting issues; I’ve learned some techniques of construction better; my fabric choices are improving; and since I retired, I can spend more time on trimming and details. As I’ve gone into different eras of costuming, I’ve had to learn different sewing techniques for each of them.
The biggest improvement has been being able to have friends over to sew and we’re able to help each other with fitting problems, and just plain figuring it out.
But back to my past costumes. This post will mostly be a collection of gowns I've made for two Charles Dickens festivals. Our Riverside (CA) Dickens Faire gave me the most opportunities to make gowns for. Granted, they do need to stay in the time period of Dickens lifetime, but that gave me a range from late Regency, to Romantic, to Civil War/Victorian.
The first year I attended in 2003, I was fairly new to costuming, and used the popular Simplicity pattern for a skirt and cape. It was quick and easy, and my Mom did the matching bias trim around the cape. A friend made me my first bonnet. And I had a really great time.


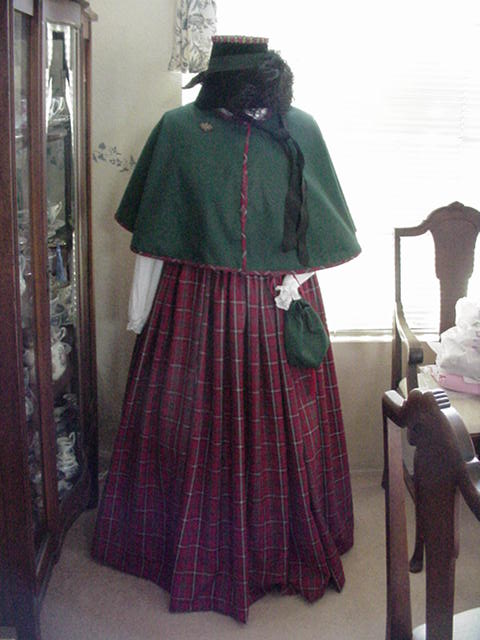
That’s me on the right.
*********
Later that year, I discovered Truly Victorian patterns, and for the 2004 Fair, I made my first bodice, using TV 440, with pagoda sleeves. It was made from hunter green cotton velveteen, and worn with the same plaid wool blend skirt from my first year.
I began a habit of changing either the bodice or skirt each year for a new outfit, and in 2005, I wore the same green bodice but with a new plaid skirt.

In 2006 I made another bodice using the same green plaid fabric, with TV’s 460/420. I also decided to come up with a “theme” costume after running across a picture of a Dickens-type peddler lady. I got two of my friends together and we each came up with a character: a flower peddler, a parasol peddler, and a lace peddler. I think I had the most fun that year.


In 2007, I had a chance to go to the San Francisco Dickens Faire and saw this pattern by Simplicity #4900. I only had two months to put this together, and it turned out to be an easy one for me to do. I really liked the fitted jacket part. My first one was a dark navy blue moiré polyester,with a black beaded trim around the jacket edges.


I wore it first to the San Francisco Dickens Fair Dec ‘07, with a white Garibaldi blouse, where only sleeves show. I saw three other versions of it there, one with a contrasting jacket fabric. So that inspired me to make a second version to wear to the SF Dickens the following year. I also saw a cute lacy day cap on a lady, who made it using a shoulder pad as a base. I immediately went home and made one for my self. The SF fair is so awesome that I know I'd be going back as often as I could afford it.


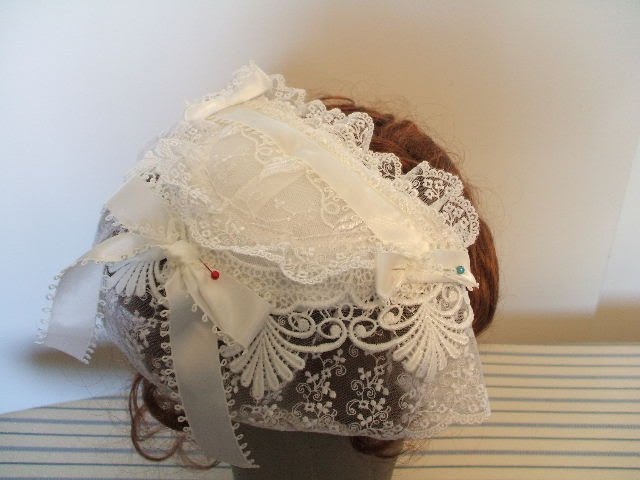
I wore this again to the Riverside Dickens Faire in February ‘08. I really liked my floppy curls that was a hairpiece I put in on top of my head, and let them fall over the front. I covered it with the lace day cap, and a bonnet on top of that. I was in my first fashion show that year at the fair.
Later in the summer of ‘08, I again wore it to a Civil War Reenactment at a local school, and wore a faux white bonnet with it. This was the last time I wore it, and sold it shortly afterwards since it was too big.

So for the next version of this outfit, I decided to try McCall’s 5132, a similar style of this pattern.

I had a brown and orange plaid silk dupioni, and bought a dark brown cotton velveteen for the jacket. When I finally got around to making the jacket, I discovered I had been shorted 1 yd. But when I went back to the store, they had none left, and I had no receipt to prove my story. So I had to run around and try and find a replacement. The closest I could find in this short time was a similar color velveteen that had a slight stretch to it. So I had to flat line it to keep it from stretching. But this still didn’t give me enough to make the McCall’s pattern, so I had to go back to the Simplicity one. I still want to make the McCall’s someday.
I was able to get it done in time for the Dec 08 SF Dickens Faire, and really liked the contrasting colors. I hand-sewed a beaded brown trim around the jacket edges and sleeves. This time I wore my braided hair halo with a chignon attached to the back and two curls hanging from the sides of my head.


For the following year at our Riverside Dickens 08, I decided to make something from cotton, since it tends to get warm out on our streets even in February. I wanted to try an 1830s Romantic era gown and couldn’t decide between using Past Patterns 1830 Full High Gown, or Truly Victorian’s #455 1830s Romantic gown.


A friend who was helping me fit the patterns said the TV was easier to fit and we went with that one. I went out shopping for the fabric, and found this one on sale at a quilt store that has a special room for period correct fabrics. And I love purple.

It was a little confusing working with an inner bodice and an outer bodice but somehow it worked out and I loved the pleating on the back and front neckline of the bodice. However I didn’t like the huge balloon sleeves and found photos of gowns with the sleeves collapsed at the top, and just let them hang down loose. I tried doing a gathering/smocking around the upper arms but it never lined up properly so I gave up for the time being.
I bought my straw bonnet online a few years earlier and trimmed that with a changeable purple ribbon and a vintage sprig of flowers I’d removed from another hat. I also was able to use a gold silk taffeta purse I’d bought from a friend.


The gown was rather plain by itself, and I’d seen one version with a belt around it so I made one, using a belt material I covered with my fabric, and a “belt buckle”, that was actually a cameo bezel I’d found in the Garment District. I sewed it to the covered belt & the opening showed the fabric through it.
I wore this to the Feb 09 Riverside Dickens Faire and was in the fashion show there also. I wore the little clip on curls I’d bought in SF, & I loved the reddish maroon shawl I’d bought to wear over it. Of course this year it got cold and rainy, but I was very comfortable with my shawl.


I got to wear this dress again in another fashion show and showed off my undies, a corded petticoat I’d made.

I again wore it to Costume College 2009, this time with an antique 1830s pelerine I’d bought on ebay. I can’t decide if I like it best this way or with the red shawl. But I got some lovely pictures taken of it on me.


I love this pattern so much; I’ve decided to make at least two more, one in a fancy silk taffeta for an evening dress, and other cotton day dress, which I have this fabric for it already.

Saturday, November 7, 2009

1918 Armistice Day outfit

For two upcoming events, I made a 1918 outfit to wear to the Armistice Day Brunch, and to a Costumed Walkabout at the Del Mar Antique Show.
Patterns I used were Butterick 4092- Basque skirt with button down wrap around and Folkwear 210- Armistice blouse.


The fabrics would be a Navy blue linen blend for skirt & white linen for blouse

I ran across this extant blouse dated 1918 that is very similar to this pattern. I like the lace idea and it could really dress up a skirt.


In a LiveJournal community group, Lamode Illustree, someone posted a fashion print of a woman wearing a blouse and skirt very similar to this, with a jacket and very nice looking hat too. It was neat that it was the exact blouse I was making. It’s called a Sport Suit, and I can see finding a nice fabric for a jacket for mine too.

I started the skirt on 9-27-09. It went together very easily except I sewed all the way down to the bottom of the fake pleat, and realized it’s only supposed to be sewn 2 inches in so it has a “flap”. So the seam ripper went to work.
This skirt style is high waisted and it cuts in very tightly from the hip, so a good fitting is needed. I’m still waiting for someone to help me fit that.


I found a blue straw hat in antique shop, & temporarily wrapped the crown with white eyelet, plans for using white with something red on it.


I started on the white linen blouse while waiting on the skirt, and it too went together very easily. It has a self fabric belt that is sewn to a gathered section on the back of the blouse to tie around to the front to give it some poof.


I decided to use a white crocheted cotton lace to sew around the collar and cuffs. Then I attached the collar to the blouse and here we have it.

I’m going to do the tucked panel that goes in the center of the bodice, called a vestee. If I’m understanding this right, one side of the front will be sewn to the vestee, the other will be attached by hooks and eyes, and snaps. I was told some extant examples have lots of snaps holding it together instead of buttons and buttonholes. They have buttons covering them though. The thought of making 14 tiny buttonholes makes me glad I won’t have to do them now.
The tucked vestee was a little easier than I expected but handling the 1/8 inch tucks was hard. I made tiny pencil marks along the pattern lines off the pattern but didn’t draw lines so I wouldn’t have any showing when I was done. I folded over each tuck and pinned them, and found if I didn’t pin them the correct size, I “lost” part of the material for the next tuck, so I had to be careful.


There are only 4 tucks on each side of the center line so it didn’t take me very long to do them. I had to also be very careful sewing them on my machine to keep it to the 1/8 inch. The first one was a tad bit bigger but not enough to make me want to try and rip it out. I was happy with the finished tucks.


After I turned under both sides and the top, I sewed a row of the crocheted lace across the top. It lines up just above the bottom edge of the collar. I slipped stitched the right side permanently to the front of the blouse and started sewing eight of my ¼ inch buttons I’d inherited from my aunt.
I was told according to some extant examples of this blouse that they used lots of snaps and hooks & eyes instead of buttons and buttonholes. So I was happy to only have the buttons as decorations. I’m sewing snaps on the opposite side of the vestee underneath the buttons, and will have a couple hooks & eyes on some stress areas.
Today I think I trimmed my hat to where I like it. I found a white embroidered ribbon in my stash and tacked that around the crown, along with a small bow, and tucked a black feather tuft in the side over the bow.


I found these Mary Jane-style shoes at Target that I’m going to wear with this outfit now. I’ve noticed a couple photos of gowns where they’ve worn spats with this type of shoe, so I’m looking at a pattern I have for possibly making some.


While watching a movie the other night, In Love and War, based in 1918, I saw this beautiful outfit on Sandra Bullock, and took pictures of it off the screen. It’s a much fuller skirt than the one I’m making, and I love the jacket she’s wearing with the blouse collar hanging out.

The rest of the blouse is still going together fairly easily. It took me a little while to figure out how to set the vestee in. It’s sewn to the blouse opening on the right, and then the left side would have the closures. I sewed the 14 tiny buttons down both sides of the blouse/vestee, and sewed snaps on the backside of the left just underneath each button. The very top on the left wants to pull away, and I tried another snap but it still pulled. So I tried a hook and eye, but it still pulls and the hook can be seen. So now it has a snap and hook and eye, and looks better but still wants improvement. I want to make sure it has a sturdy closure since all you have to do is pull on the snaps and it will pop open.


The cuffs were the most interesting. It has a cuff, then a folded back cuff that has lace sewn into its seam. I made a mistake with the lace when I sewed it sandwiched right sides together with the cuff and cuff facing, where not enough of the lace was left free. So only a tiny portion of it shows. But it still looked nice, so I decided that was good enough.
It was a nice change not to have overly large sleeve caps for once, and I only had to ease the sleeve into the armhole instead of gathering bunches of fabric where it looks like wings.

I’m still happy with how the hat is looking so no more changes have been made on it yet.


I must add that I adore working with this linen. It even presses nice sharp edges with your fingers. The backside of that is it wrinkles but since it’s not pure linen, it’s not too bad.
I finally finished the skirt, which just needed it’s waistband, hemming, and buttons sewn on the front fake wrap-around.
For the waistband closures, I used four hooks and eyes, and three snaps to keep it flat. The pattern calls for 3 or 4 large buttons down near the bottom. I came across a fashion print with buttons running down the full length of the skirt, and liked that better, since it’s a rather plain skirt. The buttons are 2” across, so it only took 6 of them, starting just at my hip.


So now my outfit is done, and I get to wear it twice this month.
*Added on Nov 16*
Here I am wearing my outfit at the Armistice Day Brunch at the 94th Aero Squadron Restaurant in San Diego.

Overall I'm happy with it but am taking in the front a little since the neckline is a little too big. I figured out all I need to do is taking the stitching out along the left side of the vestee, and just move it over. I'll be covering up one side of the tucks but the other side is still visible. So other than taking out that handstitching, re-stitching it, and re-sewing the buttons back on, it was an easy fix.
However I wasn't happy with my hat when it kept sliding forward from my low bun pushing it up. So I'll be wearing a different wig, a short curly bob, with it this Saturday at the Costumed Walkabout. I hope to get some better photos of it too.

Monday, October 19, 2009

Making Victorian mourning brooches

Recently my costume guild planned a mourning walkabout in Old Town San Diego, and with plans to wear appropriate attire. I decided to make myself a mourning brooch, using a technique I had successfully tried on an earlier costume.
After a little more thinking, I decided to make one for each of the 12 ladies attending the event. So I started at Michael’s Craft Store to look for some cameo brooches. They sell them individually for about $3 but with a coupon, can be half price. I couldn’t find a photo of the exact brooch I bought but here are some in a set on their website.

There’s usually some kind of ceramic design in the middle that you use as the base for your portrait. They come in a couple different shapes too.
So then I did a search for “Victorian portraits”, and came up with a link to some being sold on ebay. Most were cabinet portraits, and some were actual brooches for sale. I copied and saved a bunch of them that looked good, and in focus.


I made a Word Document by Inserting each portrait on the page, and shrinking it down to a size that looked like the face area would fit onto the brooch.
I made a template from the center stone of the brooches with paper, and laid it on top of each portrait to include the areas I wanted to keep on the brooch. Using a stiff vinyl or plastic template may give you a better view of the portrait before you cut it. But I didn’t have any problem doing it this way.
I used some black Americana tole paint and rubbed some of it with a paper towel along the edges of the silver brooch to age it.
Then I brushed some Modge Podge (a decoupage paste purchased at Michael’s) on the face of the cameo with my finger. I laid the cut portrait on top of it and tapped it down with a clean finger. Again using my finger, I put more Modge Podge over the top of the portrait, making sure it was all covered and wet. It looks pretty white but it will dry clear. This acts as a glue and a sealant. Nothing else is needed to finish it.
Most of the brooches had a loop for hanging it on a chain; some didn’t but had a loop as part of the frame. I wanted to make these a pinned on brooch, so I tied a narrow black velvet ribbon to each one, and at this time put a safety pin on the ribbon so the ladies could pin it to their blouses. Another option would be to glue a pin back on the back of the brooch.
This is the one I made for me.

These are the ones I made for the other ladies, and you can see the variety of shapes and designs they came in.

Here are two of us wearing our brooches in our mourning outfits.