

Last week I attended the Costume Accessories Symposium(CAS) in Williamsburg, VA. At the end of the two day lecture series, I had signed up to take a muff making workshop put on by Janea Whitacre, the Mistress of Millinery & Mantua Maker at the Margaret Hunter Millinery Shop in Colonial Williamsburg.
Our class of 15 got to see a variety of sample muffs made by the ladies of the Shop, including some lovely mitts and a workbag.


Isn't that pink one for a little girl just precious?
Janea explained that we had an option of making a single muff, OR making a separate stuffed linen bag that could have an interchangeable outer cover. I think we all chose the second option.
We were given many choices of colors of either silk satin or silk taffeta fabrics to make our muffs with. I chose a dark sage green silk satin, and after looking over the various trims, I used a simple variable green & cream trim that I would make a swirly pattern with on my fabric. Then I picked a pink ribbon flower trim to cut the flowers off and sew onto the trims. Janea came over and looked at it, and suggested I do a double row of the trim, turning it into a lattice, and put the flowers inside the squares. I thought at first I shouldn’t use so much of their trim but she was very generous with what I was using.

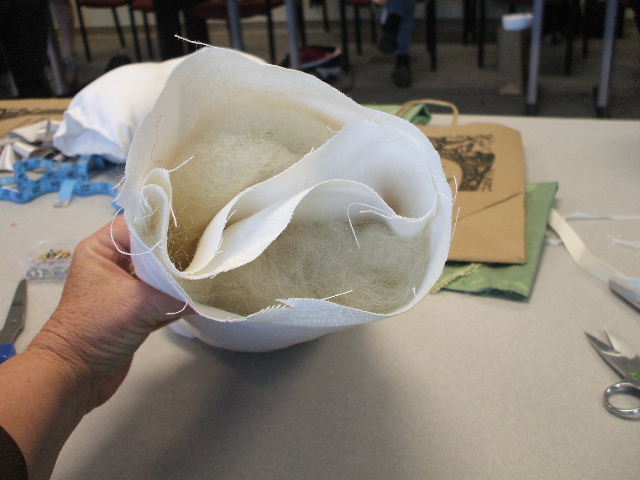
Everything was handsewn. Once we hemmed one side of the cover, we folded the sides in to form channels for the ribbon closures on the sides. We left it open so we could sew the trims on first. We then made the inner linen pocket by sewing a long tube, then turning it inside out but only half way so there was a pocket to stuff & a hole through the middle for your hands. We used real lambs wool to stuff it with.


On my side of the room, we all started sewing our outside covers. On the other side of the room, my friend started sewing her inside lining.
I started sewing my trims on the outside sleeve and sewed one row zigzagging one direction. Once that was sewn, I started another row going the other direction.
This shows how it will look once closed down the middle and put over the lining muff. This also shows the true color.
By the end of class, a few people were close to being done. It’s a fairly easy project that can be carried around to work on. And since the cover is interchangeable, I can already imagine other covers I want to make.

After I flew back home to San Diego, I was really enthusiastic about finishing my muff. But of course things kept interrupting me, and it took a week to finally finish it. I never got far along enough during the class to get the finishing instructions so I had to wing it the best I could. After sewing 28 ribbon flowers on the squares, I sewed 24 tiny crystal pearls, that I purchased here locally in a bead shop, in the other squares.


I turned the raw edges on the long sides of the muff and stitched those together to close the muff. I was finally able to put my ribbons through the side channels to draw it closed. After sewing the opening closed on my inner linen muff, I was able to stuff it into the finished outside silk cover. The inner muff didn’t have enough stuffing so it’s not as full as I’d like it but at some point I may get some batting to fill it out. I had chosen this narrow ribbon in class for my drawstring, as opposed to the wider ones, but now that I have it in, I think I’ll get some of the wider ribbon and replace it.

And here we have the final muff. Since I can easily replace the outside green silk cover with other covers, I’m going to be thinking of a less fancy one to make next.

My thanks to Janea and the ladies of the Margaret Hunter Millinery Shop for making this such a fun class.
That is so pretty, I love the colours!
ReplyDeleteOh, oh, oh...I LOVE that! How gorgeous! I think it's my favorite muff I've ever seen! I've taken all the classes with the CDC last year but there wasn't a muff workshop. Thank you so much for sharing!
ReplyDeleteThank you, *Mrs.C*
ReplyDelete*lahbluebonnet*, Thank you very much. Angela Burnley told me she'll be running a workshop on it soon. :D
Val
Val, I never made the connection between your blog and you in the muff workshop! Nice to "meet" you! :-) Your muff came out GORGEOUS and is definitely the masterpiece of the class! Well worth all the extra time the criss-cross trim took! I still haven't finished mine...!
ReplyDelete*Rebecca*, Thank you! I really enjoyed all the little trims. The silk satin was a bear to work with, since its edges wanted to curl under. I think I'd like to do a dark chocolate brown one with pleated trims next. :D
ReplyDeleteAre you in my group photo? I'm running across other ladies via their blogs on the conference who were also there. Its too bad none of us stood up and said "Is anyone here on a blog or LiveJournal?" Hah!
I hope you get yours done soon too. If you're Facebook, The Margaret Hunter Millinery Shop is asking us to post our finished photo there.
Val
In the group photo, I'm the fourth from the left in the back row with the dark green muff. I'm glad you caught some "action" shots of us working because I was so busy the entire time that I totally forgot to stop and take any! Thanks for sharing them!
ReplyDeleteAh, there you are! Susan Scott, from TwoNerdyHistoryGirls was there too.
ReplyDeleteI had a bunny rabbit one as a child and these in your class look very Victorian and elegant. As my birthplace was the lower peninsula and a l966 graduate of York High School at Yorktown you were in my old home area.
ReplyDeleteThank you Bernideen, these are even older than Victorian, in the 1 770s (Georgian/Colonial) but as someone recently pointed out, they don't much change except for the trimming.
ReplyDeleteYour muff is beautiful! I love the color choice and the trims you embellished it with. It sounds like it was a very fun seminar and trip.
ReplyDeleteThat turned out so nicely! Thanks for the "making of" pics - I think I see how they're made now! Fun!
ReplyDeleteWhat a beautiful muff! I esp. like your color choices, the pink flowers on the pale green. Hmmm, perhaps Janea needs a new apprentice....
ReplyDeleteThank you so much for sharing your pictures. I wasn't actually a participant in the workshop, but Janea, Mark, and the other instructors let me "visit" to observe. I wish I could have taken every one of those workshops.
If you're interested, here are pictures of a few more of the marvelous muffs made by the Margaret Hunter shop's mantua-makers:
http://bit.ly/exR33g
That's beautiful! Thanks for the how-to!
ReplyDeleteThank you Marilyn, Maggie, & Jen. I have more photos of my muff in progress for a later date.
ReplyDeleteSusan, I remember some people popping their heads in the door to see us. I too would have liked to take another class, like the beaded watch chain.
They had those muffs on the tables for us to see and be inspired by. And every time I look at them, I want to make another one. :D
Wow! The last one is may favourite:)
ReplyDeleteI love muff, when I bought one, my hands never feel cold!
It looks gorgeous! I'll have to make one asap, you have me hooked. Problem is that I'm immersed in the regency period for the next month.
ReplyDeleteAylwen, I'll find you some photos of Regency-era muffs! :)
ReplyDeleteVal
Wow! This whole weekend looks amazing! I was wondering why I saw people talking about Williamsburg! Looks like a whole wonderful weekend!
ReplyDeleteYours is gorgeous! Love the trim!
Thank you all for your kind compliments. I think I even impressed myself.
ReplyDeleteLauren, you have probably heard I'm thinking about offering a workshop here locally on making muffs also, but any period people want to make.
Val
Your muff is so pretty! I love the design. What a wonderful thing to make - it must have been so much fun to do so.
ReplyDeleteThank you, Carla, it was a lot of fun!
ReplyDeleteI know I'm late, but I just found this post--it didn't show up in the Google search I did before I made my muff, but it showed up in the Yahoo search I just did. Odd! At any rate, lovely muff!
ReplyDeleteThank you, Katherine. I thought your's was very pretty too. :)
DeleteVal