This is a photo diary of my costuming "travels"; where I've learned and struggled to make historical costumes for myself. They're not always pretty, but always fun, most of the time. And I want to share with others what I learn along the way. **You can find me on Facebook, https://www.facebook.com/Time-Traveling-in-Costume-640703499399817/ or have my posts delivered to your email by signing up at the lower part of the right column.**


About Me

My photo
HI, my name is Val. I'm a member of Costumer's Guild West in Los Angeles, Dean of 2018 & 2024 Costume College; Past President of the San Diego Costume Guild, member of Orange County Costume Guild, and a representative of the San Diego History Center. I also put on historical fashion shows for various groups. I make my own historical costumes but don't sell any unless I get tired of one.The eras I've made so far are 1770 up to 1918. My favorite is the 1880s bustle.

Followers

Thursday, August 27, 2009

Making three 1873 polonaises at the same time

*******************

I discovered a couple years ago that for me to learn how to make a pattern properly, it might take me three times doing it to get it right. So I came up with my "assembly line" method, working on 2 or 3 at a time. In the end, I would have three completed gowns. Granted, this is only beneficial if you WANT 2 or 3 of them. I made each one as a base, then each was trimmed up differently.
I started the first one in July, 2009. It was made out of a white with a celery green multiple striped cotton. I began calling it the Celery Polonaise. I hope to have it done in time to wear to an 1870s picnic in Los Angeles on Sept 20.


Celery Polonaise


The Purple Floral Polonaise


Polkie Dot Polonaise

Tuesday, August 25, 2009

Making my 1770s polonaise gown, The Pumpkin


**************
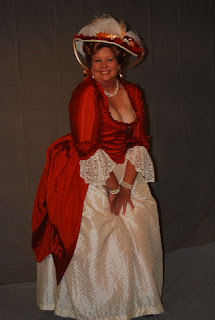
Once you see this gown, you'll know why I named it The Pumpkin. It's bright orange, and is such a happy dress. It was the first one I ever named, and now it seems to have started me naming all my upcoming costumes.
I planned this gown to wear for the 2009 Costume College for the 18th Century theme that year. While looking for one I liked, I came across a painting online of Georgiana, Countess Spencer where she had on a spicey orange gown with lace flounces. I used it as my inspiration.


I used Period Impressions pattern for the polonaise, and just tore the length of fabrics to make the petticoat (skirt). I couldn't find a silk dupioni in an orange I liked so I bought a polyester with a moire pattern fabric in the Garment District, and the polyester "quilted" design cream fabric at JoAnn's for $1.99 yd. I lined the bodice of the polonaise with a lightweight twill but found out later these were not heavily flatlined like I was used to with my Victorian bodices. But because of this being a lightweight polyester, it was good I did so it would hold it's shape better. My friends in Williamsburg lined their's with a lightweight linen. So I'm looking into finding some reasonably priced linen I could use if I make any others in the future.
The petticoat had some weight to it but to give it a little more froofiness, I made an extra skirt under it out of silk organza. I also wore a red pinned-striped cotton underpetticoat under it.
***************
After I was shown how to cut the neckline lower than it was on the pattern, it looked more balanced on me. I used hooks and eyes for my front closure, and then sewed a self-fabric ruching around the neckline and the sleeves. I trimmed the edges of the ruching with scalloped scissors.
Ruching pinned on the bodice

****************
My flounces on the sleeves are two rows of lace, also purchased in the Garment Distric, and I used a JP Ryan anglaise pattern to cut the sloped shape of them. I also attached rows of self fabric ruching above them.


*****************
I handsewed the flounces on the underside of the sleeves.


****************
My hat was made using a straw form I purchased at the Fort Frederick Marketplace in Big Pond, Maryland, while we were on vacation. I used some of my self-fabric ruching on it, along with a peach ribbon, peach and white feathers, and some vintage orange flowers loaned to me by Angela Burnley of Burnley & Trowbridge, whom I'd met in Colonial Williamsburg. It tied down behind my head under my hair, and had a pearl hatpin on the front, which I was told was period correct.


*************
These are photos of me wearing it at Costume College
with Angela Burnley and Barbee Mullins, both of Williamsburg.

Monday, August 24, 2009

My 1885 Best Black Bustle gown

When I first started costuming about seven years ago, I bought some two-toned black striped upholstery material, knowing I wanted to make a bustle gown out of it. I started on the bodice right away, using Truly Victorian's #420 (now called 460) and the pleated skirt, #221.


I cut out & sewed the bodice & bustle apron first, using TV #362, but set it aside to start making more light-weight fabric gowns.
Six years later I went back to it, and realized I didn't have enough fabric to make the skirt. So I used a solid black silk dupioni, and made the pleated ruffle around the hem. I sewed a velvet ribbon along the top where they were attached. I had plans to use this skirt for other costumes too.
I wanted to make this as my Best Black Dress similar to what the ladies would wear for fancy events or photographs. I wanted it really fancy, & over the top with trims, so I knew I would be collecting lots of trims and ribbons for it. Finding black is pretty easy. I also wanted to use it for "mourning" events, and so black glass trims worked well for that too.
When I tried on the bodice again, it was too big. Fortunately it wasn't lined so I was able to take it in. I finished the sleeves, and started the trimming. I had plans to wear it in the next two months to a mourning event, The Bennington Memorial at Fort Rosecrans, and to Costume College in Los Angeles.
I spent many hours where I handsewed all the trims on it, and enjoyed every minute. I used three layers of trim along the neckline, the bottom edges of the bodice, and the sleeves. I use antique lace in the inside of the neck edge, black beaded braid on top of it, then some lace appliques, and sewed some black glass dress decorations I'd bought at a flea market. Those were also used down the front of the bodice, which used hooks and eye closures.


Here you can see the sleeves and the bottom edge of the bodice.
I found two cloak closures made of brass and black glass, and put those on the back of the bodice pleats.

I put the bustle apron together, sewing a 2 inch black pleated grosgrain ribbon to the front edge, and then layered another black beaded trim on top of it. My friends came over and helped pin up the bustling in the back, and it came out lovely.

I was inspired by a photo on the internet of a gown with braided tassels and a rosette hanging from the side of the bustle. With the help of another friend, I made a black rosette out of wide ribbon, and attached an antique black glass button to it's center.
I used some black cording from the upholstery section of a fabric store, and hung it from the front of the apron to the side, where I put the rosette on top of it. I hung three cords down from it, and attached some tassels. I had no idea how to attach or finish the cords, so I just sewed them together and wrapped the threads around it until it seemed like it would hold.
I found an antique capote hat in an antique shop in Sacramento, and it was the right era for this gown. It's supposed to sit on the back, cupping your head. Mine is a wire frame and holds onto my head very well.
The gown was finished in plenty of time to wear it to both planned events. These were taken of me at the Sunday Tea at Costume College, in Aug '09.

Wherein I try to keep a diary when I make a historical gown

I've been writing and sharing about my costuming attempts on LiveJournal for a few years, but never on a step by step agenda. I do take pictures while it was in the construction stage but not in much detail. I don't know if that will change, but it will be nice to have it all documented here in one place. So bear with me.