

July 1, 2013
Stay tape, in costume language, is an inside belt loosely
attached to the seams that keeps the bodice from pulling open, or just staying in place. Get it? "Stay tape". Well, that's what it said to me. I’ve made a few
bodices that after I’d been wearing them a while, they get a little loose,
bunchy, and ride up. I’d heard about using stay tape belts inside the bodice,
and even have one of my extant study bodices with them in it.

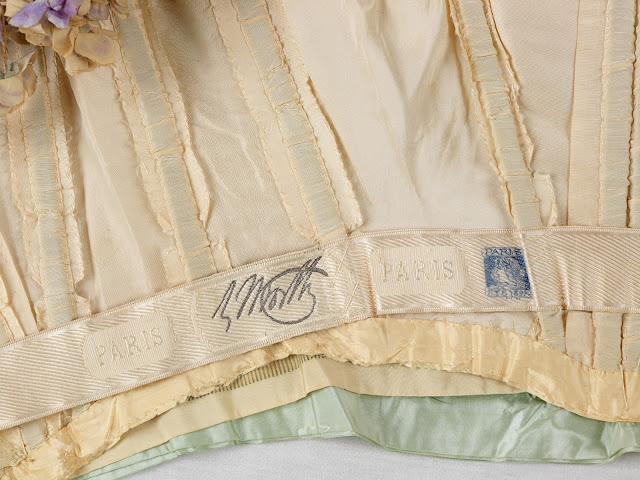
This one hooks in the front with a very large hook &
eye. The two hooks you see under where it’s attached to the bodice are for
attaching the bodice to the skirt. This belt is attached at the bottom of the
bodice but not the bottom edge. This other 1897 bodice also shows it above the
edge.

I’ve made two 1850s bodices and both hang kind of loosely on
my back, one because the original it was copied from has no back seams, and the
other is too large for me now. So I decided now was the time to look into
finally making stay tape belts. I did a search on the internet and most of what
I came up with was the modern plastic stuff being used in modern clothing. *Sigh*,
same old story for most costumers; it’s mostly about modern techniques. I knew
the historical ones used twill tape & other sturdy tapes but basically they
serve the same purpose. I didn’t find anything directly telling me how to do it
in historical costumes. I haven’t found out when they quit using them, but I
did find out they came back in vogue during the 1950s when ladies bodices again
became very tight fitting with big skirts held up by tulle petticoats. Hello
1860s! And they’re still used in formal
wear.


I had a roll of cotton twill tape and began pinning it on to
the inside seams of my bodice. First question: where do I place it? Not what
seams, but where on it? - along the bottom of the bodice, or at the narrowest
part of me? My narrowest part is slightly above my waist and most of my bodices
tend to ride up a bit there. Maybe this will solve that problem?

So I marked on my bodice with pins where my corset was the
narrowest on me, which was basically where the laces went around me. I took out
the couple stitches holding the belt in and measured up 3 inches from the
bottom edge of the bodice on both side seams. I laid the belt along the back
and tacked one side seam to it, then started thinking should I just match it to
the width of my bodice, or does the belt need to be shorter? I measured my back
and it was narrower than the bodice back. See the problem? I think this needs
some size altering later when I have someone here to help me. So back on went
the corset. After re-measuring and marking exactly where the belt should be
attached to just my side seams, that seemed to make it work. I’m going to leave
the belt loose in the back for now.
I took out the next bodice that needed a belt and to make it
simple, I put it on inside out, and wrapped the stay tape belt around me and
marked on it where the side seams hit. So much easier! This bodice is attached
to the skirt so it hits me differently, and also there are no seams in the
back. That is how this particular bodice was made, so the tape will only be
attached to the side seams. It sits just above the facing I have sewn at the
waist.

Of course minutes after I took this photo and was saving it
to my computer, Chloe claimed the dress as her new bed for a couple hours. So
no further work was to be done on it.

After a few hours naptime, Chloe was up and ready for
dinner, and I was able to finish sewing the hook & eye to my belt. I used
the flat trouser-type ones that lock into place to hook it closed.

*If anyone knows of a website that tells more about these, in historical context, please comment with the link. Or add your own knowledge of them by commenting. I and other folks would really appreciate it.* -Val
Well, your second try was exactly how it is done! :) I can't tell you anything much historical about this technique but it sure is in use today, especially for strapless dresses, to help give them vertical alignment (so the bodice doesn't twist or droop).
ReplyDeleteThank you Maryanne, I'm hoping my third bodice will be even better, since it has a back seam to attach to. I was told that's the best place to attach it to.
DeleteVal
For Victorian dresses, you have to sort of go back and read through the period instruction manuals, but here's what I've gathered. The stay tape is to sit at *your* waist, and it helps both pull in the back for a better fit, and also ease the tension on any fastenings. You can tack it to any seams - I've seen evidence of everything, including tacked to darts. It should be snug around your waist, and it'll help hold the bodice *at* your waist, so it doesn't slide or roll up.
ReplyDeleteLaura, thank you, very good description of what this is for.
DeleteVal
What a great topic ... it's often those unseen parts of a garment that are so important to making it look right.
DeleteThanks for bringing it to all our attentions.
Andrea