After I finished the last 1894 Brown & Aqua Polka Dot
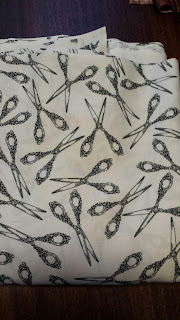
outfit, I decided I wanted to make the same blouse out of a white cotton with
scissors designs on it I had. It could go with another grey skirt I was working on
for yet ANOTHER secret outfit for Costume College. Isn’t that what many girls
did, have multiple blouses for multiple skirts to mix and match?
It’s always a bit hard to do sewing projects in places other
than your home when it’s not set up as a sewing area. So I had to make do with
a large desktop to cut out my fabrics. Also, not having your own sewing machine
you’re comfortable with has its own problems. I’ve fussed at my Mom for a
couple years about the inexpensive plastic Singer she’d bought after her
absolutely fabulous 1950s Pfaff sewing machine motor finally gasped it’s last
breath. The little farming town she lives in doesn’t have anyone that can do
repairs or replacement parts like it needed, and she’s at least two hours away
from a major city that might. But since she wasn’t sewing much anymore, she
didn’t think she needed anything expensive to replace it. So I’ve dealt with a
clunky noisy machine that doesn’t like me much either.
This time I decided to check around town and see if there
was any place that I might rent a machine. They’re really big into making
quilts and there were two quilt supply stores there. But sadly, no rentals.
*sigh* So Plastic Singer and I compromised and we didn’t do too bad this time
and played nice.
Four days before I was leaving for home, we stopped in one
of the large thrift stores and I was looking for large white sheets to use for
cutting out patterns and making my muslins from. Used queen-size sheets here go for
$2-$4 dollars each, and usually can get you about 10 yards of fabric, so that’s
much cheaper even than the $1 a yard muslin I get in Los Angeles, or worse when
I’m home. *grumble JoAnn’s grumble*. There must have been a lot of Spring
cleaning because I came away with four Queen-size sheets, plus Mom dug a few
out of her closet for me. *Score!*
And it was!
I did some test stitches on it, and it ran like butter. Then
I eyeballed the Kenmore. But alas, they didn’t know where the cord was. They
said they get them stolen some times. So the Singer it was! And it had a
carrying case with it.
Back home I was confronted by Mom with it. She said since it
was my birthday she’d pay for it. Yay, Mom!
I was able to finish my blouse on it up to where it needed
buttonholes, which I’ll finish at home, and sewed as much of the vest as I had
time.
While at the JoAnn’s in town (note* it's 30 minutes away), I bought some black dome
shaped buttons to go on the scissors blouse, and they actually had enough cards
on them. And I found the pewter grey metal buttons I wanted for my vest. Gotta
love small towns. Sometimes. The black and white scissors fabric with the black
buttons goes very nicely with my grey twill skirt that you can see at the bottom of this photo.
You know how sometimes you come up with ideas when you wake up in the middle of the night? I had an ahah moment about how I line my sleeves with two layers of netting sandwiched between my fabric and flatlining. I’ve been cutting out a full size sleeve of the netting to keep it stabilized. My idea is to only go to the elbow next time but when I top stitch it to my flatlining, I can sew straight across to stabilize it to that, then sew the whole thing to the inside of the sleeve. That stitch line won’t show except on the inside. It doesn’t save much netting but it also doesn’t make stiff cuffs.
Chloe
didn’t waste any time moving into my sewing bag when I came home.
~~~Val~~~


Love it love it LOVE IT....Fantastic
ReplyDeleteThank you Joyce!
DeleteVal
I love this! I have never tried this pattern because I thought the sleeves looked scary. Thanks to your helpful hints I am going to give it a try.
ReplyDeleteI thought so too, until I saw a couple friends wearing their blouses from it.
DeleteGo for it!
Val