This is a photo diary of my costuming "travels"; where I've learned and struggled to make historical costumes for myself. They're not always pretty, but always fun, most of the time. And I want to share with others what I learn along the way. **You can find me on Facebook, https://www.facebook.com/Time-Traveling-in-Costume-640703499399817/ or have my posts delivered to your email by signing up at the lower part of the right column.**


About Me

My photo
HI, my name is Val. I'm a member of Costumer's Guild West in Los Angeles, Dean of 2018 & 2024 Costume College; Past President of the San Diego Costume Guild, member of Orange County Costume Guild, and a representative of the San Diego History Center. I also put on historical fashion shows for various groups. I make my own historical costumes but don't sell any unless I get tired of one.The eras I've made so far are 1770 up to 1918. My favorite is the 1880s bustle.

Followers

Thursday, December 12, 2019

NEVER TOO LATE TO START THINKING ABOUT XMAS NEXT YEAR

I wished I had more to share of completed outfits for my final post of the year but everything I have been working off and on for the past several months are all in a state of incomplete. However, I do want to have a finale post to close out this year. That is unless I suddenly get a wild hare on and finish something or make major progress on one.
As mentioned earlier, my sets of skirts and shirtwaists all just need hemming and a couple more buttonholes. I forgot about the ones on the cuffs. They’re all collecting on my door. Same with my burgundy ‘teens dresses but I’m liking one more than the other so that may win out as getting finished earlier. And since I can wear my Purple Floral Voile bustle in a fashion show in January, I need to finish that one up. I think it just needs its lavender bows on the sides and hemmed (as usual).

I actually started a new project about a month ago, in hopes of having it done for the Riverside Dickens Festival in Feb next year for the fashion show, and possibly wear to the Port Townsend Victorian Festival at the end of March. I’ve been wanting to make an Arsenic Green Dress and hadn’t come across any green fabric that would do it justice, but finally did. It’s a dark Kelly-green Bengaline, a perfect color and weight for it.
And then I started doing my favorite part: digging around on the internet for information on the history of these “killer” dresses, as they were killers. The arsenic used to create this vivid green color started back in Germany in 1814. It infiltrated everything, down to paint, wall paper, and ladies clothing. Unfortunately, it would leech into a lady’s skin and was poisonous. It also affected those painting with it. The color was still being used as late as 1895 when the truth came out about it. There are existing samples of the wall paper and some dresses, and they are still treated as being deadly. 

These are a few of the known extant dresses held in museums containing arsenic in them. Those handling them have to wear gloves and masks even after all these years.


After looking through a few photos of a couple of the extant dresses, I decided I liked the 1872’s ones and am going to try making this one.
The dress is not displayed with the proper hoop/bustle under it, so the skirt is too big. It should look like these; flatter in front, fuller in back. I don’t have a correct one so I’ll be wearing a small hoop with a bum pad on the back.

I found a couple ads showing some beautiful bodices of this date, along with the hoop/bustle worn under the skirts. They also showed skirt shapes, sleeve trims, and hats being worn then. I’m still working on my hat plan.


This Truly Victorian pattern #TV 403 would work well for my bodice, although while making my mock-up, I removed the lapels and won’t be turning up the bottom of the peplum. I still need to find my contrast fabric for the center piece. And I need to hunt around for some fringe for it.
I’m making the skirt with just panels of fabric but the overskirt will need a pattern. Heather from Truly Victorian told me she’s been playing with a pattern for one and this has encouraged her to make it, and I hope its soon but overskirts go together a little quicker.

And this is what I’ve done on it so far. Impressive, right? At least it looks Christmasy.
And speaking of Christmas; the other day I got an inspiration for next year after decorating our new house with lights. We had one night where a group of judges go through the neighborhood and give out award signs for various themes. (Nope, didn’t win). I noticed a lot of my neighbors would sit out in their driveways and offer wine, champagne, and hot chocolate. Yes, they bribe! One had an elf, and that has inspired me to make a Santa suit for myself and next year sit out there and hand out my homemade caramels. Right now is the perfect time to buy the pattern and fabric, so off to JoAnns I went. The Simplicity 2542 pattern was on sale, as was the red faux-suede and white fleece. I want to make the long Santa coat for myself and add some feminine touches to it. I fell in love with the little reindeer pin and will wear it on the neckline. It should be warm to wear outside, and look like a vintage Santa. No beard, I’ll be a Mrs. Santa. I may even be able to wear it to a couple other places, maybe shopping? This project will be sometime next year, maybe when I’m not so busy. Hahah!


                                              ~~~Val~~~

Friday, September 27, 2019

‘TEEN’S KIMONO SLEEVE DAY DRESSES

I’ve been working on a late Edwardian-early ‘teens era wardrobe, so, 1910 to 1918. As usual I’ve been all over the place with patterns and fabrics. I’ve only done one kimono sleeve dress before (Truly Victorian TVE 45) but haven’t finished the skirt to go with it yet because I had been waiting for a corset. Which I now have. I started out next with the Hint of History #102, (1910) Kimono dress.

I had planned to cut out two of the H of H pattern dresses but I was short on one fabric, so am waiting for more to arrive any minute now. 😊 But I did get the one done to where I just need to do the buttons and buttonholes, and hem it.
A couple problems I had with this pattern was not being able to tell what side was what on the bodice. I was really confused by the line drawings on the instructions until I realized the dart is on the back of the bodice. It was so counter-intuitive to my sewing experience that it took me almost a day to figure this out.
Then I finally folded the pattern in half to create the shoulder line, and marked on the pattern the fold line and wrote that on it. I also wrote armhole on the two sides also. The next problem was fitting the pattern on my fabric since it fits you on the bias and has one point that goes over the edge. The pattern relates to 45” fabric, but after washing, it was 42”. You have to fold it the other way but as you can see by my second fabric here, I didn’t have enough in length for that to work. So be aware of that when you cut your own.  

After that it went together pretty easily. I decided to make it with an underskirt and overskirt, and have trim on it similar to this. I sewed some narrow black soutache cording along the neckline and sleeve trims. 


I still need to cover some self-fabric buttons for it, and make the belt, since looking at my photo, it’s just some folded fabric around the waist.
---------------------------------                            
Back in 2016 I purchased my first digital pattern from Edwardian Rose on etsy, a 1912 day dress. The pattern company is now known as the History House, designed by the Fashion Archaeologist, from antique French patterns that she actually constructs herself and then writes the directions to.  Fashion Archaeologist
I planned to use this pattern as an example for teaching a class on how to print and put together digital patterns at Costume College later that year. I actually had fun putting the pattern together but didn’t have time to make the dress prior to the class. I did however see one that one of my students, Molly W., made from it, and I knew I’d want to make mine soon after. 
When I got home, I cut out my fabric, an inexpensive medium weight polyester in burgundy, but while trying to cut out the shoulder lace insert, I found none of my laces were wide enough for it. I think it needed lace yardage and nothing I saw in the stores looked appropriate for it. So, it all got bagged up to wait until I found some.

Fast forward 3 years. As I’ve been unpacking, things from my former sewing room have come to light while putting them away in my new sewing room. Things I’d forgotten, and delightfully, things that were already cut out. Two of these were this 1912 dress, and also for a pair of combinations for the same time period by Wearing History. And then I had purchased another Edwardian Rose corset cover pattern, which I’m currently purchasing laces to use for it. And it seems I also collected all the fabrics I need for making the Truly Victorian TVE 14, 1911 petticoat. Too bad that’s not cut out.


 The Edwardian Rose pattern has extensive and well-written details but my brain cells get overwhelmed trying to comprehend them. I’m more of a visual learner, so after reading them (ok, not all of them), I played with the pattern. The first thing I did was work out that shoulder line by folding it in half.
The lace inserts and contrasting trim are all sewn on top of your fabric. The shoulder piece is laid over the top of the V-shaped opening and the raw edges will be covered with your contrasting trim. I skipped a lot of marking this and that, using quick marks by chalk, a pin, or even a couple thread stitches. When I got to adding the contrasting black trim to my sleeves, I decided I wanted to do just one row of it, instead of the two. I also added a tiny cuff of self-fabric to finish off the edge of lace.
While preparing the shoulder lace inserts, I’d read that it should be lined, so naturally I lined it in white cotton to match it. Except when I sewed it and the sleeve lace on, they didn’t match. The sleeve one showed the burgundy color through the lace, and the shoulder one was white. So out it came and a new one lined with burgundy replaced it.
This construction help page has photos that can help with all this. 1912 day dress construction help


I haven't read far enough on the pattern yet to see what it says about the button closures. But I just chatted with Molly about her button closures on her dress. The pattern calls for a side opening on the skirt which is attached to the bodice, and the bodice opens in the front. So my brain says it wants to make the skirt open in the front with a placket. Molly confirmed that’s what she did. AND!!! She didn’t make buttonholes to close the bodice or skirt. They close with snaps, a totally period technique. The buttons are strictly decorative. Wow, that’s a lot less work.

Now onto my skirt. I need to mark the darts on that first. We’re making progress here, little by little. Chloe approved of my work and left me a giftie on my pattern. Fortunately it's not a live mouse. 

                                                               ~~~Val~~~

Wednesday, September 11, 2019

DRESSING FOR HOT WEATHER


                 Reenactment of the Railroad Groundbreaking Ceremony in Campo, CA
Our weather in Southern California has been sweltering recently. This has actually been weather we usually have late July-August, with humidity, hitting high temperatures, along with an occasional thunderstorm. But Mother Nature is delayed this year, so instead of just hot and dry, we’re still in miserable hot and damp.
I normally don’t like to do outdoor events in the summer. I don’t handle heat well. But when my friend Birda asked for some costumed players to be part of a reenactment ceremony at the Pacific-Southwest Railway Museum in Campo, I responded to attend. Our time period would be 1900-1910. This doesn’t require lots of underpinnings and many of us chose to wear light flowy cottons. I looked through my closet of dresses for that time period, and had two choices, both of which were from 1905. I really wanted to wear my olive-green striped outfit because it’s only been out of the closet twice but with it being a heavier polyester fabric, there was no way I could get away with wearing it in 90+ degree weather. So, my cotton voile pink floral dress came out. It needed shortening because I apparently have shrunk a half inch. It already was a bit too long due to my dress-form not set at the right height. In fact, I think most of my dresses are going to need some altering very soon.


The next issue was my hair. Wearing a full wig is awfully hot. I loved my little braid halo with an attached braided bun that I plop on top of my head for earlier eras but this time period needs a much fuller hair style. Most people are familiar with the “Gibson Girl” hairstyle, and that’s what I needed, a fullness on the sides to hold up the large hat. This is my braid halo I wear for most of my 1860s-80s outfits as long as I wear a bonnet or hat that covers the top and sides of my head. It’s made from making a braid from the 24” Jumbo artificial hair extensions (sometimes called switches) you can purchase at beauty supply stores. They’re really cheap, about $2.59. You attach the ends by hand-sewing them together.  It can be messy looking but your bun will cover that. Then use a 2nd switch make a second braid, and twist it into a small bun. Don’t ask me how to do that, I had my wig lady do all this. I can barely do braids. Then cover the bun with a matching fine hair net to keep in the fuzzies. Sew it to the back of the halo braid, and attach toupee clips to the front and back of the halo to attach to your own hair. I can’t find a really good photo showing me wearing it but this one gives you an idea. I usually let my bangs hang out a bit too. 


For my faux early 1900s wig, which most people are familiar with the fluffy “Gibson Girl” style, it needed to be a very full and fluffy braid so that most of it would show around my head and hold up my hat. A skinny head of hair and a big hat for this time period is, I don’t think, not very flattering. It also keeps your hat from falling over your face.
I wasn’t sure how many of the switches would be needed for this, so I just bought 3. I took them over to my wig lady, Creations by Coni, and showed her some photos of what I wanted, explained to her my idea, and brought the hat I’d be wearing. She caught on right away. She enjoys a challenge too.


Within 4 days she called me and said come and try it on. It was wonderful!


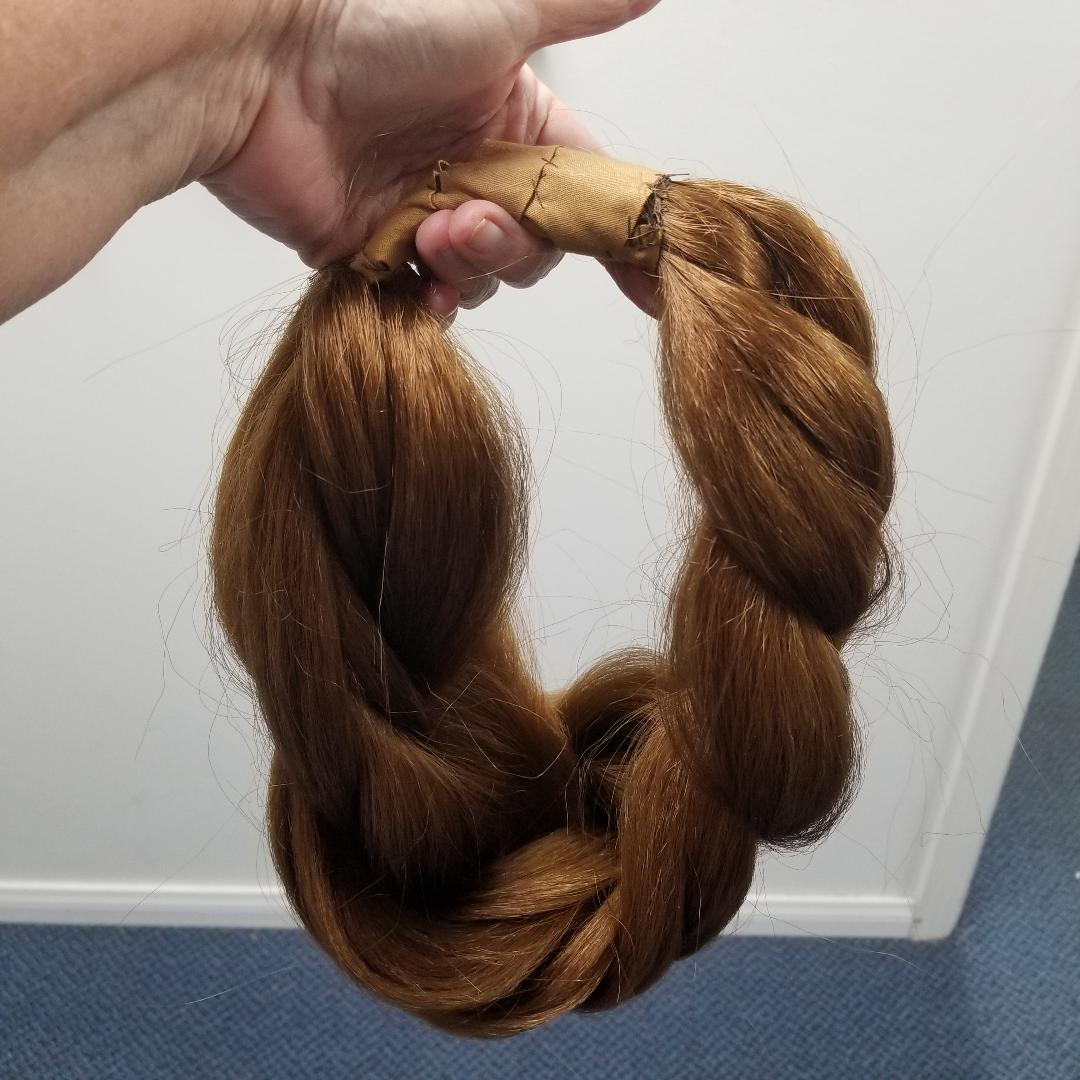
She loosely braided all the switches into one, then folded it in half. She twisted the raw ends together and sewed a heavy duty thread around them to keep it together. She wrapped a long strip of fabric around that, stitched it tight then pulled it to the folded center and ran the threads around it. I plan on buying another switch that can be wrapped around the fabric part. 
The only parts of my own hair that show are on top of my head, and my hat covers that. It hangs low enough in the back and on the sides to cover my short hair. I chose to have my bangs hanging out too, at least until I can get that fabric portion covered. It also needs toupee clips stitched to the front and back to hold it on my head. The hardest part is running hat pins in to catch the braid. They’re lower than the hat. So that's going to need some thinking. I think I may be able to use this also for some other time periods. 
So, onto the train event. We were told to wander around the train museum, have our picnic lunches, and at some point, meet for a group photo. Except when that time came everyone had scattered to different parts of the museum and were taking photos themselves. I wandered a bit and walked up into one of the antique cars and caboose. They were pretty worn out due to age and the weather from being outside. But you could still see the first-class booths were classy and had their own toilet and shower. The “steerage” or workers caboose were just rows of bunk beds, sharing one toilet.
After I got off the caboose, I walked around to the front and found the group photo had just been taken on the back stairs. I finally was called up and got on a couple lower steps and made it into one group photo. Then Cindy took some of just me on the landing. 


The main part of the reenactment was recreating an old photo showing the ground breaking ceremony for the railroad coming through, and of course the speeches of all the big-wigs. Cindy Piselli (THE BROKE COSTUMER) got to be the woman seated in the photo. I trimmed up a straw boater hat for her, and I think she got the look very well.

While we were seated during the ceremony, I took one photo showing the reenactors starting the dig. And yes, it’s pretty barren and dusty out there. At 92d it was hot but there was a strong wind that helped and also blew off our hats and parasols a few times. 
                              **Thanks to Cindy P., Brian T., Carol S., & Russell S. for their photos.**


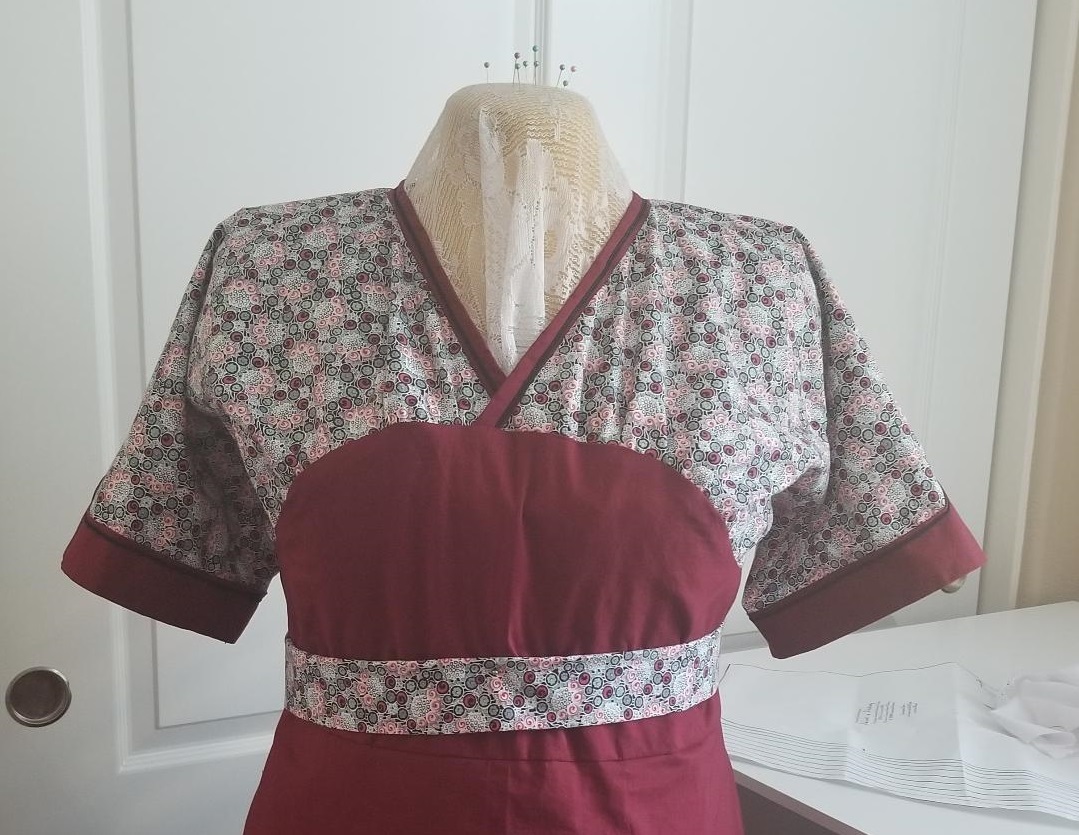
As the hot weather continues for who knows how long, I’m pulling out some fabrics for a couple 1912 dresses and will be using this Hint of History #102 Kimono dress pattern.

~~~Val~~~