

I’ve been
working on a late Edwardian-early ‘teens era wardrobe, so, 1910 to 1918. As
usual I’ve been all over the place with patterns and fabrics. I’ve only done
one kimono sleeve dress before (Truly Victorian TVE 45) but haven’t finished
the skirt to go with it yet because I had been waiting for a corset. Which I
now have. I started out next with the Hint of History #102, (1910) Kimono
dress.

 I had
planned to cut out two of the H of H pattern dresses but I was short on one
fabric, so am waiting for more to arrive any minute now. 😊 But I did get the one done to where I just need to do the buttons and
buttonholes, and hem it.
I had
planned to cut out two of the H of H pattern dresses but I was short on one
fabric, so am waiting for more to arrive any minute now. 😊 But I did get the one done to where I just need to do the buttons and
buttonholes, and hem it.
 A couple
problems I had with this pattern was not being able to tell what side was what
on the bodice. I was really confused by the line drawings on the instructions
until I realized the dart is on the back of the bodice. It was so counter-intuitive
to my sewing experience that it took me almost a day to figure this out.
A couple
problems I had with this pattern was not being able to tell what side was what
on the bodice. I was really confused by the line drawings on the instructions
until I realized the dart is on the back of the bodice. It was so counter-intuitive
to my sewing experience that it took me almost a day to figure this out.
 Then I
finally folded the pattern in half to create the shoulder line, and marked on
the pattern the fold line and wrote that on it. I also wrote armhole on the two
sides also. The next problem was fitting the pattern on my fabric since it fits
you on the bias and has one point that goes over the edge. The pattern relates
to 45” fabric, but after washing, it was 42”. You have to fold it the other way
but as you can see by my second fabric here, I didn’t have enough in length for
that to work. So be aware of that when you cut your own.
Then I
finally folded the pattern in half to create the shoulder line, and marked on
the pattern the fold line and wrote that on it. I also wrote armhole on the two
sides also. The next problem was fitting the pattern on my fabric since it fits
you on the bias and has one point that goes over the edge. The pattern relates
to 45” fabric, but after washing, it was 42”. You have to fold it the other way
but as you can see by my second fabric here, I didn’t have enough in length for
that to work. So be aware of that when you cut your own.

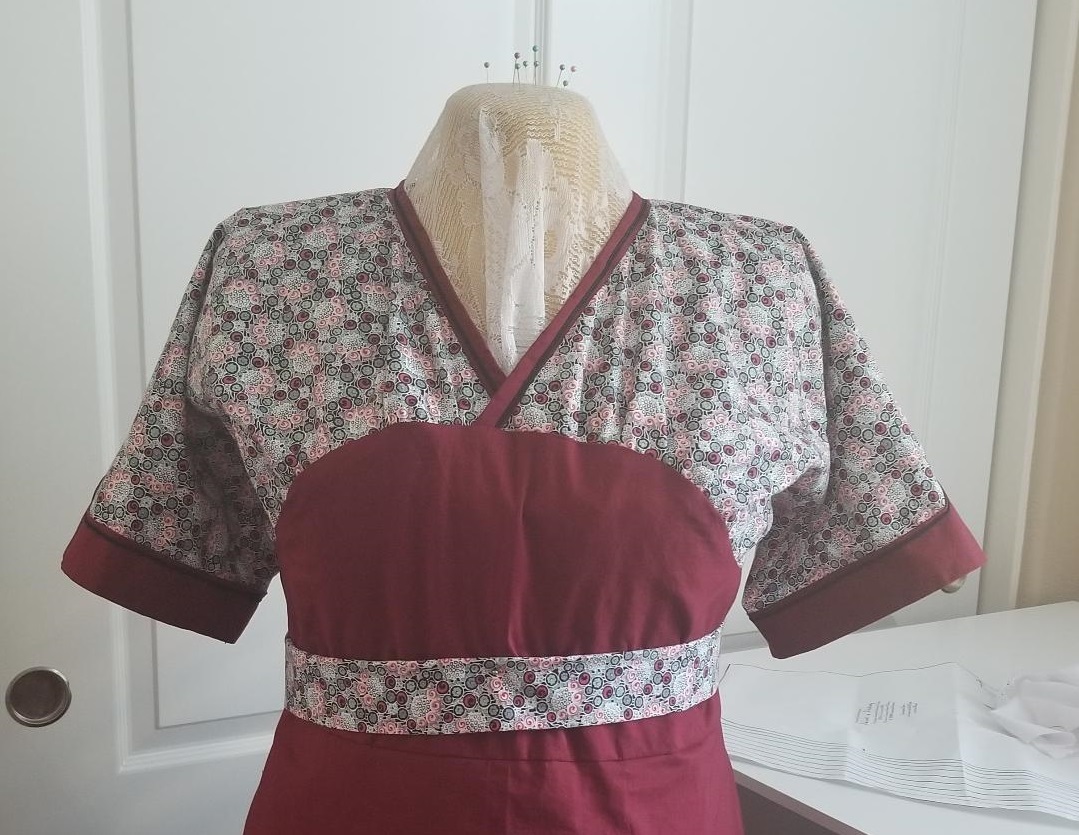
 After that
it went together pretty easily. I decided to make it with an underskirt and
overskirt, and have trim on it similar to this. I sewed some narrow black soutache cording along the neckline and sleeve trims.
After that
it went together pretty easily. I decided to make it with an underskirt and
overskirt, and have trim on it similar to this. I sewed some narrow black soutache cording along the neckline and sleeve trims.


 I still need
to cover some self-fabric buttons for it, and make the belt, since looking at
my photo, it’s just some folded fabric around the waist.
I still need
to cover some self-fabric buttons for it, and make the belt, since looking at
my photo, it’s just some folded fabric around the waist.
 I planned to
use this pattern as an example for teaching a class on how to print and put
together digital patterns at Costume College later that year. I actually had
fun putting the pattern together but didn’t have time to make the dress prior
to the class. I did however see one that one of my students, Molly W., made
from it, and I knew I’d want to make mine soon after.
I planned to
use this pattern as an example for teaching a class on how to print and put
together digital patterns at Costume College later that year. I actually had
fun putting the pattern together but didn’t have time to make the dress prior
to the class. I did however see one that one of my students, Molly W., made
from it, and I knew I’d want to make mine soon after.
 When I got
home, I cut out my fabric, an inexpensive medium weight polyester in burgundy,
but while trying to cut out the shoulder lace insert, I found none of my laces
were wide enough for it. I think it needed lace yardage and nothing I saw in
the stores looked appropriate for it. So, it all got bagged up to wait until I
found some.
When I got
home, I cut out my fabric, an inexpensive medium weight polyester in burgundy,
but while trying to cut out the shoulder lace insert, I found none of my laces
were wide enough for it. I think it needed lace yardage and nothing I saw in
the stores looked appropriate for it. So, it all got bagged up to wait until I
found some.


 I haven't read far enough on the pattern yet to see what it says about the button closures. But I just
chatted with Molly about her button closures on her dress. The pattern calls
for a side opening on the skirt which is attached to the bodice, and the bodice
opens in the front. So my brain says it wants to make the skirt open in the front with a placket.
Molly confirmed that’s what she did. AND!!! She didn’t make buttonholes to close the bodice or skirt. They close with snaps, a totally period technique. The
buttons are strictly decorative. Wow, that’s a lot less work.
I haven't read far enough on the pattern yet to see what it says about the button closures. But I just
chatted with Molly about her button closures on her dress. The pattern calls
for a side opening on the skirt which is attached to the bodice, and the bodice
opens in the front. So my brain says it wants to make the skirt open in the front with a placket.
Molly confirmed that’s what she did. AND!!! She didn’t make buttonholes to close the bodice or skirt. They close with snaps, a totally period technique. The
buttons are strictly decorative. Wow, that’s a lot less work.

~~~Val~~~


---------------------------------
Back in 2016
I purchased my first digital pattern from Edwardian Rose on etsy, a 1912 day
dress. The pattern company is now known as the History House, designed by the Fashion
Archaeologist, from antique French patterns that she actually constructs herself
and then writes the directions to. Fashion Archaeologist


Fast forward
3 years. As I’ve been unpacking, things from my former sewing room have come to
light while putting them away in my new sewing room. Things I’d forgotten, and
delightfully, things that were already cut out. Two of these were this 1912
dress, and also for a pair of combinations for the same time period by Wearing
History. And then I had purchased another Edwardian Rose corset cover pattern,
which I’m currently purchasing laces to use for it. And it seems I also
collected all the fabrics I need for making the Truly Victorian TVE 14, 1911
petticoat. Too bad that’s not cut out.


The lace inserts
and contrasting trim are all sewn on top of your fabric. The shoulder piece is
laid over the top of the V-shaped opening and the raw edges will be covered
with your contrasting trim. I skipped a lot of marking this and that, using
quick marks by chalk, a pin, or even a couple thread stitches. When I got to
adding the contrasting black trim to my sleeves, I decided I wanted to do just
one row of it, instead of the two. I also added a tiny cuff of self-fabric to
finish off the edge of lace.
While
preparing the shoulder lace inserts, I’d read that it should be lined, so
naturally I lined it in white cotton to match it. Except when I sewed it and
the sleeve lace on, they didn’t match. The sleeve one showed the burgundy color
through the lace, and the shoulder one was white. So out it came and a new one
lined with burgundy replaced it.
This construction help page has photos that can help with all this. 1912 day dress construction help
This construction help page has photos that can help with all this. 1912 day dress construction help


Now onto my
skirt. I need to mark the darts on that first. We’re making progress here,
little by little. Chloe approved of my work and left me a giftie on my pattern. Fortunately it's not a live mouse.

I can't wait to see the finished product. That's a new era for me, so will be glad to open this post and follow along when I'm ready.
ReplyDeleteOoh, interesting time period! Will be looking forward to the results. Chloe's "giftie" -- great work -- had me laughing.
ReplyDeleteVery best,
Natalie in droughty KY