

Began November 8/ Finished December 14, 2013
This was my first time ever to be challenged to make
semi-matching gowns for an event. Cindy asked if I wanted to make matching Xmas
plaid 1870s gowns for our Costume Guild’s Holiday Dinner in December. I decided
I was up for it since I didn’t have any projects that needed to be done by
then.
Cindy wanted to do the Truly Victorian #216 (1875) Parisian Trained Skirt
that she’s done a few times, and I’d never done but she said it was easy. We
both liked the Truly Victorian #405 (1872) Vest Basque Bodice to go with it, which I’ve
already made and liked it. Both patterns have a lot of possibilities for
different types of trims and fabric use.
.jpg)
.jpg)
We drove up to the Garment District with open minds
regarding colors and fabric types. We knew we didn’t want the same color and
that we would absolutely not look like Xmas tablecloths. I was leaning towards
cotton but when Cindy said she was now thinking of silk taffeta, we added that
to our search but knew the choices would be very limited. The first store we
started looking in at Robert’s got the ball rolling. Cindy found a red and
black Tartan plaid in a good quality cotton-wool blend and for an excellent price. So now
I needed to find something similar that would compliment her color in a Tartan
for me.
It took us walking through seven more stores before I went
back to one that was a hunter green and black Tartan but was a polyester blend.
But it had a good weight and I can line it with cotton. Then we went looking for some sparkly trims,
and both of us found glass beaded trim at Target Trims. Mine has a slight green
tint to the glass; and Cindy’s is black.


I found a couple fashion prints made with plaids from the
70s, and liked these two where the sleeves were a solid color, making it look
like she was wearing a vest. And I like the BIG bow in back!


I’ve made a few plaid dresses and so far really haven’t paid
much attention to how I’m cutting the fabric but my plaids always seem to match
up pretty well. Not perfect mind you, but not bad either. I’m not that precise.
This time however I paid attention to how I did it out of curiosity and took
photos as I went along to show how I do it.
My first method requires lining up the plaid on both sides of
the fabric at the selvedges. Apparently I’ve always done this but didn’t think
about it.

This time I put a little more effort into it, if you can
call this an effort. Once I placed my main back pattern piece I found out where
the front piece would line up to it by finding the waistline and putting it on
the same line to match. Then I place the sides panels in similar locations, so
when I cut and sewed them together, that one line was fairly close together.
Not a precise method, but close enough for me. And no stressing over “is it
going to match?!!”

And voila! A sorta matched plaid! For me, this is
satisfactory. I’d never get it made if I made myself worry over every little
detail. And there’s not enough time in my life to do that.


Cindy came over to my house at this point so we could work
on them together. She had started with her skirt, and I had started with my
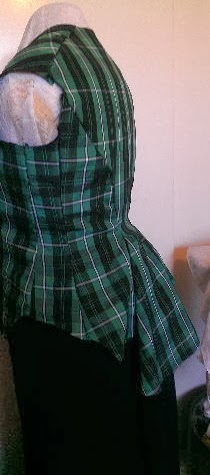
bodice. We both use black silk taffeta as the vest insert, and I chose to do
black sleeves to get the “vest effect” and Cindy did hers in the plaid. My
collar was in the matching plaid, and hers was in black. So we managed not to
be too matchy-matchy.


Cindy thought the bottom edges of the bodice and peplum was
too long so we cut off three inches in the back and one in the front, and it
did look better. This is the longer version.

All that pleating in the front and back into the sides of
the side panels made for a very heavy skirt. My polyester blend fabric was
slippery and heavy, and it fought me tooth and nail whenever I was trying to
pins things, or run it through the sewing machine. It got called many flowery
names while I was sewing. This is the two layers of the front apron where one
overlaps the other, and then is sewn onto to the side panel. The overhanging
edge, where my finger is pointing, shows on the outside at the front and was
later trimmed with beads and braided trim.


You may have noticed my sleeves are STILL not on my bodice.
I leave the hated Sleevils off till last and as usual they fought me the whole
time and I ended up not happy with them but what can you do?
At the bottom of the front apron we attached a knife pleated
panel to the portion of the black cotton underskirt to cover that. Our panels
were twelve inches finished, and went around the side panels ending at the edge
of the back bustle.


As we were getting down to the two days before our holiday dinner event we had to decide what still needed to be done and what could be left behind to finish at a later date. I was finishing up my bows and started on our hats, while Cindy got more beads sewn on hers. She put them along the bottom of the bodice and on top of the black pleated ruffle. Her beads are black with a black braid while mine are the pale green beads but I will be adding a black braid on top of mine later.

Our costume guild’s dinner at the Harbor House restaurant in
Seaport Village was the first time we got to see each other fully dressed in
our completed gowns. And we were both very pleased by what we saw. Cindy
started calling our hats “The Ridiculous Hats” because they were so poofy and
feathery. I hadn’t stood back and looked at mine when I was finished and didn’t
notice it was a bit flat in the center. More feathers are needed! But overall
we were happy.
You can read about Cindy's dressmaking in her blog- The Broke Costumer
You can read about Cindy's dressmaking in her blog- The Broke Costumer


Dear Val,
ReplyDeleteAugghh, I LOVE them, love them, love them. Such fun, fa la la la dresses! Your writeup is a hoot, too. Oh, so been there...
Thanks for sharing the process and the ducky results,
Natalie
Thank you Natalie! Still working on it too. :)
DeleteHappy Holidays, Val!
Hi Val!
ReplyDeleteYour dress turned out fabulously! I love the look that you and Cindy pulled off! How utterly adorable you both look in your Christmas Tartan Plaid Twin Dresses!
Blessings,
Gina
Thank you Gina! Happy Holidays!
DeleteVal