


My first
search was for the style of my open robes. I was going to make them sleeveless,
as it’s quite warm in Los Angeles, even in the air-conditioned hotel. There
were many choices of how to make the front of the robe: belted under the bust,
crossed over the bust, or almost a jacket. The robe portion could be long, half-length,
or even done in panels.


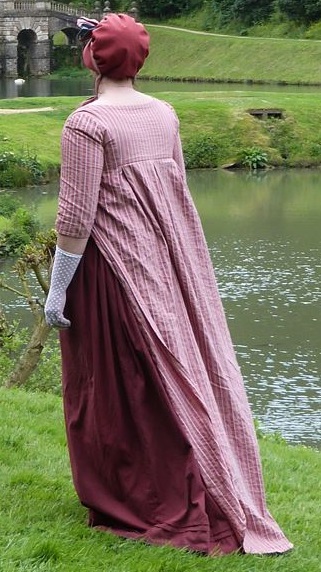
This pink
really caught my eye since it was so different. I wished I could have seen the
front. It had a lot of details, a mile or so of sawtooth trimming, and a cute
little rosette in the back to match the one on the side of her robe. Sadly, as
reality and time constraints set in, I realized this would have to be something
for a later day as I’m trying to cram 4 dresses into my sewing schedule. So I
gave in to just a long straight robe.


Next
up was pattern choosing. I made my white
dress from a previously used pattern, La Mode Bagatelle’s Regency Wardrobe drawstring
neckline, since I knew it fits already, and made three quarter-length sleeves. I
used a very sheer white dotted Swiss voile. It was so sheer, I had to make a
nice solid petticoat to wear under it. I used the skirt from my pattern, taking
out one panel so it wasn’t too full, and added some shoulder straps, with a
buttoned closure. Easy Peasy!


I also
decided to wear a pair of short front-closing stays since I usually don’t have
someone to tie me into my bodiced petticoat. When I try it, it’s just too
loose to hold everything in and up. Wearing a shift/chemise, stays, and
petticoat, it sure feels like I still have a lot going on under the dress. So
much for skipping the bustle idea.


The other one
I’d seen on the market before was by Wingeo #256, a 1795-1825 overdress. The
only photo I could find of it made up was on someone’s blog, and with no front
photos. It seemed a bit shapeless to me from the back.

I
saw another version with a buttoned front bodice using Laughing Moon #126, Bib
Front gown, using the inside closure of it and eliminating the bib front that
comes up over it. Examples showed either buttoning it, or lacing it closed. I
really like this and given time, would like to try that someday too.


But then,
being lazy and not wanting to fit a new pattern, I used the same one I’d made
in the past, Butterick #4890. It already had a belt but it was separate and
used like a real belt. In my alterations I just added a piece to the middle,
sewed one side to the bodice and attached the other side with hooks and eyes. On the closeup of my pink version you can see
that better. I still say this is a quick and easy outfit to make, or why else
would I be making two day versions and one evening version? (Evening version
won’t be shared until later).


This time I
did more alterations to the front and actually traced out the bodice to include
a belt on both sides.


I wanted my
two daytime open robes made of linen, and chose a peach and a fuschia color,
which at first the “hot pink” doesn’t look historically correct but actually
was. I purchased both linen blends at LA Alex in the Los Angeles Fabric
District for $6 a yard. They’ve got a nice body and weight to them, and don’t
wrinkle as badly as pure linen does. Also, its machine washable. Win-win!


Since
both are plain, I wanted to add some trims to the robes, like plackets with
buttons, bows, rosettes, or something. But sadly, when I got around to finally
adding some trim, my remnant bits of fabric were nowhere around. I couldn’t
even cover any buttons to go on them. They must have gone out in the trash with
the whirlwind reorganizing I tried last month. So no pretties got to be added
to them. Just call me Plain Jane.


I
asked a Regency Costuming group on Facebook for some suggestions as to what I
could use to close my front belts with. I shared a bunch of ideas I’d found.


I love
rhinestone buckles but these were for day dresses. Two suggestions, mother of
pearl buckles, and a cameo, were my best shot. I already had a nice cameo
surrounded by pearls I could use for the peach robe, and after searching on
etsy, I found a set of 3 small mother of pearl buckles for $3.50. These will be closed by
pins most likely, also historically correct.


Since my
outfit is a bit on the plain side, my accessories will have to dress them up a
bit. I can use my coral necklace from Hawaii, and earrings from Dames a la Mode,
but not sure yet what I’ll wear on the fuschia.

And
my hair, or lack thereof, I plan to cover up, either with a turban or a cap, with
little curls hanging out. No bonnet needed for indoors. I have one of these
lace caps, like Mrs. Bennet wears, so that’s my backup.

With these
two done (sorry, they’re not ironed yet), I finished my evening version that
will be worn at the Friday Night Social at Costume College. And now I’m working
on my Gala dress, which had been started a couple months ago, and stalled by
indecisions. I swear it evolves every time I pick it up.


And here’s
my little helper, trying to find something for me, probably those missing
fabric scraps.

~~~Val~~~
No comments:
Post a Comment
ALL COMMENTS ARE HELD IN MODERATION UNTIL I APPROVE THEM TO SAVE EVERYONE FROM SPAMMERS. But I would love to hear from my readers!