

Started 9-25/ Finished 10-7-11


I made this bonnet to go with my 1845-50 second year mourning gown of black and grey for the upcoming Dia de los Muertos celebration in Old Town San Diego. In trying to decide what year my gown and bonnet were going to be, I found them very similar during those years, so I couldn’t nail it down to an exact year. I found this photo of an 1850 straw bonnet frame, and it was similar to the modern reproduction that I had bought at the Johnson House in Old Town San Diego. So the bonnet decided the year it wanted to be.


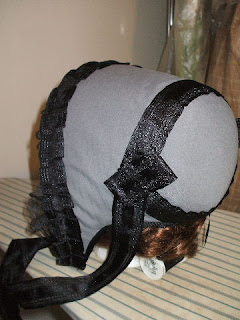
I wanted the bonnet itself to be covered in grey but not with the same cotton I’d made the chemisette for the gown out of. I found a remnant of a moleskin, that has a slightly fuzzy look to it, and a bit of a stretch which made it easier to cover the bonnet.
A few years ago I'd taken a Millinery I class at our local college, and learned how to cover and trim hats. But when it came to cutting the fabric to fit the bonnet, I never got to that part. So I began piecing it to fit the different shapes of the bonnet. Later I realized my mistake was not making the front going back to the crown a separate piece. I used one piece to cover it all but the back. Because of the slight stretch, it still worked. And I figured I would be covering the seams with ribbon. You can see the lighter grey thread I used to sew the seams together here. 
I covered the edges with a wide black grosgrain ribbon and hand sewed the outside to the frame. Because of the limited time I had left to finish this, the inside edge was turned under & hot glued to the straw. At some time I intend to line the inside and this cheat will be covered up.

My trimming was a slightly sheer black wired ribbon that I pulled the wire out of. For the front brim of the bonnet, I pleated the ribbon and tacked it on the top. I put another length of flat ribbon around the crown, and a separate piece under the crown. The part that crisscrossed was covered with a doubled folded piece of ribbon that after it was tacked on, I puffed up the edges.


Under the bonnet I’ll be wearing a black lace day cap I purchased and you can see it peeking out the front of the brim. It has little rosettes of lace down by my ears which I hope will show when it’s on. My plans to recreate a more elaborate cap will have to wait until I have time to visit the Garment District for a better choice of fabrics than I have at home. I have ties but will still have a black bead hat pin to hold it on. I still have a pelerine to make for this but again, that will have to wait since I’m leaving on vacation. Three days after I return I’ll be wearing it on All Hallows Day, November 1. But we know costumes are never really finished.


Bravo! It worked out handsomely. Neat that the fabric stretched even over the crown.
ReplyDeleteVery best,
Natalie