This is a photo diary of my costuming "travels"; where I've learned and struggled to make historical costumes for myself. They're not always pretty, but always fun, most of the time. And I want to share with others what I learn along the way. **You can find me on Facebook, https://www.facebook.com/Time-Traveling-in-Costume-640703499399817/ or have my posts delivered to your email by signing up at the lower part of the right column.**


About Me

My photo
HI, my name is Val. I'm a member of Costumer's Guild West in Los Angeles, Dean of 2018 & 2024 Costume College; Past President of the San Diego Costume Guild, and a representative of the San Diego History Center. I also put on historical fashion shows for various groups. I make my own historical costumes but don't sell any unless I get tired of one.The eras I've made so far are 1770 up to 1918. My favorite is the 1880s bustle.

Followers

Monday, October 19, 2009

Making Victorian mourning brooches

Recently my costume guild planned a mourning walkabout in Old Town San Diego, and with plans to wear appropriate attire. I decided to make myself a mourning brooch, using a technique I had successfully tried on an earlier costume.
After a little more thinking, I decided to make one for each of the 12 ladies attending the event. So I started at Michael’s Craft Store to look for some cameo brooches. They sell them individually for about $3 but with a coupon, can be half price. I couldn’t find a photo of the exact brooch I bought but here are some in a set on their website.

There’s usually some kind of ceramic design in the middle that you use as the base for your portrait. They come in a couple different shapes too.
So then I did a search for “Victorian portraits”, and came up with a link to some being sold on ebay. Most were cabinet portraits, and some were actual brooches for sale. I copied and saved a bunch of them that looked good, and in focus.


I made a Word Document by Inserting each portrait on the page, and shrinking it down to a size that looked like the face area would fit onto the brooch.
I made a template from the center stone of the brooches with paper, and laid it on top of each portrait to include the areas I wanted to keep on the brooch. Using a stiff vinyl or plastic template may give you a better view of the portrait before you cut it. But I didn’t have any problem doing it this way.
I used some black Americana tole paint and rubbed some of it with a paper towel along the edges of the silver brooch to age it.
Then I brushed some Modge Podge (a decoupage paste purchased at Michael’s) on the face of the cameo with my finger. I laid the cut portrait on top of it and tapped it down with a clean finger. Again using my finger, I put more Modge Podge over the top of the portrait, making sure it was all covered and wet. It looks pretty white but it will dry clear. This acts as a glue and a sealant. Nothing else is needed to finish it.
Most of the brooches had a loop for hanging it on a chain; some didn’t but had a loop as part of the frame. I wanted to make these a pinned on brooch, so I tied a narrow black velvet ribbon to each one, and at this time put a safety pin on the ribbon so the ladies could pin it to their blouses. Another option would be to glue a pin back on the back of the brooch.
This is the one I made for me.

These are the ones I made for the other ladies, and you can see the variety of shapes and designs they came in.

Here are two of us wearing our brooches in our mourning outfits.

Saturday, October 3, 2009

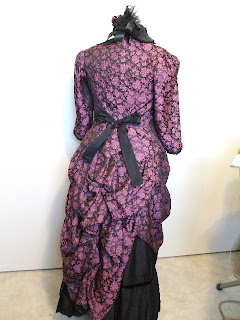
1870s Purple Floral Polonaise

I started this gown along with two others (The Celery Polonaise & The Polkie Dot Polonaise) from the same pattern, Truly Victorian 410.


I bought the polyester fabric from the Los Angeles Garment District last year,

and flatlined it with a lightweight black twill to give it some body, just in the upper bodice area.
I planned on wearing it over a solid black silk taffeta skirt that I already had. I thought it set off the floral print on the bodice fabric better.


The polonaising in the back really came out nice and the peplum in the back


looked really crisp, but it really needed some subtle trim. And I wanted the trim to pop.
So I decided on putting a ½” pleated trim made from a wide black ribbon on it, but when I started on that, I couldn’t find the ribbon. So I made my own from my black silk taffeta. See my blog on making these trims: http://timetravelingincostume.blogspot.com/2009/10/making-pleated-trims.html


It looked really nice going around the neckline and sleeve ends but I ran it down the front of the bodice. Then it really made the buttons stand out more.

The buttons were a vintage reproduction gum drop shape from JoAnn’s Fabrics. Because the bodice edge continues down to the hem of the skirt, I knew I had to keep making more pleats. I ended up cutting 6 strips from the 60” wide taffeta to make all the pleat fabric.
I basted the pleats all along the neckline and down the front of the dress, and then around the sleeve ends. Then I top stitched it by machine close to the fabric edge.

The back over the peplum needed a bow, and I continued with using the silk taffeta and made a large bow out of it.


I looked at the dress sideways, and it really needed bows there too. So I cut out two more lengths of the taffeta, and added a large bow on each side where it gathered up on the skirt.

A hat I’d made earlier turned out to be perfect for this outfit, even down to the vintage purple flowers I had on it.


The purple doesn’t match the fabric exactly,but I liked the variety of the colors.
OK, I knew I'd not stop with just one trim, and after digging through my stash of trims, thinking I'd just find a black soutache or something, I came across a fancy beaded one on black velvet that I had lots of, and would be perfect for this gown. I really would have liked to run it all the way down the front and around the hem but because of the buttons and pleating already being there, there wasn't any room for it. I may yet find a way to add it to the hem somehow.
I only have a bit sewn so far but here it is on the neckline.

ETA on Oct 17: I wore my polonaise for the first time at a walkabout in Old Town San Diego for our A Haunting We Will Go, and I was very happy with it's completed look.

Making pleated trims

This post is kind of an addition to a previous one where I'm making a purple and black floral 1870s polonaise to wear to a Halloween Walkabout this month in Old Town San Diego. We're all wearing black mourning costumes, and along with having lunch there, we're touring some of the historical buildings and the cemetary.
I'm trying to improve my historical costuming skills by adding more trims. In the past, my gowns were rather plain. Because of this being a busy print on the fabric, I wanted my trim to be a little more subdued. So I decided on a pleated trim around the neckline and sleeves.
My first idea was to buy some wide black ribbon, and pleat it on my sewing machine with the expensive pleater foot I'd bought. Except I couldn't find the ribbon in my sewing room, which I'd just purchased a couple weeks ago. So next best thing was cut strips of black silk taffeta I had and make my own ribbon, which I'm really happy with! I cut three inch widths of it, then folded it in half and pressed.
Next I tried my expensive pleater foot *note sarcasm* but the best I could get was a rather loose 1" pleat, and it looked more like a ruffle. I know I must be doing something wrong because the photo on the box shows a lovely 1/4" pleat. But times a'wasting.
So I went back to the manual method of pleating, and found a piece of plastic zip tie that was the perfect 1/2" that I needed.
I folded in the outside end of the ribbon, laid the zip tie next to it, and folded over the ribbon, then back to create the first 1/2" pleat.

I slide the tie to the right, since pulling it through was catching on the threads with the rough edges of the tie. After pinning it down, I placed the tie next to it, and started the next fold.


It’s a slow process, and I need about 40” for where I want to trim the dress.

After I had about 30” pinned, I sewed down the pleats with my sewing machine so I could pull out all those pins, and pressed it.
I recently read that spraying a mix of ½ vinegar and ½ water on it, then pressing, will hold the pleats forever. I’m going to test this on a piece of my fabric and see if I can do it without damaging the silk.
I finished enough length of the pleats, so that I was able to pin it on my bodice to see what it’s going to look like.

I really liked it going down the front where it set off the buttons, so I decided to make more pleats and continue on down the front to the hem on both sides. I think I've now cut 6 lengths of the 60" wide silk taffeta.
Once I was done making all the pleats, I basted it along the inside edge of the neck, front closures, and sleeve ends, then top stitched it just near the edge of the fabric.
Now that that's all sewn on, instead of finishing off the raw edges of the ribbon that are on the inside of the gown, I'm going to use my scalloped scissors and trim it off. I used those before on silk taffeta and it doesn't unravel then.
*See my upcoming blog on the completion of the Purple Floral Polonaise.*