We had our Celebration of the Engagement of the Dashwood sisters today and had some wonderful locations for photographs, especially on board the Star of India, and the HMS Surprise, which was used in the filming of "Master & Commander". I think the color of my red pelisse really made me stand out in a crowd, and I got a lot of compliments on my turban. In fact, I've been asked to teach a class on it for our costume guild.
This is a photo diary of my costuming "travels"; where I've learned and struggled to make historical costumes for myself. They're not always pretty, but always fun, most of the time. And I want to share with others what I learn along the way. **You can find me on Facebook, https://www.facebook.com/Time-Traveling-in-Costume-640703499399817/ or have my posts delivered to your email by signing up at the lower part of the right column.**
About Me
- Time Traveling in Costume
- HI, my name is Val. I'm a member of Costumer's Guild West in Los Angeles, Dean of 2018 & 2024 Costume College; Past President of the San Diego Costume Guild, and a representative of the San Diego History Center. I also put on historical fashion shows for various groups. I make my own historical costumes but don't sell any unless I get tired of one.The eras I've made so far are 1770 up to 1918. My favorite is the 1880s bustle.
Followers
Sunday, March 21, 2010
Monday, March 15, 2010
Red Regency pelisse and gown
Started Jan 2010,finished Mar 2010.
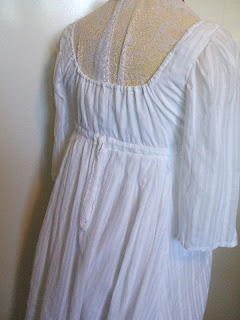
With the pressure of an upcoming Regency event in March and nothing to wear, I drew on some previously fitted patterns from LaMode Bagatelle for my gown.
I already had a partially sewn bodiced petticoat from this pattern and finished that, adding a double rows of ruffles to the hem. By tightening the ribbons in the back at the neckline and bustline, I was able to get a nice tight lift to my bust. The drawback is no corseting the midriff so you have to suck that in yourself. I have a proper set of Regency stays but I’m going to be on my own putting this on, so I needed something that I might be able to get in and out of myself, even if only part way.
For the gown I had a sheer white cotton striped voile purchased in the Garment District. For the pelisse, I found a red striped polyester at JoAnn’s that looked like linen and was lightweight.
When I started on the gown I decided to reuse the pattern for the bodiced petticoat, and added 2 inches to the bodice neckline to raise it above the petticoat's neckline. I also used ribbons in a drawstring along the neckline and bustline to close it in the back. I wanted quarter length sleeves on it, so I used a sleeve from one of the other pattern views. I’ve considered adding some crocheted lace along the neckline but later decided to leave it plain. I used a blind hem stitch on my sewing machine for both the hem and the sleeve hems. I’m only able to minimally adjust the bustline on my dressform so it doesn’t exactly look right in the photos.
For the pelisse, I again used a pattern I’d had success with in the past, Butterick 4890. I used the same sleeve from the white gown for the pelisse.
It went together very quickly. I only lined with top with a white cotton, which later I realized red might have been better but it worked. The white shows a little where it closes in the front but it’s not bad. I sewed the bodice and lining right sides together, and left it open at the bottom and armholes to turn it right side out. This pattern doesn’t actually close in the front under the bustline like I wanted so I added an extension. But if I do it again, I’ll make the extension wider. This is just shown over my chemise on my dressform.
The back looks really pretty but it has modern darts in it, not the curved ones true Regency patterns have. But for this short time I have, this one will suffice and it looks really nice.
I marked the hem about 10 inches shorter than my gown, according to some photos I saw, and again used a blind hem stitch on the hem but hand tacked along the front edges of the robe. I used two sets of hooks and bars on the overlap to close it. This is pulled tightly to “lock and load” the bust.
Since I’m planning on dressing as a well-to-do lady, I decided I didn’t want the pelisse to be too plain so I covered two large buttons and sewed them on each side of the front overlap.
Here you can also see the turban with it, as shown in my previous post. Since it’s predicted to be only 65degrees that day, and along the waterfront in San Diego, I pulled out my large, dark fake fur muff to go with it. It’s got lots of room inside to hide my camera too.
Stay tuned for photos of this after Sunday.
Friday, March 12, 2010
A collection of previous costumes Part 2
This is another collection of costumes I've made in the past but also included some updated photos of recent gowns that I didn't have in their own posts.
**************************
In 2005 I made an Edwardian summer gown, using Sense & Sensibility's pattern for the 1914 afternoon gown. I happened to be looking at some sheer curtains at the store one day, and in the Shabby Chic section came across some white embroidered cotton voile one that just spoke Edwardian lingerie dress to me. I used one panel and one short window curtain for the pattern.
I used the short curtain panel for the sleeves with the embroidered finish on the cuffs, and a portion over the upper bodice. I used the "valance" that came with the panel to do an overskirt. Since the embroidered sections were finished off, I didn't have to hem anything. I change the ribbon belt color occasionally from blue to pink, and it ties in the back.
*********************
In 2008 for that year's Costume College (annual costume convention in Los Angeles), I decided to make two 1795 Empire/Regency open robes using Butterick 4890.
I used this photo from the Kyoto book for my inspiration.
The pattern didn't have the bodice close in the front. It just hung open along the sides of the bust, with a belt going around it, so I made an extension on each side just under the bust so I could close it. I made one with this pink upholstery remnant I found in an antique shop. It had a gold fern design on it.
I closed the front band on the inside with a hook and bar, and I sewed a pretty bauble purchased at JoAnn's to the front. I machine-stitched a gold flower trim all around the edges, and a stiff lace that stood up along the neckline, and ending just below the shoulders.
For the other robe I used a periwinkle blue dupioni but don't have a picture of the fabric. I used a different trim on it so it didn't look the same as the pink one.
At the same time I was making a white dress to go under it using a silky peau de soie. I started it using a brand new Reconstructing History pattern but it wasn't graded up correctly so at the last minute I had to trash the bodice and recut it from a LaMode Bagatelle pattern. The skirt portion is a little big since it was a round gound but eventually I plan to take it apart and remove some of the the excess fabric.
I sewed a two-sided lace trim along the neckline and sleeve edges, and at a later date, sewed tiny glass beads onto the trim so it sparkled when the lights hit it. Along the hem line of the dress I handsewed a gold trim that really set it off when the robe opened in the front.
For my headpiece I made my first attempt at a wraparound turban. This was just two long tubes of the peau de soie that I braided, then wrapped around my head loosely and tacked it to hold it together. Later I pinned a very tall white ostrich feather to it with a fancy brooch.
I wore both these gowns to Costume College, but I only had the pink one on for a short time and never got a photo of me in it. I did get quite a few of the blue one, and it was one of my most favorite gowns that I've ever made.
************************
This is an update photo of my 1918 Armistice Day outfit that I again wore to a Costumed Walkabout at the Del Mar Antique Show.
We came across this fashion print and I noticed the blue bow on the front of the white blouse, so next time I wear this, it will have a blue bow also. And maybe a handsome accessory too.
Wednesday, March 10, 2010
Regency turban
I'm close to being finished with my white cotton voile Regency gown and red pelisse for the March 27 luncheon, celebrating the engagement of the Dashwood sisters (of Sense & Sensibility). Mainly they just need hemming. Once those are done, I'll have a post typed up for my blog.
I also needed something for my head, and I was considering two bonnets I'd bought from Mela Hoyt-Hayden a few years ago.One was an off-white color, and the other an emerald green.
The problem with the green one was with wearing a red pelisse, I would look like a Christmas tree. So I was left with the white one.
Then I watched the online video by PBS of American Experience: Dolley Madison, and saw some beautiful turbans she wore. The best part was they had an extra video with it, showing the artist making the turbans. https://www.pbs.org/wgbh/americanexperience/features/dolley-turban-maker/
His trick to making the turbans was having a straw hat base to wrap the fabrics around. He used just the crown from a Hawaiian beachcomber hat by trimming off the brim. The crown is a roundish shape. The one I found at a party store in the Hawaiian bbq section was the same but the brim was flipped up. It's a very soft straw, and costs $4.
I trimmed off the brim up to the crown, then did a machine zigzag stitch around the inside to stop it from unraveling. Then I sewed a bias tape around the rough edges.
My base fabric was a dull finish gold polyester. I had a long strip of it & laid it centered over the top and turned it under the edges a bit. I tacked it around the bottom. Then the two lengths on either side I twisted and wrapped it around, building it to the top. I used pins to tack it temporarily in place. There's no exact way of doing this. You just wrap and look at it, and fiddle with it until you like it.
I wanted to add color to it and the only fabric I had was a wide strip of a multi-plaid silk that had a chunk missing out of the center. It was mainly sage green and gold but had a reddish-orange bit that I wanted to dominate the turban and compliment the red pelisse. So I had to sew it in parts and weave it under the gold parts.
I handstitched most of the gold fabric to the base but the patchwork parts I just tacked or slipstitched it to the gold.
Since this is a daytime event, I didn't want it too dressy, but a girl's got to have bling, so I added a vintage bronze brooch with red stones to the front of the turban. I may add a small brownish feather I have, IF I can find it, just over the brooch.
I'll be wearing my little curly hair clippies hanging out on the sides.
In the mirror you can see the back, and then the two sides. It's not a real smooth wrap around of fabrics, and usually it looks more planned. But it worked for me.
Thursday, March 4, 2010
1860s pinner apron
This is such a quick and easy project, it hardly seems worth a post of it’s own. But hey, it’s something to post about, so why not?
Since I decided to try going to another Civil War event, and I would be sitting in an encampment making butter in a butter churn, I knew I was going to need an apron to wear over my dress, especially since I was planning on wearing my blue and white voile.
My CW friend Beth told me to just buy the Simplicity #7217 pattern, since it came with a pinner apron pattern. It’s the Fashion Historian line by Martha McCain, and I trust Martha (a very nice lady whom I’ve met at Costume College).
A pinner apron is so called because instead of having a tie around the neck, the top of the bib just pins to the bodice. It uses two straight pins or special pins made just for them. But I wasn’t able to find a photo of them to show what they look like. This pattern also has the waistband buttoning in the back instead of tied. I think this gives a much neater look that was so important to the Civil War silhouette.
Of course the fun part was looking for the fabric. I knew it should be dark, and I had to keep trying not to “coordinate” it with what I was going to wear. I didn’t have any luck looking on those $1 yd tables everyone is always bragging about but did find one at JoAnn’s that, with a 40% off coupon, I only paid $1.89 yd. It only takes 2 ½ yards.
Basically this pattern only has two pattern pieces, the bib and the waistband. Then the skirt is a 43” square. Since my fabric was 44” wide, I just left that additional inch on and my piece ended up with a selvedge finish on the sides.
The bib, even though cut to my size, was a little wide for my chest. So I cut about 2” off the sides but left the length as indicated. I sewed the bib right sides together, trimmed and turned right side out. I top-stitched ¼” in along the outside edges, but chose not to do the second row 2” from that. Then I did two rows of gathers along the bottom. The waistband pattern has marks on it where you attach it to the bib but basically it’s just gathered to cover the front of you, about 9 inches across. I used a piece of iron-on interfacing on one side of the waistband, then basted the waistband to the bottom of the gathered portion of the bib.
The skirt potion was really easy: turn under the sides and hem, which I did by machine. Turn up 3 ½ inches on the hem, and turn under the half inch. Again I machine stitched it.
I sewed two rows of gathering stitches along the top of the skirt, and gathered it to the bottom half of the waistband. Again the pattern has marks where you attach it, mine came out 5 inches past the side of the bib, pretty much lining up with my “side seam”.
The other half of the waistband is then sewn right sides together to the waistband but stopping at either side of the skirt. The waistband is trimmed, and turned right side out. Press, and slip stitch the opening in the middle to the top of the skirt.
The waistband will have two buttonholes and buttons in the back to close it.
This is just over a chemise on my dressform with no hoopskirt to fill it out so it looks long. It should be about 10 inches shorter than your dress skirt.
Since I decided to try going to another Civil War event, and I would be sitting in an encampment making butter in a butter churn, I knew I was going to need an apron to wear over my dress, especially since I was planning on wearing my blue and white voile.
My CW friend Beth told me to just buy the Simplicity #7217 pattern, since it came with a pinner apron pattern. It’s the Fashion Historian line by Martha McCain, and I trust Martha (a very nice lady whom I’ve met at Costume College).
A pinner apron is so called because instead of having a tie around the neck, the top of the bib just pins to the bodice. It uses two straight pins or special pins made just for them. But I wasn’t able to find a photo of them to show what they look like. This pattern also has the waistband buttoning in the back instead of tied. I think this gives a much neater look that was so important to the Civil War silhouette.
Of course the fun part was looking for the fabric. I knew it should be dark, and I had to keep trying not to “coordinate” it with what I was going to wear. I didn’t have any luck looking on those $1 yd tables everyone is always bragging about but did find one at JoAnn’s that, with a 40% off coupon, I only paid $1.89 yd. It only takes 2 ½ yards.
Basically this pattern only has two pattern pieces, the bib and the waistband. Then the skirt is a 43” square. Since my fabric was 44” wide, I just left that additional inch on and my piece ended up with a selvedge finish on the sides.
The bib, even though cut to my size, was a little wide for my chest. So I cut about 2” off the sides but left the length as indicated. I sewed the bib right sides together, trimmed and turned right side out. I top-stitched ¼” in along the outside edges, but chose not to do the second row 2” from that. Then I did two rows of gathers along the bottom. The waistband pattern has marks on it where you attach it to the bib but basically it’s just gathered to cover the front of you, about 9 inches across. I used a piece of iron-on interfacing on one side of the waistband, then basted the waistband to the bottom of the gathered portion of the bib.
The skirt potion was really easy: turn under the sides and hem, which I did by machine. Turn up 3 ½ inches on the hem, and turn under the half inch. Again I machine stitched it.
I sewed two rows of gathering stitches along the top of the skirt, and gathered it to the bottom half of the waistband. Again the pattern has marks where you attach it, mine came out 5 inches past the side of the bib, pretty much lining up with my “side seam”.
The other half of the waistband is then sewn right sides together to the waistband but stopping at either side of the skirt. The waistband is trimmed, and turned right side out. Press, and slip stitch the opening in the middle to the top of the skirt.
The waistband will have two buttonholes and buttons in the back to close it.
This is just over a chemise on my dressform with no hoopskirt to fill it out so it looks long. It should be about 10 inches shorter than your dress skirt.
Subscribe to:
Posts (Atom)