This is a photo diary of my costuming "travels"; where I've learned and struggled to make historical costumes for myself. They're not always pretty, but always fun, most of the time. And I want to share with others what I learn along the way. **You can find me on Facebook, https://www.facebook.com/Time-Traveling-in-Costume-640703499399817/ or have my posts delivered to your email by signing up at the lower part of the right column.**


About Me

My photo
HI, my name is Val. I'm a member of Costumer's Guild West in Los Angeles, Dean of 2018 & 2024 Costume College; Past President of the San Diego Costume Guild, and a representative of the San Diego History Center. I also put on historical fashion shows for various groups. I make my own historical costumes but don't sell any unless I get tired of one.The eras I've made so far are 1770 up to 1918. My favorite is the 1880s bustle.

Followers

Friday, July 26, 2024

SOMETIMES A SMALL PROJECT EXPLODES

Did you ever have a small project that you think you can make it or fix it in a just a couple hours? Yeah, that.

Because I realized I didn’t have time to make a new skirt in the four days before I was attending an afternoon tea with friends in costume, dressed in the early 1900s, I went to Plan B and pulled items from my closet that I could wear instead. I picked a black and white pin dot skirt; with a white cotton voile shirtwaist I had sewn lace appliques on the front. I remembered an antique Edwardian black tape lace jacket that was gifted to me last year by a friend in the Port Townsend (WA) Heritage Association who was clearing out her collection. (I’m calling this tape lace but it may not be the correct term. If anyone knows, please let me know.)


While I was trying the jacket on, I noticed quite a bit of the lace had separated in parts where the threads had rotted, so I decided to do some repairs on it to strengthen it before wearing it and causing more damage. The “lace” itself is pretty strong although a bit dry. The center front also seemed to want to close there so I pulled an antique black glass button from my stash and sewed that to it. If you notice just up to the right of the button is an area of netting that are is in certain areas of the jacket. Some of it I can’t save so I’m attaching the lace portions together to stabilize it.

I started yesterday afternoon tying a double thread of heavy-duty thread between the separated pieces. There were a lot of loose threads hanging from it and I thought maybe someone before me had tried to do the same thing but didn’t clip those loose ends. And then there were single threads just barely holding some parts together with the thread stretched across in open air. What the heck? Ok, maybe it was a way to keep the lace front separating? There were some areas that looked like it had braided thread between the lace.


After spending four hours slowly going over and over the jacket, I had to take a break because black thread on black lace is an eye strain. So I started up again today and I’m almost done after four more hours of repairing. But after handling this so much, I now think those single loose threads were originally that braided thread that held the lace together and came unraveled, and those loose threads are broken dried up ones. So there’s going to be more work continuing later.

                                       This is a photo of a similar jacket dated 1908-1914.


I've added a photo of me wearing my complete outfit at tea a couple days later. 


DISNEY HAUNTED MANSION MAID’S DRESS

Last year during the summer of 2023 I got an idea for a costume to make for a movie theme at Costume College, since the main theme was Costumes of Stage & Screen.

I came across a photo on Pinterest of the maid’s outfits that were worn at Disney’s Haunted Mansion. I also had a friend, Cat, who used to work there, and she shared photos of her in her costume to help me with my design.

I found a couple of different versions you could buy on Amazon but I was leaning towards more of a historical-style dress and I wouldn’t have to reinvent the wheel in making it. There are many different versions for sale on etsy from short to long, even a child’s which would make a cute “Lolita” version.  I did like the full-length version of the first one the best. The last photo is a more recent one worn there at Disneyland but I wanted to make mine in cotton and I liked the stripes.


I started the fun part of fabric shopping online and did a search for black and green stripes. When I came across this particular one with bats included, that was it! Except they only had 4 yds 58” wide, which was only enough for the bodice and apron. So I also continued searching for a solid green for the skirt, which it turned out wasn’t easy because it has a bit of a bluish color to the green and nothing in the three stores I went to had anything close to it. So I decided just to wear a solid black one with it and maybe in the future I might find a green for it.

Patterns were an easy decision. I wanted an open neckline so I could add lace along it. I liked the neckline on Truly Victorian’s #422 1881 bodice but squared off the back peplum since it was going to be tucked in under my skirt and apron. I used the apron portion of Truly Victorian #208 to make my maid’s apron, just adding ties to the waistband in the back with a big bow. My black cotton skirt was made a few years ago, using TV #221.


When I started on my accessory maid’s cap, I planned to make one similar to the ones worn at Disney with the white pleated lace and bat wings on it. Cat even sent me detailed photos of her cap for inspiration. But then I found this on etsy! Similar fabric to mine and it has mouse ears! Even better to tie my outfit into Disneyland! And I didn’t have to make one more thing when I began to run out of time.

I also wanted to have a proper name tag like they wear at the Mansion and found three I liked on etsy but thought I could make one myself. Except in the end, I didn’t have time, and totally forgot. Stupid, I should have just bought one, which I probably will now, since I want to wear this for Halloween this year. I like “Foolish Mortal” the best.


I began construction of my dress in September of 2023, a bit close to Halloween but as always, I had my ghost bride outfit as a backup just in case. I sewed a self-fabric ruffle around the hem of the apron, and added some white lace that I cut off a much wider one I had that had a blue ribbon and a smaller ruffle on its opposite side. I pleated the portion to go around my hem, then cut it down some more for the sleeve cuffs and neckline trim.


That was as far as I got because my Mother’s health had been going downhill for a while, and I was distracted from sewing. Sadly she passed away on Halloween, so I went with Plan B, and set aside my maid’s outfit to finish for Costume College the following year in July.

---------------------------------------------------------------------------

I pulled my dress out of my closet in February 2024, thinking I still needed to add the sleeves and lace, but was surprised I had already sewn the sleeves on last time I worked on it. So I only needed to add the lace to the neckline and sleeves, and then all that was left to do was the buttons and buttonholes. I thought antique black glass buttons would be very appropriate for this bodice and used ones from my stash. I only had 5 buttons but the portion below the waist didn’t need them.


I only wore a petticoat under my skirt since this was a maid’s outfit and didn’t need a bustle, even though the pattern had a peplum for one, and my skirt had some gathering in back to accommodate one. It was fine without one.

It turned out to be one of my favorite outfits I wore to Costume College this year. I had lots of compliments, especially when someone recognized the mouse ears. I wasn’t able to go to the Photographer’s Studio for a good photo because even though I was 8 weeks post-knee surgery, I can’t stand for long and the lines there were long. So I depended on friends to take some for me. Now I can’t wait to wear this for Halloween this year, and am thinking of putting pale white makeup on with black circles around my eyes. And I just ordered that “Foolish Mortal” name tag on etsy.


Wednesday, July 24, 2024

THE EVOLUTION OF MY BRIDGERTON DRESS


A year ago in May of 2023, I had to think of what the theme for the Gala at Costume College was going to be. For those that don’t know, I was the Assistant Dean for that year’s event, and would be Dean in 2024. So we had to plan way ahead for what our event themes will be to set them in progress. I didn’t hesitate when I decided on a Bridgerton-theme for it. I thought it would be a lot of fun to play with, and there are so many Regency events and fandom going on right now. I immediately started planning what my dress would look like. I wanted a gaudy or colorful looking fabric but also didn’t want to spend a lot of money on it because I might not ever wear it again, since it wasn’t historical.

I picked a color I liked from one of the dresses from the Bridgerton series Season 1, it being a sheer purple with large flowers embroidered on it. So I started shopping on etsy and found an embroidered netting I liked on sale for $4.79 a yard. It was 59” wide and coming from China. I didn’t really pay attention to the fabric type but knew it would be polyester at least. I was in no rush, but it didn’t take long to arrive. My first impression was the netting was plasticky but the embroidery was nice. I found out later it was nylon. And of course I would need to line it with cotton.


The more I thought about this dress, the more I realized it was going to be hot. Too hot for Southern CA summers. I spent a few months thinking this through. In the meantime, I had to decide on my pattern. I bought the Nehelenia pattern NP403 for a Regency dress online since I liked the front crossover bodice and pretty lace insert it had. It only came as a digital download but my plan was just to print the bodice portion, and use the skirt pattern from another printed Regency one. I ended up using Simplicty 8941 but am having to take in a lot of the fabric because it has more fullness than what I want. But at least it’s a tissue pattern that’s easier to use.


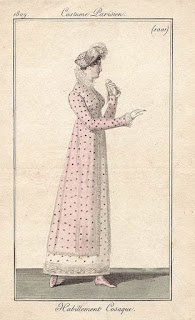
So after months of thinking about my dress, I decided to just make a white dress using some cotton sateen I had, and then make the embroidered portion a separate dress that would go over it, like an open-robe, and the white dress could be worn on other occasions. In looking at Regency fashion plates, it looks like the 1806-1809 time period would work for it.


I was able to cut out a muslin for the bodice at a sewing workshop and I was right, other than needing to add a 1/2 inch to the seam allowances to enlarge it, the front opening and shoulder width was perfect for my short shoulders and wouldn’t be falling off my arms like previous patterns I’d used. My sleeves will be a three-quarter length, as befits my age.

After cutting out the cotton sateen and the embroidered fabric for the bodice, I sewed those seams together. Instead of machine sewing the neckline opening I sewed those seams under by hand. The white dress has a back closure and a closed front with the lace insert also sewn to it. But I plan to make the over-dress with a front opening to make it easier to get in and out of, and it won’t have the lace insert, so basically, it’s like an open-robe. And why cover up the pretty lace? 


I even found an open robe that someone made using Nehelenia’s pattern for it.

Next plans are blinging it up for the Bridgerton-look. I saved some photos from the TV series of florals and ribbon trims I liked on a couple dresses that go under the bust. I won’t make that decision until the dress is constructed. But it’s also part of my plans for my headpiece.


I liked the lace headpiece that one actor wore and tried to think of some way to add flowers to it, because I want to look like a flower garden. But it seemed like a lot of work, and I might not have the time. Then I saw this headband with flowers on it, and thought, aha! that I can do. Another idea came from the floral necklace around the one actor’s neck that could be filled out with flowers on a headpiece.


Then I got another idea while watching Chateau Diaries while she was trying on a wedding hat. I really liked the strings of pearls hanging from it with the netting. Now that could be really different and stand out by adding flowers to the top. I mean, the Featheringtons from Bridgerton were all about being gaudy and tacky! So now I have two ideas to play with. When Joann’s came out with their spring flowers, I bought a bunch of them to use. I probably need more now that I’ve trimmed off their stems. My hat idea is still evolving. I plan on wearing my curly wig with my outfit.


And of course I needed jewelry. I bought this purple set from AliExpress last year, and it’s a fairly nice quality. I took a couple of the stones off the bracelet which I wasn’t going to use and am making them into drop earrings. I decided to reuse my reticle I made in 2018 when I was also Dean for “Dressing the Royals”.


I started cutting out the over-dress fabric today and after cutting off the plain white portion, I lost about 8 inches in width. The fabric was advertised as 59 inches wide, but that was 8 inches of unusable fabric that wouldn’t work for my dress. I only ended up losing about 2 inches of the pattern width at the bottom of my skirt, but since this is a very full skirt pattern, I may be cutting off some width anyhow as I don’t want the round gown (aka pregnant-look) skirt.


It took me two days to finally cut out all three pattern pieces. I cut out the pattern size according to the pattern directions, also knowing it would have lots of ease. And as I expected, it was a LOT of fabric! Since I can’t stand for very long, I didn’t want to try pinning it on my dress form and keep trying to fit it on there and adjust it. So yesterday I decided to hand baste just the front and back pieces of my white cotton sateen together, and not using the two side panels, which were just as wide as the front and back. I didn’t want to machine baste it because this fabric tends to get thread pulls. And it would be much easier and quicker to take it out if I needed to adjust the size. I did a gathering stitch along the top edges so I could be sure it wouldn’t be too fluffy in the front the “pregnant-look”, but would have a nice fullness in the center back. I pulled it on today and pinned it under my bust and sides, and I’m quite happy with the amount of fabric I have. So, only using the front and back pieces. Unfortunately there’s that leftover side panel, and of my floral over-dress fabric. But they’re just large panels, and usable for something else. At least, I’ve made progress, and after I’ve recovered from my knee surgery next week, I can sit and sew these on my sewing machine.

I did some testing of whether gathering or pleating the skirt into the waistband would work best. Pleating was better on the cotton sateen. Not so sure about the nylon overskirt. It’s a bit fluffy and I’m wondering if I should take out some of the extra fabric rather than it being as fluffy as the under dress. I’ll try them on together today but for now it’s just the skirt portion. I’m not attaching the bodices until the skirts are right.

-----------------------------------------------------------------------------------------

My plans of getting back to sewing a week after my knee replacement surgery was a fantasy. It actually took me more than 3 weeks before I was able to walk that far in my house to my sewing room and sit down for very long. I decided hand-sewing was probably better for me right now. Attaching the overdress together needed to hand baste everything first because it spits out my pins in about 3 seconds.  Because of its sheerness, I attached a facing to the waistband to give it some body and so the seam allowances didn’t show through it.

I was able to try on the bodice of the underdress and after making sure it was fitting me in the front, I started pleating a panel of lace from my stash to a piece of the non-embroidered section of the fabric and attached it to the front neckline.  Next up on that will be cutting out the sleeves for it.


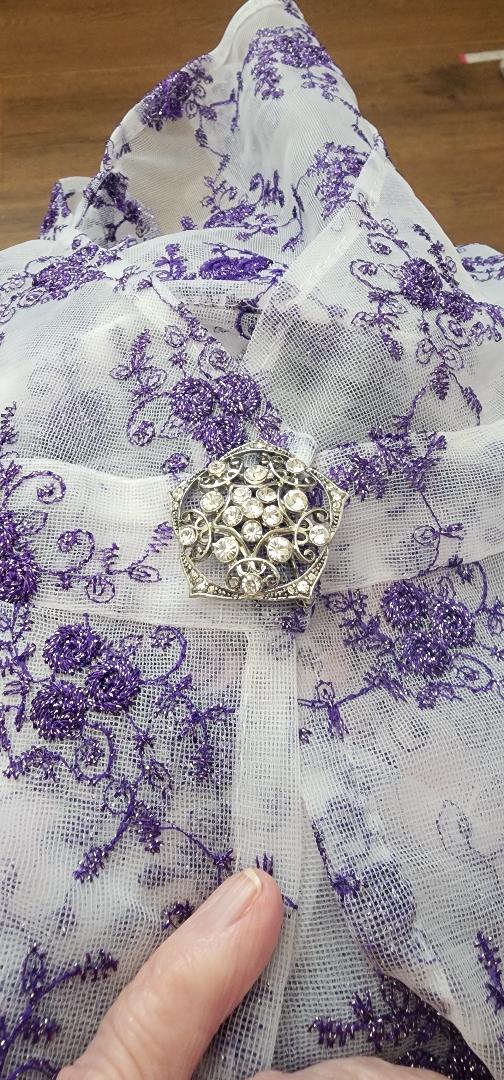
After sewing the bodice of the overdress to its skirts, I tried it on and was really happy to see it wasn’t bulky on me or make me look like a tank, as I had expected from a nylon.  When I put them together on my dress-form, I could see it was all coming together.  I found a vintage rhinestone brooch in my stash to close the front of my overdress with. 


After I made the sleeves for the underdress I was going to see how it would look for the overdress to NOT have sleeves, similar to an open robe. But then I looked at a previous open robe I’d made for CoCo back in 2008 and that made me decide that no, I would not make it like a 1795 open robe since this is supposed to be a later style. I want it to look like one piece of fabric with embroidery on it.

I picked up on some new ideas for my dress and fascinator as I’m watching the 3rd season recently. One of them was the giant bows on the back of some of the lady’s dresses. The back of mine is rather plain and I think a purple bow would be perfect but need to decide on a large one, or a sweet little one. Ooh, and I just noticed the white fringe on the bottoms of the bow swags in the fashion plate.


Then in the 2nd half, I saw some sparkly things added to some of the lady’s hairstyles. My first thought of the strings of pearls may be changing into rhinestones. I think when I start putting it all together, I’ll be able to tell what looks best on it.  


Now only one week before Costume College, I was in the final stages of finishing everything. My floral hat was the last thing I worked on. I made a base of buckram and covered it with my white cotton sateen. Then hot-glued my flowers and some ribbon leaves to it. This was a quick and dirty hat because I don’t expect to wear it again. After playing with a few different trims, I decided to just go with a tulle ruffle around the base. I couldn’t find any pearl picks to add to it, so that was it. I tacked on a couple hair clips to it and it’s done.


Now that I’m back from CoCo I'm gathering photos of my outfits as they show up. I had fun with this costume at the Time Travelers Ball, “Lady Watered-Down’s Gala”. Halfway through dinner, I had a “prize” to pass out to random ladies in the room. On each of the 26 tables, everyone had a menu, and the one with a butterfly decal on it was the “winner”. I had written a speech as Lady Watered-Down and fortunately the Gala Mistress had a friend who could read it off-stage in a “Julie Andrew’s” voice (saving me from doing it) where I announced those with the butterfly had been chosen as the “Diamonds of the Season” and to come up to the front to collect their prize. I handed each of them a tiara. There were a lot of excited ladies!

I know this was a long post, but I have more for another one about my Disney’s Haunted Mansion maid’s outfit that was my favorite costume this year. And I’ll get to wear it on Halloween this year, which was delayed from last year. That will take me a few more days to write though.