

This dress has been trying to get made since January this year. Well, two dresses. I really liked how my Nehelenia Regency dress fit me for Costume College in 2024 and was determined to make another one in a cotton fabric. My friends and I have been talking about going to a tearoom in Regency, or having a picnic but some of us needed to make or finish a dress for that. I was one of those.


This painting was my favorite for my accessory inspiration for the blueberry fabric. It gave me a few ideas of a belt and a headwrap I might try too. I found a blue beaded necklace on Dames ala Mode, and hubby graciously claimed it as his birthday gift for me. Then I ordered a cute little reticule from Shocking Bad Hats after admiring the ones she made to go with the hats & bonnets she custom made.


For the white one, the world is my oyster in what color
accessories I can try. This one with red was the first photo I found. In the
meantime, I plan to use my coral necklace I had from Hawaii and a pair of
earrings I had purchased from Dames ala Mode a few years ago.


I dug through my hat collection and decided this simple
one would work for either dress but also have an unfinished straw from Austentation.com
that I like the wider brim on it better. Having them both trimmed in a generic
color, with a splash of green, makes them very functional.


I found this very interesting when I was looking at this unfinished bonnet again online. They also sell a 3 in 1 Day to Evening bonnet/turban. The
turban fits over the crown of your bonnet for daytime and can be worn by itself
for evening. Genius! And last year I took a turban-making class at Costume
College so this can be done!


One of the changes I wanted to make to my pattern was to
make it easier to get in and out of it by using ribbon ties on the back closure
rather than buttons or hooks & eyes, since I can’t do that myself. Yes, one
day I am going to try making Laughing Moon’s bib-front gown that came so
highly recommended to me for ease of dressing. But first I wanted to try the
Nehelenia again because it fit me so well.

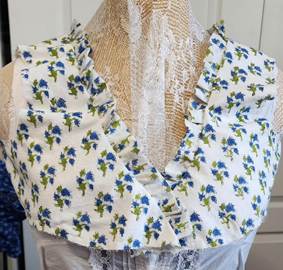
The bodice of my fabrics came together easily, and I
added pleated ruffles along the necklines, which I loved. I repeated the center
insert of lace on the white bodice but I pleated matching fabric instead on the
blueberry one. I thought lace might be a little too dressy for it.


At this point, other projects had to come first with some
deadlines coming up for events. I also needed someone to check how it fit in
the back and if just using ties would work. Yesterday I was finally able to get
that done at another sewing workshop. The back edges butted up against each
other which meant I could close it with ties. My original thought was to have a
channel inside the neck and waistline to have the ribbon like a drawstring, but
it’s not necessary. I’m going to use grosgrain ribbon so it’s not slippery.
This meant I could now attach the skirts to the bodices
and was on the way to getting them done. However, the neckline pleats on the
white one didn’t quite match up in width when they were lined up in the back,
so I’m unstitching part of one side to correct that. In the meantime I will
continue working on the blueberry one and put the sleeves on it. I’m getting
close!

Here they are a couple months later, all done! Except the
hemming of course. These are both on my dress form with a Victorian corset because
I can’t change the height of the bustline on it so it doesn’t matter to me. These aren’t
ironed yet so you can still see the center front seam down the skirt.


Not wanting to stop my momentum since Costume College was
coming up soon and everything would come to a halt to work on those
projects, I started both the Spencers for my dresses since they were small. Instead of cutting
into my royal blue silk (which I haven’t gotten down from the top shelf in my
closet yet), I’m just making the red linen and green cotton twill ones first. And
this way I can practice on the pattern before cutting into the more expensive
stuff. I used Laughing Moon’s pattern #129 for them, and used View A in blue so
it followed my crossover dress style.

After fighting with the multiple pattern sheets to find
the correct pattern pieces, I got the bodice portions traced, cut out and fitted
on me in another workshop. This pattern contains both #129 (Spencer) & #130
(redingote/tunic), in sizes 6-34, so you can imagine how many sheets of paper
there were, and I had to find the pieces I needed that were mixed in there. It
was a massive undertaking to say the least. I’m no longer cutting out the
pattern pieces but tracing them because with the demise of many pattern
companies, we need to treat these as treasures and take care of them.
After a quick look through the instructions, I sewed the
pieces together and then sewed the lining together. I followed the instructions
to sew these right sides together and left my opening at the bottom to turn
them right side out. After being very happy with how this looked on me, I cut
out the pattern piece for the neckline ruffle. Hmmm….something’s not right… Shouldn't those have gone in already? I hadn't even cut out the ruffle fabric yet. I continued looking through the instructions and found
it pages later where it tells you then to sew the ruffle to the inside of the
bodice before sewing it all right sides together. I went back to the first part
of the instructions and it was referring to sewing the lining to each pattern piece.
So I guess to my brain, this meant sew the lining as a bag-lining when actually
it was referring to what I call a flatlining. Or was that the reverse? Either
way it was sewn. I guess if I had read through the entire directions I might
have caught that. Instead of taking out all my stitching, and under-stitching I
had done on the lining, I let my brain think about this for awhile and came up
with an alternative. I sewed the ruffle piece in half, turned it right side out
so it had a nice finish, then pinned and ruffled it to the inside on the
lining, and top-sewed it really close to the edge. After I finished that I
whip-stitched the exposed edge inside to the lining to keep it flat. It turned
out nice and no one can tell any difference.


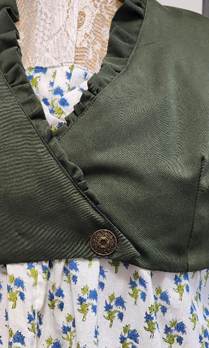
I questioned the ladies on a Regency costuming group I’m
on about what they used for a closure on the bottom points of the bodice. The
inside one that doesn’t show was easy, either a pin, safety pin, snap or hook
& eye. The same response came for the outside point but quite a few added a
decorative button or brooch. Also using a pin or safety pin, it makes it
adjustable too. These are only for daytime and don’t have to be fancy, so I
wanted something understated. I had a bag of leftover metal buttons and after
pinning one on, that was going to work. I’ll have a safety pin on the underside to make it adjustable and have the button sewn on as a decorative design.
My next step is to make a fitting muslin for the sleeves
but that’s going to have to wait until after Costume College.
No comments:
Post a Comment
ALL COMMENTS ARE HELD IN MODERATION UNTIL I APPROVE THEM TO SAVE EVERYONE FROM SPAMMERS. But I would love to hear from my readers!