
This is a photo diary of my costuming "travels"; where I've learned and struggled to make historical costumes for myself. They're not always pretty, but always fun, most of the time. And I want to share with others what I learn along the way. **You can find me on Facebook, https://www.facebook.com/Time-Traveling-in-Costume-640703499399817/ or have my posts delivered to your email by signing up at the lower part of the right column.**


About Me

My photo
HI, my name is Val. I'm a member of Costumer's Guild West in Los Angeles, Dean of 2018 & 2024 Costume College; Past President of the San Diego Costume Guild, and a representative of the San Diego History Center. I also put on historical fashion shows for various groups. I make my own historical costumes but don't sell any unless I get tired of one.The eras I've made so far are 1770 up to 1918. My favorite is the 1880s bustle.

Followers

Tuesday, December 17, 2013

THE TARTAN TWINS--1870s Christmas Plaid gown

Began November 8/ Finished December 14, 2013
This was my first time ever to be challenged to make semi-matching gowns for an event. Cindy asked if I wanted to make matching Xmas plaid 1870s gowns for our Costume Guild’s Holiday Dinner in December. I decided I was up for it since I didn’t have any projects that needed to be done by then.

Cindy wanted to do the Truly Victorian #216 (1875) Parisian Trained Skirt that she’s done a few times, and I’d never done but she said it was easy. We both liked the Truly Victorian #405 (1872) Vest Basque Bodice to go with it, which I’ve already made and liked it. Both patterns have a lot of possibilities for different types of trims and fabric use.

We drove up to the Garment District with open minds regarding colors and fabric types. We knew we didn’t want the same color and that we would absolutely not look like Xmas tablecloths. I was leaning towards cotton but when Cindy said she was now thinking of silk taffeta, we added that to our search but knew the choices would be very limited. The first store we started looking in at Robert’s got the ball rolling. Cindy found a red and black Tartan plaid in a good quality cotton-wool blend and for an excellent price. So now I needed to find something similar that would compliment her color in a Tartan for me.
It took us walking through seven more stores before I went back to one that was a hunter green and black Tartan but was a polyester blend. But it had a good weight and I can line it with cotton.  Then we went looking for some sparkly trims, and both of us found glass beaded trim at Target Trims. Mine has a slight green tint to the glass; and Cindy’s is black.

I found a couple fashion prints made with plaids from the 70s, and liked these two where the sleeves were a solid color, making it look like she was wearing a vest. And I like the BIG bow in back!
 

I even made paper dolls this time to try and decide what parts of the dress I wanted plaid and solid black. After playing with it for a while I decided on black sleeves, plaid bodice, with a black vest insert. The skirt will have a panel of black going down the sides, which also leaves me an area to do some trims too. Maybe big bows?
I’ve made a few plaid dresses and so far really haven’t paid much attention to how I’m cutting the fabric but my plaids always seem to match up pretty well. Not perfect mind you, but not bad either. I’m not that precise. This time however I paid attention to how I did it out of curiosity and took photos as I went along to show how I do it.
My first method requires lining up the plaid on both sides of the fabric at the selvedges. Apparently I’ve always done this but didn’t think about it.
This time I put a little more effort into it, if you can call this an effort. Once I placed my main back pattern piece I found out where the front piece would line up to it by finding the waistline and putting it on the same line to match. Then I place the sides panels in similar locations, so when I cut and sewed them together, that one line was fairly close together. Not a precise method, but close enough for me. And no stressing over “is it going to match?!!”
And voila! A sorta matched plaid! For me, this is satisfactory. I’d never get it made if I made myself worry over every little detail. And there’s not enough time in my life to do that.

Cindy came over to my house at this point so we could work on them together. She had started with her skirt, and I had started with my bodice. We both use black silk taffeta as the vest insert, and I chose to do black sleeves to get the “vest effect” and Cindy did hers in the plaid. My collar was in the matching plaid, and hers was in black. So we managed not to be too matchy-matchy.

Peplums are still a bit of a mystery to me and I wasn’t quite getting it in the written instructions, so I was able to work it out by just looking at the picture on the pattern.
Cindy thought the bottom edges of the bodice and peplum was too long so we cut off three inches in the back and one in the front, and it did look better. This is the longer version.
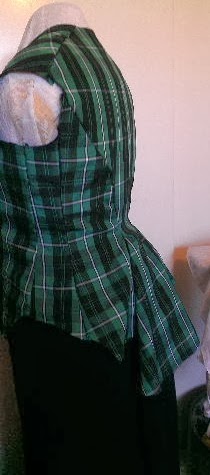
When I had the bodice mostly constructed I did my buttonholes on the vest and used two different sets of black glass buttons I had. They were similar and showed off very nicely. I tried to find some more to put on my sleeves or other places I could trim at an antique show and etsy but as time ran out I had to give up on that idea and come up with other trim plans.
Then I got started on my skirt, which was a new one for me. Cindy had made it twice before. It has an underskirt, two aprons, and two bustle sections plus a side panel on both sides. We made the under skirt that doesn’t show out of black cotton and the side panels from the black silk taffeta. Once it’s all sewn, the skirt is just one big piece.
All that pleating in the front and back into the sides of the side panels made for a very heavy skirt. My polyester blend fabric was slippery and heavy, and it fought me tooth and nail whenever I was trying to pins things, or run it through the sewing machine. It got called many flowery names while I was sewing. This is the two layers of the front apron where one overlaps the other, and then is sewn onto to the side panel. The overhanging edge, where my finger is pointing, shows on the outside at the front and was later trimmed with beads and braided trim.


To help create the big bustle in the back, besides wearing the regular steel bustle under them, Cindy had us put two layers of tulle under the upper portion of the bustle fabric. It was pleated and attached to the waist and sides. Although with the heavy fabrics we were using, they only added a bit of poof but still was worth it. It works better with lightweight fabric. We would also have a bit of train and we’d planned to put a ruffle (called a balayeuse or “female sweeper”) under it to protect it but ran out of time for that.
You may have noticed my sleeves are STILL not on my bodice. I leave the hated Sleevils off till last and as usual they fought me the whole time and I ended up not happy with them but what can you do?
At the bottom of the front apron we attached a knife pleated panel to the portion of the black cotton underskirt to cover that. Our panels were twelve inches finished, and went around the side panels ending at the edge of the back bustle.
Now for my favorite part, TRIMS! In the evenings Cindy and I sat at our prospective sewing machines with our computer chat box open and talked back and forth about what we were doing, bouncing ideas back and forth and sent photos what we tried. We decided on large bows on the side panels out of our plaids. And big bows of black taffeta under the lower back bustle. Small black bows were placed on the back peplum at the waistline but we didn’t get any photos of those in progress.

I made my sleeves without the folded up cuff shown in the pattern and just had a cuff that I added a band of my plaid to it by topstitching it onto the finished cuff. I had a long car trip so it was something I could do sitting in the car. My final touch to it was a plaid bow which now I’ve decided that the tails are a bit too long but they were cute.


As we were getting down to the two days before our holiday dinner event we had to decide what still needed to be done and what could be left behind to finish at a later date. I was finishing up my bows and started on our hats, while Cindy got more beads sewn on hers. She put them along the bottom of the bodice and on top of the black pleated ruffle. Her beads are black with a black braid while mine are the pale green beads but I will be adding a black braid on top of mine later.
On the day of the dinner, we got them finished as best we could, then Cindy came over to make our hats. I had the base of them done and ready to trim by the time she got here. *More on those in another entry*
Our costume guild’s dinner at the Harbor House restaurant in Seaport Village was the first time we got to see each other fully dressed in our completed gowns. And we were both very pleased by what we saw. Cindy started calling our hats “The Ridiculous Hats” because they were so poofy and feathery. I hadn’t stood back and looked at mine when I was finished and didn’t notice it was a bit flat in the center. More feathers are needed! But overall we were happy.
You can read about Cindy's dressmaking in her blog- The Broke Costumer


 And the dress project still continues as I’ve been sewing the rest of my beads and braid on each evening at home. And my brain is already thinking about next year when I could add some white rabbit fur trim to it. I promise, no rabbits will die in this process.

Monday, December 9, 2013

Starting Off the Holidays!

My plan this month was to attend as many holiday events as I could. I was able to squeeze in three within one week, but only two were in costume. And I was able to wear my Christmas dress from last year.

Last Wednesday I was again part of the vintage car Parade of Lights in El Cajon that we went to last year. The car owners decorate their rides with lots of Xmas lights and decorations. And there’s a party in the park on the route. I’m not sure why but the loudspeaker was playing mostly modern music with just a bit of Xmas thrown in; even when Santa passed by in the parade. I wanted more Xmas music!
We didn’t realize it was coming up so quickly until we looked it up on the internet just a day after Thanksgiving. It was going to be the following week, a week earlier than last year so we left a message in their office to see if they wanted us again. They did and were very happy we called them. They asked if we could have mainly Victorian or Dickens era gowns to create a Christmas mood.
It was also a little different this time as they wanted us to ride in the vintage cars instead of walking behind them, mostly because they didn’t get the permit to close down the street. It’s just a two block small town parade. But we weren’t thrilled with riding in cars that we wouldn’t be able to show off our gowns, and that’s why we were there. Then we saw the fire engine! Please please please can we ride on the fire engine? They agreed to let us do that.  
I wore my 1873 red and black checked gown that I’d made last year, and since it was going to be cold, wore my antique chenille cape, and black sealskin muff.

This was a group shot taken of us along with another western costume group that was there.


Cat, Karen, Trudy, Gina & I all climbed on the sides and back of the rig and to our delight found out Santa would be seated up there with us. Another gentleman who joined us brought his Dalmation with him too. Climbing up there, and down, wasn’t all that easy. The first step was about two feet off the ground and trying to be lady-like in a bustle gown took a lot of effort.

We were the tail end of the parade bringing Santa in with us and obviously were the most popular.
My mind is already thinking about putting white fur on a Christmas gown for next year.
********************************************* 
My next event wasn’t in costume but was a holiday tea at Paris in a Cup tearoom in Old Town Orange (CA). I picked up my friend Martha and we really enjoyed the “Joyeux Noel” tea given by them. The owner said she really liked purple this year so the decorations were purple, white and silver. It was very pretty.
Our menus were held by little Eiffel Tower place card holders that were a keepsake for us. Later when I asked about buying 6 of them for an upcoming tea of my own, the owner said they didn’t have them for sale but gave me 6 as a gift.


                                                        Happy Holidays! 

My next holiday event was the Victorian Christmas Open House at Heritage House in Riverside (CA).

Heritage House is a beautiful historical home and my friends Tonya and Cindy are docents there, so we get the inside scoop on events. Tonya always asks us if we will come in period costume to them to add a special touch to the day. Our time period range was 1870s to 1920s but I think most of us were in the 1870s-90s with a couple other attendees in 1860s. I wore my 1873 red and black checked gown again and kept myself warm wearing a shawl. We were even approached by one docent who said we were dressed so nice that we really should come to the Dickens Festival in February as they love having historically well-dressed people come. We laughed and said we’ve been coming for years, and some of us are in the fashion show there.
Hot mulled cider and Christmas cookies were served, and Christmas ornaments were available to make. I joined in the ornament making & made a clove spiked orange that had been cut from one of the many orange trees in the area. I pinned red and green ribbons on it to hang it on our Xmas tree.
My friends Sally and Karen with their dapper gentlemen.
Some more of my friends, Sandy, Robert, Laura & Heather McNaughton, and Ivan.
We went on a tour inside the house and this was my first time to see the upstairs bedrooms which were very pretty. I mostly took photos of the Christmas decorations that really set off the house.


These are my friends Tonya and Cindy, both of whom are docents at the house.
I’d hoped to have my photo taken with Saint Nicholas who was wandering the gardens but the timing was never right. He was cute and very rustic looking.
I’m almost done with my holiday dress for this year. I only have 5 more days to finish it and wear to our guild’s holiday dinner on Saturday night. I’m having to deal with a few different issues on it not familiar to me on it but I always enjoy a challenge. And it helps when someone else has made it can help me out a bit.