This is a photo diary of my costuming "travels"; where I've learned and struggled to make historical costumes for myself. They're not always pretty, but always fun, most of the time. And I want to share with others what I learn along the way. **You can find me on Facebook, https://www.facebook.com/Time-Traveling-in-Costume-640703499399817/ or have my posts delivered to your email by signing up at the lower part of the right column.**


About Me

My photo
HI, my name is Val. I'm a member of Costumer's Guild West in Los Angeles, Dean of 2018 & 2024 Costume College; Past President of the San Diego Costume Guild, and a representative of the San Diego History Center. I also put on historical fashion shows for various groups. I make my own historical costumes but don't sell any unless I get tired of one.The eras I've made so far are 1770 up to 1918. My favorite is the 1880s bustle.

Followers

Monday, September 26, 2011

Welcome to my Sewing Room

I was really inspired today after seeing someone else posting photos of their wardrobe holding their costumes. I always love seeing how other folks store and display their costumes and projects. And I get some ideas from them sometimes.
This is the right half of my closet in my sewing room. It has two shelves above for extra storage. My gowns are really packed in there, and right now I can't even slide a piece of paper between them.
I started hanging the overflow on a storage rack outside my closet, and it still has room for some more. It also holds my big floofy petticoats, bustles, and an elliptical hoop.  
So here we have my entire wardrobe. I counted 21 gowns. I have a plastic tub that holds my underpinnings.
On the left side of my closet (yes, it's a big one!) is all shelves for my fabrics. I have them folded around cardboard bolts from JoAnn's Fabrics that they just throw away and are happy to give me.

On top of my computer desk opposite is my hat collection. Each box has a small photo of the hats inside which makes it SOOO much easier to find a particular hat. I tried having them listed but it took so long to read the lists. A quick glance finds me the hat I'm looking for. They reach the ceiling so I have no more room to go up.
On the opposite side of the room are my shelves that hold my costume books. I've been told by a friend that she is bequeathing me her entire library of costume books, so I'm afraid some reorganizing is going to be needed soon.

This is how I store my patterns, in large see-through tubs under my sewing table. The smaller one holds all my ribbons, & I have another that holds my laces. Each tub is labeled with the pattern companies stored inside them. I have four altogether.

I showed you mine. Let's see your's now!

Sunday, September 18, 2011

1845-1850 mourning gown

Started Dec 25, 2010 Finished Sept 17, 2011
While cutting out my fabric for my 1845 teal plaid gown last year, I decided to also cut out my black silk taffeta for my mourning interpretation gown. My assembly line method was back in business.
I’ve been collecting photos for trim ideas for a mourning gown, and originally I really liked the velvet diamonds trimming this 1850 gown. It looked like a lot of fun handwork.

But sometimes my ideas for my gowns evolve as I see more photos and find trims. What determined how I would eventually trim this gown was a purchase of antique etched black glass buttons. 

I thought they would look good following the same front design as the 1845 gown of Queen Victoria.  And then I found a photo of another 1840s blue and silver floral gown with the sleeves I liked, and now that has influenced me to want to make a pelerine to go with it. Unfortunately that will cover the pretty trims I plan to put on the front, so it may not stay on me long. But I’m betting I can make that kind of fancy too.
 
  I also found this wonderful 1840s daguerreotype of a young lady with the ruched trim down the front of her bodice too.
I wanted to use the buttons as a focus of my trims on the front of the gown, simply decorative, and I made a pleated self fabric trim to go around the entire front of the bodice and the sleeve cuffs. It would border the row of buttons I would sew down the front of the bodice.


Since I liked the current pattern I was using for a V-neck bodice, Simplicity 3855, I cut the black one out at the same time and sewed the bodice together. I also used the same sleeve pattern I’d made for my turquoise plaid but lengthened it a bit, and sewed the pleated trim just at the edge of the cuffs.

I flatlined my bodice with a navy blue cotton I had and made a bias facing to sew all around it.


That was as far as I got and then worked on it in fits and starts for the next year. I didn’t take any more photos during that time so this is how it started to look with its trim and two of the buttons. I had ten buttons and decided to use them all down the front.  I considered doing something to the skirt and I really wanted to sew three rows of velvet bands around the bottom of the skirt as I’d seen in a fashion print. But because this was a mourning gown, I decided to pull the reins in on my trimming frenzy and kept it plain.
 
For my accessories I made my chemisette and undersleeves from a grey cotton. I used TV 104 for the chemisette and Period Impressions 401 for the undersleeves. I sewed a black soutache trim along the border of the collar and cuffs.


I pinned my watch to my bodice with an antique pin I bought recently, and a jet mourning brooch I bought on ebay from a seller in Norway. The really cool thing is it came from Trondheim, Norway, where my grandmother came from. The back of the brooch has a little window that you can open and put a lock of hair in it. I have some black lace mitts to wear, along with this bracelet I got for a steal at one of our antique shows.

 For my bonnet- I haven’t decided if I’m going to do one like this dated 1847 one in the photo (definitely want to do the flowers on the inside, or the one shown in this fashion print of the mourning gown. The black one seems to be more of a cottage bonnet shape.
  
I don’t have the bonnet frame right now and since I’ll be gone for a good part of next month, with only a week after before this needs to be done, I’m seriously considering making this cap out of a grey fabric with black ribbon. The colors will all depend on what kind of fabric or ribbon I can find in the meantime. I don’t want it entirely black since I’m doing second year mourning of black and grey.
I will be wearing this to the Dia de los Muertos candlelight procession on Nov 1 in Old Town San Diego. I’ve been planning & working on it since last year, and at least it’s at the point that it’s wearable now. I have a three tiered ruffled petticoat made from cotton organdy to wear under it, and am currently working on a corded petticoat to go under that. I’m hoping I don’t have to fall back on my past shortcut of wearing a tulle petticoat, or even the great theatre trick of a quilted fabric petticoat. But it is in progress now. The bonnet/cap will have a higher priority though.

Monday, September 5, 2011

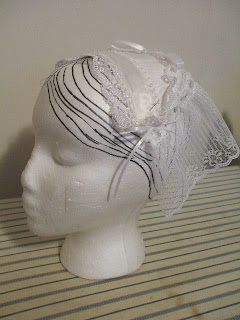
Making a lacey day cap

Back in 2009, I wrote up instructions on how to make a small day cap after seeing one worn at the San Francisco Dickens Faire.
I admired it and the young lady took it off to show me she had used a shoulder pad as the base, then sewed lace in layers on it. I ran into Carolyn Runnels, who also had one a little different, and she took hers off to show me.

Carolyn's started as a piece of lace as the base, then she sewed ribbon and more lace around it.
When I came home, I started making my own, first using a shoulder pad, then later just cutting an oval of Thermalan fleece used for quilting. Using a shoulder pad tends to keep it smaller since you only have that surface to sew your laces too. I had a huge stash of different laces and had fun using them all.
I started with a 4x6” white shoulder pad from JoAnn’s. I cut and sewed a piece of flat lace to fit the area just on top of the pad. If your shoulder pad has a yellowish tint to it, make sure this covers it. You might even use a piece of solid white fabric, like a moire taffeta. Then I sewed a longer lace around the back outside edge. I sewed it all by machine and used a wide zigzag stitch to sew it on. My lace was straight, so I made tiny tucks under each pin for it to curve.

I used a curved lace around the top edge of that lace to cover the edges.

 Then I just started building different laces around the front edge.
 I decided on this one to sew a piece of flat lace to cover the top. You could, at the beginning, just attach that to the top before beginning the layering. I was doing this a little backwards with my first one. But it still worked out nicely in the end.

Finally I sewed a flat ribbon across the top to each side, and a bow in the back. I think later I also put bows on either side that hung down the side of my head.

 This was Version #2 where I covered an oval piece of Thermalan fleece with a white moire taffeta like a little pillow. Then I began doing the same layering of lace technique.
These were mostly meant to be worn indoors, to keep your head covered at all times, or to wear under your bonnet. And they looked very pretty peeking out. I've seen this style mostly in the late 1840s up to the 1860s, and a smaller one in 1882. 


This is an antique one I aspire to copy next. It goes to show you don't have to do it all white or all black. This one looks like it used a base of a solid color fabric, then layered with ruched ribbons and lace added to that. Such a pretty and frothy little thing.

These are a collection of different ones I found in my Petersen's book.

1882.