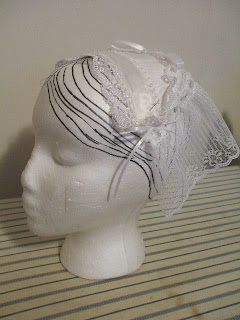
Back in 2009, I wrote up instructions on how to make a small day cap after seeing one worn at the San Francisco Dickens Faire.
I admired it and the young lady took it off to show me she had used a shoulder pad as the base, then sewed lace in layers on it. I ran into Carolyn Runnels, who also had one a little different, and she took hers off to show me. Carolyn's started as a piece of lace as the base, then she sewed ribbon and more lace around it.
When I came home, I started making my own, first using a shoulder pad, then later just cutting an oval of Thermalan fleece used for quilting. Using a shoulder pad tends to keep it smaller since you only have that surface to sew your laces too. I had a huge stash of different laces and had fun using them all.
I started with a 4x6” white shoulder pad from JoAnn’s. I cut and sewed a piece of flat lace to fit the area just on top of the pad. If your shoulder pad has a yellowish tint to it, make sure this covers it. You might even use a piece of solid white fabric, like a moire taffeta. Then I sewed a longer lace around the back outside edge. I sewed it all by machine and used a wide zigzag stitch to sew it on. My lace was straight, so I made tiny tucks under each pin for it to curve.
I used a curved lace around the top edge of that lace to cover the edges.
Then I just started building different laces around the front edge.
I decided on this one to sew a piece of flat lace to cover the top. You could, at the beginning, just attach that to the top before beginning the layering. I was doing this a little backwards with my first one. But it still worked out nicely in the end.
Finally I sewed a flat ribbon across the top to each side, and a bow in the back. I think later I also put bows on either side that hung down the side of my head.
This was Version #2 where I covered an oval piece of Thermalan fleece with a white moire taffeta like a little pillow. Then I began doing the same layering of lace technique.
These were mostly meant to be worn indoors, to keep your head covered at all times, or to wear under your bonnet. And they looked very pretty peeking out. I've seen this style mostly in the late 1840s up to the 1860s, and a smaller one in 1882.
This is an antique one I aspire to copy next. It goes to show you don't have to do it all white or all black. This one looks like it used a base of a solid color fabric, then layered with ruched ribbons and lace added to that. Such a pretty and frothy little thing.
These are a collection of different ones I found in my Petersen's book.


This is so lovely! Your blog is great, and your hands are just magic :)
ReplyDeleteBeautiful but did you use period correct fabric?
ReplyDeleteThis was almost 10 years ago. As I explained, I was copying one my friend had, a shoulder pad with modern polyester lace. So you can't expect that to be of period fabrics.
Delete