Back in 2013
I started a dress that started with a small photo from a fashion magazine labeled
1905 Directoire, and I began trying to make it. Trying, because I had to find
patterns that I could use and alter to do it. I had a striped fabric in mind when I went
shopping in the LA Garment District and found one, a lightweight upholstery
fabric that looked exactly like what was in my head. It was olive green with brown and gold
stripes, the stripes being what I was primarily looking for.
I began
pulling ideas for it from other photos and fashion prints, which is actually my
favorite part of planning a dress.
At some
point I thought I might make it as this green dress with a full bodice but in
the end, didn’t have enough to do the sleeves, and couldn’t find any more of
the fabric in the Garment District. So I went back to my vest plan. This dress however is still in my MAKE THESE file.
The skirt was
the easy part. I’d used Truly Victorian’s Edwardian skirt pattern, #TV E22,
before and knew the stripes would make a great chevron pattern down the front. I
sewed that up right away. Again I was asked later how I got those stripes to
make that chevron pattern. I didn’t. The pattern did. When I laid out the
fabric, I made sure the stripes matched along the edges of the selvedge, and
that’s it. It’s cut on the bias and when you sew that front seam, that’s what
it does. Awesome, isn’t it? And it’s a very flattering line.
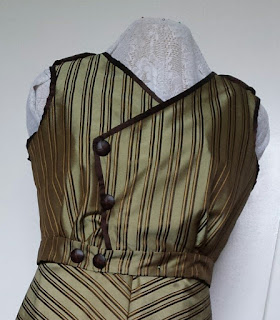
Now the
problem was how to do that crossover vest. I first thought of trying to use this
EvaDress pattern 1900 blouse but then remembered this Past Patterns #3973 tunic
pattern I had that I could use w/o the overskirt portion.
Next I
started on my blouse. Again, looking at various ideas.
I had bought
some accordion-pleated cream silk voile for the blouse and started cutting it
out from the TV E 41 pattern that I was going to alter the sleeves on, but it
kept stretching and I threw it into a bag and back on the shelf.
That’s about
as far as the dress got done in 2013. Every once in a while, I looked at it,
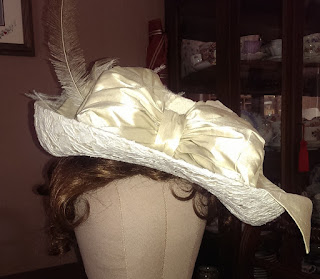
and last year thought maybe I should finish it. I even got a hat made just for
it by a friend. It was inspired by another’s friend’s hat she’d made. Gina from
Beauty from Ashes http://beauty4ashes7.blogspot.com/
made this pretty one for her Mom and I
loved the turned up edge with lace fabric around it.
My hat was
made from scratch with a lovely ivory lace fabric and Dupioni bow, and should
have inspired me to finish the dress. But it sat on top of my hat boxes
taunting me for another year because I again didn’t get the dress finished.
I don’t care
that this pattern says that it’s 1899, it’s not. The pigeon breast, dipped
waist and sleeves make it about 1905. But it would need some scaling up for me,
and I suddenly ran out of time to do much with it. I was also working on three
others dresses. That darn squirrel.
If you’re
interested in that pattern further, you can purchase it from The Vintage
Pattern Girl on etsy. https://www.etsy.com/shop/VintagePatternGirl
And Jennifer from Historical Sewing shows how she made hers from it. http://historicalsewing.com/the-1905-bodice-mockup-in-real-fabric
After reading that again, I may just
give it another try one of these days.
But then I
pulled out the Ziplock bag that had the previous blouse ALL CUT OUT, and
decided GO FOR IT! If it stretched and looked wonky while I was sewing it, it
was a loose blouse that probably wouldn’t show it. Except, it sewed a lot
easier than I expected, and even though it was very sheer, it handled fairly
well. The buttonholes were a bit snaggy though. But hey, they’re tiny. I used
some very tiny antique shell buttons I had from an Aunty. Once it was sewn I
added some rows of lace I either bought in the Garment District, or if memory
serves, from a seller in the Costume College Marketplace. I also sewed it
around the collar and cuffs. As you can see, it’s quite sheer. To save time
making a new corset cover, I used my ruffled one I’d made from Truly Victorian.
My little Edwardian brooch went with it perfectly too.
Next up were
the buttons on the vest and the decorative ones on the shoulders. I just
bought some from JoAnn’s, being in a time crunch. They looked like brown
leather.
I put it on to mark the buttons and this is
where something decided it didn’t want to cross over to my left without being
wonky. And in that, I mean bad baggy. When I have it on, it’s not quite as
baggy as that lower section is because I have the fluffiness of the ruffled
corset cover to fill it out. But you can see how the front is much longer than
the pattern drawing shows. When I started the pattern, I thought that excess
was the pigeon breast pouch but it didn’t want to do that. So I took a tuck
into the waistband to make it a bit shorter. It doesn’t look really great on my
dress form since it’s longer waisted than I am.
I’m thinking
at some point I might want to cut down the top of it and make the opening
lower. But who am I kidding? This already took 2 years and so far, I think it
looked quite nice in the final outcome. I added a brown silk rose to the front
of the hat to pull it all together, and wore my antique leather purse that
hangs by a small chatelaine to my waistband. I was wearing my cream American
Duchess Gibson shoes but with all the walking and nervousness about getting up
on stage at the CoCo Friday Social and being announced as the next Assistant
Dean, my feet were killing me. So I took them off. And I walked on stage holding up my shoes. Hey, Lauren! It was free
advertising!
One thing I’m
learning from dresses I make each year to wear to events: I’m always going to
want to alter or edit it afterwards. I rush to finish it and something won’t be
right.
However, I
did make one dress this year that I don’t want to change a thing on it. My
1870s tea gown.
~~Val~~


