This is a photo diary of my costuming "travels"; where I've learned and struggled to make historical costumes for myself. They're not always pretty, but always fun, most of the time. And I want to share with others what I learn along the way. **You can find me on Facebook, https://www.facebook.com/Time-Traveling-in-Costume-640703499399817/ or have my posts delivered to your email by signing up at the lower part of the right column.**


About Me

My photo
HI, my name is Val. I'm a member of Costumer's Guild West in Los Angeles, Dean of 2018 & 2024 Costume College; Past President of the San Diego Costume Guild, and a representative of the San Diego History Center. I also put on historical fashion shows for various groups. I make my own historical costumes but don't sell any unless I get tired of one.The eras I've made so far are 1770 up to 1918. My favorite is the 1880s bustle.

Followers

Showing posts with label 'teens dresses. Show all posts

Thursday, December 12, 2019

NEVER TOO LATE TO START THINKING ABOUT XMAS NEXT YEAR

I wished I had more to share of completed outfits for my final post of the year but everything I have been working off and on for the past several months are all in a state of incomplete. However, I do want to have a finale post to close out this year. That is unless I suddenly get a wild hare on and finish something or make major progress on one.
As mentioned earlier, my sets of skirts and shirtwaists all just need hemming and a couple more buttonholes. I forgot about the ones on the cuffs. They’re all collecting on my door. Same with my burgundy ‘teens dresses but I’m liking one more than the other so that may win out as getting finished earlier. And since I can wear my Purple Floral Voile bustle in a fashion show in January, I need to finish that one up. I think it just needs its lavender bows on the sides and hemmed (as usual).

I actually started a new project about a month ago, in hopes of having it done for the Riverside Dickens Festival in Feb next year for the fashion show, and possibly wear to the Port Townsend Victorian Festival at the end of March. I’ve been wanting to make an Arsenic Green Dress and hadn’t come across any green fabric that would do it justice, but finally did. It’s a dark Kelly-green Bengaline, a perfect color and weight for it.
And then I started doing my favorite part: digging around on the internet for information on the history of these “killer” dresses, as they were killers. The arsenic used to create this vivid green color started back in Germany in 1814. It infiltrated everything, down to paint, wall paper, and ladies clothing. Unfortunately, it would leech into a lady’s skin and was poisonous. It also affected those painting with it. The color was still being used as late as 1895 when the truth came out about it. There are existing samples of the wall paper and some dresses, and they are still treated as being deadly. 

These are a few of the known extant dresses held in museums containing arsenic in them. Those handling them have to wear gloves and masks even after all these years.


After looking through a few photos of a couple of the extant dresses, I decided I liked the 1872’s ones and am going to try making this one.
The dress is not displayed with the proper hoop/bustle under it, so the skirt is too big. It should look like these; flatter in front, fuller in back. I don’t have a correct one so I’ll be wearing a small hoop with a bum pad on the back.

I found a couple ads showing some beautiful bodices of this date, along with the hoop/bustle worn under the skirts. They also showed skirt shapes, sleeve trims, and hats being worn then. I’m still working on my hat plan.


This Truly Victorian pattern #TV 403 would work well for my bodice, although while making my mock-up, I removed the lapels and won’t be turning up the bottom of the peplum. I still need to find my contrast fabric for the center piece. And I need to hunt around for some fringe for it.
I’m making the skirt with just panels of fabric but the overskirt will need a pattern. Heather from Truly Victorian told me she’s been playing with a pattern for one and this has encouraged her to make it, and I hope its soon but overskirts go together a little quicker.

And this is what I’ve done on it so far. Impressive, right? At least it looks Christmasy.
And speaking of Christmas; the other day I got an inspiration for next year after decorating our new house with lights. We had one night where a group of judges go through the neighborhood and give out award signs for various themes. (Nope, didn’t win). I noticed a lot of my neighbors would sit out in their driveways and offer wine, champagne, and hot chocolate. Yes, they bribe! One had an elf, and that has inspired me to make a Santa suit for myself and next year sit out there and hand out my homemade caramels. Right now is the perfect time to buy the pattern and fabric, so off to JoAnns I went. The Simplicity 2542 pattern was on sale, as was the red faux-suede and white fleece. I want to make the long Santa coat for myself and add some feminine touches to it. I fell in love with the little reindeer pin and will wear it on the neckline. It should be warm to wear outside, and look like a vintage Santa. No beard, I’ll be a Mrs. Santa. I may even be able to wear it to a couple other places, maybe shopping? This project will be sometime next year, maybe when I’m not so busy. Hahah!


                                              ~~~Val~~~

Friday, September 27, 2019

‘TEEN’S KIMONO SLEEVE DAY DRESSES

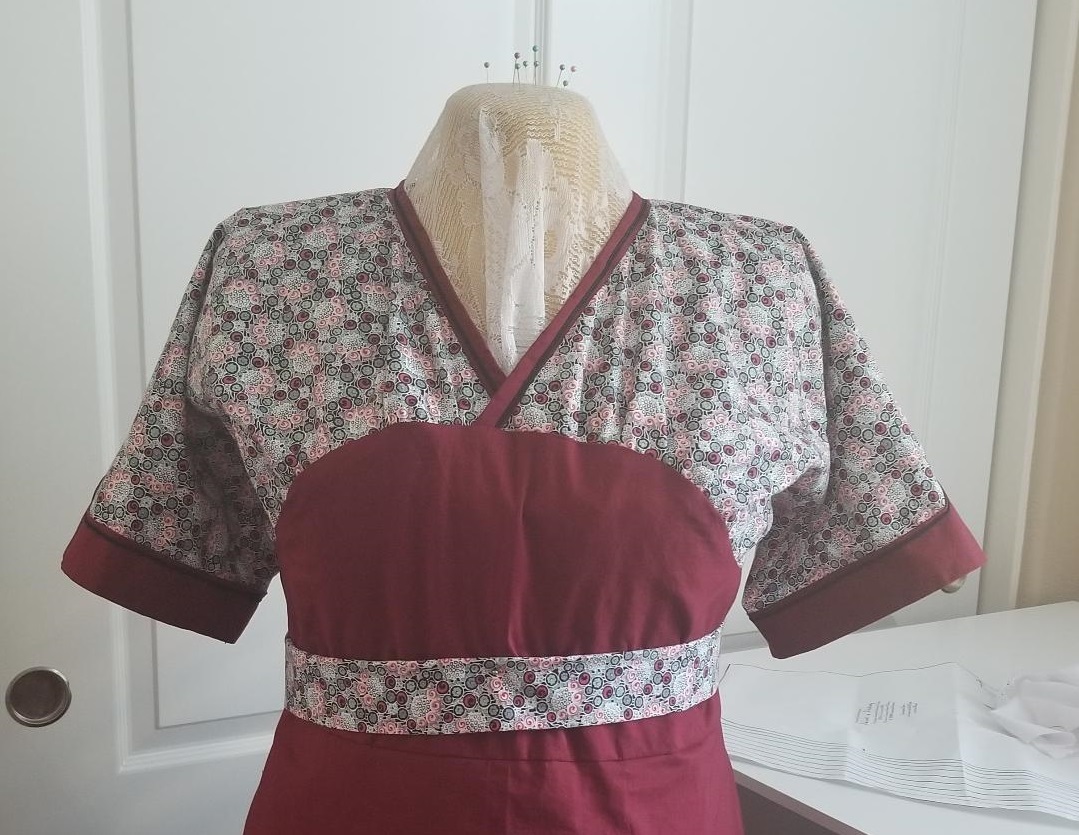
I’ve been working on a late Edwardian-early ‘teens era wardrobe, so, 1910 to 1918. As usual I’ve been all over the place with patterns and fabrics. I’ve only done one kimono sleeve dress before (Truly Victorian TVE 45) but haven’t finished the skirt to go with it yet because I had been waiting for a corset. Which I now have. I started out next with the Hint of History #102, (1910) Kimono dress.

I had planned to cut out two of the H of H pattern dresses but I was short on one fabric, so am waiting for more to arrive any minute now. 😊 But I did get the one done to where I just need to do the buttons and buttonholes, and hem it.
A couple problems I had with this pattern was not being able to tell what side was what on the bodice. I was really confused by the line drawings on the instructions until I realized the dart is on the back of the bodice. It was so counter-intuitive to my sewing experience that it took me almost a day to figure this out.
Then I finally folded the pattern in half to create the shoulder line, and marked on the pattern the fold line and wrote that on it. I also wrote armhole on the two sides also. The next problem was fitting the pattern on my fabric since it fits you on the bias and has one point that goes over the edge. The pattern relates to 45” fabric, but after washing, it was 42”. You have to fold it the other way but as you can see by my second fabric here, I didn’t have enough in length for that to work. So be aware of that when you cut your own.  

After that it went together pretty easily. I decided to make it with an underskirt and overskirt, and have trim on it similar to this. I sewed some narrow black soutache cording along the neckline and sleeve trims. 


I still need to cover some self-fabric buttons for it, and make the belt, since looking at my photo, it’s just some folded fabric around the waist.
---------------------------------                            
Back in 2016 I purchased my first digital pattern from Edwardian Rose on etsy, a 1912 day dress. The pattern company is now known as the History House, designed by the Fashion Archaeologist, from antique French patterns that she actually constructs herself and then writes the directions to.  Fashion Archaeologist
I planned to use this pattern as an example for teaching a class on how to print and put together digital patterns at Costume College later that year. I actually had fun putting the pattern together but didn’t have time to make the dress prior to the class. I did however see one that one of my students, Molly W., made from it, and I knew I’d want to make mine soon after. 
When I got home, I cut out my fabric, an inexpensive medium weight polyester in burgundy, but while trying to cut out the shoulder lace insert, I found none of my laces were wide enough for it. I think it needed lace yardage and nothing I saw in the stores looked appropriate for it. So, it all got bagged up to wait until I found some.

Fast forward 3 years. As I’ve been unpacking, things from my former sewing room have come to light while putting them away in my new sewing room. Things I’d forgotten, and delightfully, things that were already cut out. Two of these were this 1912 dress, and also for a pair of combinations for the same time period by Wearing History. And then I had purchased another Edwardian Rose corset cover pattern, which I’m currently purchasing laces to use for it. And it seems I also collected all the fabrics I need for making the Truly Victorian TVE 14, 1911 petticoat. Too bad that’s not cut out.


 The Edwardian Rose pattern has extensive and well-written details but my brain cells get overwhelmed trying to comprehend them. I’m more of a visual learner, so after reading them (ok, not all of them), I played with the pattern. The first thing I did was work out that shoulder line by folding it in half.
The lace inserts and contrasting trim are all sewn on top of your fabric. The shoulder piece is laid over the top of the V-shaped opening and the raw edges will be covered with your contrasting trim. I skipped a lot of marking this and that, using quick marks by chalk, a pin, or even a couple thread stitches. When I got to adding the contrasting black trim to my sleeves, I decided I wanted to do just one row of it, instead of the two. I also added a tiny cuff of self-fabric to finish off the edge of lace.
While preparing the shoulder lace inserts, I’d read that it should be lined, so naturally I lined it in white cotton to match it. Except when I sewed it and the sleeve lace on, they didn’t match. The sleeve one showed the burgundy color through the lace, and the shoulder one was white. So out it came and a new one lined with burgundy replaced it.
This construction help page has photos that can help with all this. 1912 day dress construction help


I haven't read far enough on the pattern yet to see what it says about the button closures. But I just chatted with Molly about her button closures on her dress. The pattern calls for a side opening on the skirt which is attached to the bodice, and the bodice opens in the front. So my brain says it wants to make the skirt open in the front with a placket. Molly confirmed that’s what she did. AND!!! She didn’t make buttonholes to close the bodice or skirt. They close with snaps, a totally period technique. The buttons are strictly decorative. Wow, that’s a lot less work.

Now onto my skirt. I need to mark the darts on that first. We’re making progress here, little by little. Chloe approved of my work and left me a giftie on my pattern. Fortunately it's not a live mouse. 

                                                               ~~~Val~~~