This is a photo diary of my costuming "travels"; where I've learned and struggled to make historical costumes for myself. They're not always pretty, but always fun, most of the time. And I want to share with others what I learn along the way. **You can find me on Facebook, https://www.facebook.com/Time-Traveling-in-Costume-640703499399817/ or have my posts delivered to your email by signing up at the lower part of the right column.**


About Me

My photo
HI, my name is Val. I'm a member of Costumer's Guild West in Los Angeles, Dean of 2018 & 2024 Costume College; Past President of the San Diego Costume Guild, and a representative of the San Diego History Center. I also put on historical fashion shows for various groups. I make my own historical costumes but don't sell any unless I get tired of one.The eras I've made so far are 1770 up to 1918. My favorite is the 1880s bustle.

Followers

Tuesday, January 18, 2011

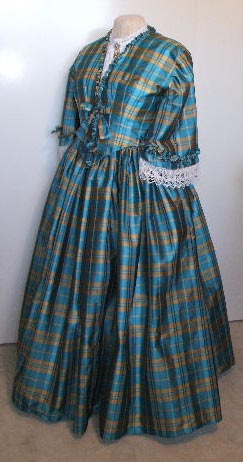
Completion of my 1850s Turquoise Plaid gown

This blue plaid gown was my inspiration.

I started this gown around December 14, and I’ve even amazed myself that I finished it in just a little over a month, and with a week to spare before I’ll be wearing it for the Riverside Dickens fashion show. Granted, I am retired, but everyone knows you really ARE busier after you retire, and it’s true. I also have a hard time keeping my nose to the grindstone when so many other things are calling to me.
I had a few problems when I used sleeves from one pattern company that had the shorter bell shape that I wanted for my other pattern. This is a closeup of the sleeve from the Butterick 6694 that I used.

I rounded the edges off so I didn’t have the points but the more I look at this pattern, the more I like the points on both the sleeves and the bodice. Oh well, next time.
The sleeves on this pattern fit higher than the ones on my Simplicity 3855 pattern so there was a lot of poofiness on the top of the sleeve cap. The Simplicity had a dropped sleeve cap that went 5” down my arm, where this one only went down 2”. In the end, I cut off the extra 3” on the shoulder of the bodice and it went in easier. It still has a little uneveniness but it was acceptable. I’m not a perfectionist, and if it works, I’m happy. Or just lazy.
And look! The plaids match! After reading an article by Diane Yoshitomi on Your Wardrobe Unlock’d http://yourwardrobeunlockd.com/ about matching plaids, I paid more attention to doing that. *Disclaimer- the skirt fabric's third panel doesn't match because I didn't have enough fabric to correct that.*


With only a month to make the gown, I didn’t have time to make new set of pretty undersleeves for this. I wanted to have a layer of lace on top of the cotton undersleeve, so I sewed a wide lace trim to the bottom of the sleeve cuff. I do have a plain pair of cotton undersleeves I can wear for now but eventually I want to make a softer prettier pair.
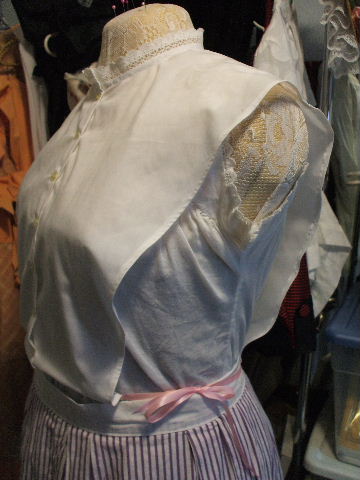
Once the bodice was pretty much constructed, I made up the little chemisette that comes with the Simplicity pattern. It was simple and quick, only taking me 4 hours to make. The waist is a bit too long for me, since I didn’t even think of checking the fit but since it does under the bodice, that will never be seen. A simple correction will just require turning the bottoms up farther for a new ribbon channel. I used a fine cotton for the chemisette, vintage mother of pearl buttons, and a cotton crocheted lace on the neckline.

And we must have trim! Lots of it! I made a 1” wide ruffle from the plaid fabric, machine gathered it, and sewed it around the neckline and down the front by hand. Then I went around the cuffs. Ok, stop me now.


I made one big bow to pin at the bottom of the V front. Then a friend suggested a second smaller bow just below it. I also made a set of the smaller bows and put those on the sleeves just above the ruffle.
My skirt was just 3 panels of my 60” wide fabric, and cartridge pleated to a narrow self fabric waistband. For this show, I’m wearing a tulle crinoline petticoat for the fullness, with a flounced cotton petticoat over it. Later I want to make a corded petticoat to wear instead. I had one but it didn’t have the fullness this skirt needs.
My accessories will be an antique brass Victorian pendant with a small cameo on it, and my navy blue bonnet made by Mela Hoyt-Hayden from her Young Victoria collection. I’ll be wearing a white lace day cap under it. Tomorrow I have an appointment with a hair stylist who is going to style a long straight wig into a proper hairstyle of the era for me. She’s as excited as I am.


Last night, and with only 4 days to spare, I finished the gown. Of course I’m already wanting to tweak a few things, but that will have to wait until after this weekend. And now I can start on the black mourning version of this pattern.

Monday, January 17, 2011

Ruffles and Petticoats introduction

Two months ago a friend of mine and I decided we wanted to start making affordable Victorian and Edwardian underpinnings and sell them. I wanted to do just petticoats, and she was going to do chemises and drawers. Someday we may add other accessories but since we're pretty busy making our own costumes, this is just a sideline for both of us.
I decided I didn't want to make plain white petticoats but have them in fancier colors and patterns. I'm just making cotton ones right now, and each one has a ruffle with a pretty trim at the bottom. I'm making them out of pastels: light blue, sage green, pink, and lavender, and have fabrics with polka dots, tiny florals, and stripes ready to be made. Many will be one of a kind depending on fabrics I find. These are all machine sewn.
My Victorian petticoat is flatter in the front, and pleated in the back to accommodate a bustle, but not the very large ones. My late Victorian and Edwardians are pleated all around for a flatter silhouette.
These are sold as finished items, not custom ordered. My petticoats are $35.00 plus shipping. Once we get a good stock of them made up, we plan to have a location where we'll just post photos of them to sell. In the meantime, here are some that are ready for sale now.
This is a closeup of the trim on one of them. The trims may vary according to the availability.

All of these have a waist measuring 36-38" but can be made smaller since the excess ruffles would remain in the back; or about 3" larger but having a gap at the placket, which obviously would be covered by a skirt.


Sage green:

Light blue:

Pink Floral: SOLD

Lavender:

I am selling them now. In fact I sold my first one at our last San Diego Costume Guild meeting and she's very happy with it. They come from a smoke-free house, although my cats do help in the sewing.


If you're interested in one, email me at cinnamonhrts AT yahoo dot com. I do have Paypal.

Monday, January 3, 2011

Dia de los Muertos in Old Town San Diego


This event was last Nov 1, and I was just reminded about it. It also gives me something else to write about.
The Dia de los Muertos is a Mexican celebration, the Day of the Dead. It's the day after our Halloween, and honors those who have passed on, and they build memorials to them. These aren't religious altars as some people think, but memorials, and they had them all over Old Town during the celebration.
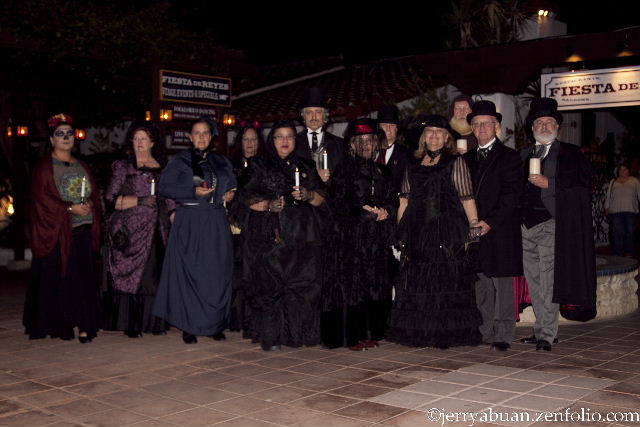
I had talked to a couple people running the Candlelight Procession that starts at the Whaley House, and goes to the El Campo Santo Cemetery up the street. They ended up asking if any of us would come in mourning costume and lead the procession. It was the first year they were doing this, and were really excited to get off to a good start. I wore my 1870s purple floral polonaise and an antique black lace mourning veil that I'd bought at the Johnson House in Old Town.
We had a very large group from our costume guild show up over in the marketplace.

We began the procession in front of the Whaley House, and our group stood on the porch waiting to lead the crowd of about 200 people carrying candles in the Procession. Many of us brought battery operated candles to carry.

While I was standing there waiting, I was next to a column, and near the edge of the steps. I felt someone push my shoulder like they wanted to get past me. But I turned and no one was there. I thought then maybe I had bumped into the wood column but I was about 8" away from it. So apparently one of the ghosts of the Whaley House was anxious to get by me. It didn't bother me, as I've loved the House since I was in elementary school, and first went on tours there.
Later we arrived at the cemetery, and gathered around some of the graves for photos.

The whole event kind of fell apart then because there wasn't anything planned other than going to the cemetery. But next year they've asked us to portray actual people, and hopefully the program will be a little more rounded out. This is one of the events I'm working on my 1850s black mourning gown for.
These are some of the altars around Old Town.


Tuesday, December 14, 2010

1850s turquoise plaid dress- My “Young Victoria” gown

I’m in the planning stages of a new project, and I always get really excited at this part of it. I am really hoping I’ll get this made in time to wear it in the Riverside (CA) Dickens Fair fashion show. It’s a month away and if the fitting goes well, there’s a chance I might be able to finish it. I plan on using a purchased bonnet I have so that won’t slow me down.
I was very impressed by the gowns in the recent movie of Young Victoria, about the young Queen of England. This led me to start searching for actual photos or drawings of gowns from the years around late 1840s to 1850s. I really liked the bell shape of the skirts at this time, and saw a couple with a deep V in the neckline, with a pretty chemisette under it. I was really excited when I came across this photo of Queen Victoria in 1845 holding the young Prince Edward. And she was wearing the deep V neck that I so liked. I can’t tell what color her gown is but it looks like a solid with no pattern design.

I knew I wanted mine made with a plaid after I saw this fashion print.It’s trim along the V-neck is scalloped and matches the scalloped tiers on the skirt.

And the clincher was this blue plaid. I love these sleeves with the lace ruffles and smaller sleeve sticking out on it. It’s similar to the green plaid but has a fringe as it’s trim along the V and the sleeves.

These are other versions of a similar dress, and also gives me ideas for hairstyles, which I’m going to try with a wig of long straight hair.


I saw this Simplicity 3855 pattern made up, and other than the very large pagoda sleeves, it was exactly what I wanted. And I found the silk taffeta plaid I thought would look good with it.


My skirt won’t be the same shape as this pattern, but a narrower bell shape which gets its shape from a corded petticoat under it. I may not have that done in time for the fashion show and I’m hoping my ruffled petticoat will support it enough until I get one made.

Sunday, December 12, 2010

Another wearing of my 1860s olive green gown


Last night was our costume guild's annual Xmas dinner where we go to a restaurant in Old Town San Diego during their Holiday in the Park event. The Old Town Park is a living history museum with the town preserved back to it's original buildings. It burned down in 1873, and is a rough Californio settlement. During the Holiday event, everything is decorated for the holidays as it was back then, with tours and singing. Some of the little shops are our favorites, like the Johnson House which has costume accessories. We've bought hat forms, jewelry, shawls, vests, and other things they've gotten in that work with our costumes. It's not all historically correct but still a fun place and so pretty. Then there's Capt'n Fitches who carry all the Dover fashion print softbound books. The stores give guild members a 10-20% discount on everything, so we do all our shopping on this night.
Then we had our dinner at the recently renovated Cosmopolitan Hotel in their inside courtyard.
I wore my olive green 1860s gown, and added my antique fur muff (which includes the fox's head, who is named Oscar).


We stood out in front of various buildings, and were swamped by the public taking photos of us. So we had a chance to enjoy everything and the public enjoyed us.

Here I'm sitting in front of the Johnson House.

This was our whole group at the restaurant.
The rest of my photos can be found in my Flickr album. http://www.flickr.com/photos/26036741@N00/sets/72157625583244074/

Sunday, November 21, 2010

Blinging up my caraco for Venetian Masquerade

Twice a year our costume guild does a Costumed Walkabout at the Del Mar Antique Show in San Diego. We’ve been doing this a number of years where we would dress in a different costume theme to entertain the shoppers. And of course, we shop there ourselves. We’re supported by all the vendors and get to win raffle prizes of gifts and gift cards to spend at the show that they and the producers donate to us.
Our theme for November 20 was Venetian Masquerade, and I planned to use my 1780s teal caraco and petticoat that I’d worn once at Costume College, but with lots of glitz and glitter added to it.

My caraco so far had pleated trim all around the edges & the sleeve cuffs, and looked very plain even the first time I made it. But I didn’t have time to take them any further before I left for the costume convention. So the only other decoration on it was a big cream silk bow on the front. I pretty much had a blank slate.
Because this was a fantasy costume, I had to keep myself from thinking “this isn’t historical” when I came up with an idea that clashed with period correct. I can’t believe how hard it was to get out of that mode. Even though I was wearing a 1780s gown, I didn’t have to stick to what was worn then. Unfortunately I came down with the flu and followed up with a cold the two weeks before our Walkabout, and my brain and energy went downhill. But I had a few ideas already and went with those.
My first idea was to hand sew crystal beads down the center of the pleating. But I didn’t like a straight line of them, so I sewed groups of 4, separated by an inch. In looking at the photo, they looked like a dotted line.

The next idea was to add pearls to it. I bought some strands of fake freshwater pearls and separated them, then sewed one between each group of crystals. They broke up the line and gave it more texture.

I had enough of the crystals and pearls that I was able to continue them down to the bottom of the pleats to the hem but if I decide to continue around the back & maybe around the sleeve cuffs, I’ll have to buy more. I also made a new set of lace flounces for the sleeves. At first I thought they were too long but after looking at pictures of some, I knew they weren’t. But my fears proved correct when I got BBQ sauce on them later.
I was digging through my costume jewelry collection for a brooch to use on a headpiece and saw a teal glass brooch that needed to be on the caraco so I put it on the back between the two pleats. The pin broke off while trying to pin it on, so I had to baste it on.


I had a freshwater pearl necklace that I wore with this last time but I wanted something that would hang in the open area of my chest. So I found a silver and glass rhinestone necklace at Icings.

The only other addition I made to my costume was a headdress to wear on my wig. I’ve tried added feathers to my hair in the past with hilarious results (like a helicopter ostrich feather pointing in opposite directions every few seconds) so I bought a glittery silver plastic headband to attach them to. I only had two days left to complete this and had to resort to buying two ostrich feathers from Michael’s for $6.99 each, which really hurt, but ended up not using them because they wouldn’t lean over like I wanted them to. So I used two white feathery Xmas decorations I had and taped them to one side of the headband. While at Michael’s, I also bought a tall Xmas pick of large white pearls that could curl over my head, and attached that to the headband. On the opposite end I attached a piece of jewelry with a drooping pearl. I say attached, but that took some doing. First I used a white floral tape to wrap the feathers, pick, and jewelry on, but the tape was dry and wouldn’t stick. So I used Scotch tape around those but that wouldn’t stick. In the end, I tied thread around each wrapping, and it looks like everything held together because it all still looks intact after wearing it all day. Since my necklace was silver, I couldn’t wear the gold and pearl earrings I’d planned on, so I wore hanging double pearl earrings, and both my pearl bracelets.


This is a photo taken with my camera at the event, and our group photo. Our photographer took a lot of pictures of me so I hope for more detailed ones later tonight.


In January, we will once again be doing our Steampunk theme, which was so popular with everyone last January.

Friday, November 5, 2010

The wearing of my Carmelite nun costume

Last weekend was the debut of my nun costume at the Felicita Park Renaissance Fair in Escondido, CA.
***EDITED TO ADD: I was reminded that I didn't include my inspiration photo of this costume. On a website about the Carmelite nuns was a photo of an older outfit that I liked the color on and wouldn't be the usual black and white that we're used to seeing. It also seemed to me to fit into a Renaissance time period with its earthy colors.
I still had to make a wimple to wear under the cap and veil but that didn't come with the pattern so I had to make one up myself. Since the only part that's visible is around my face and under my chin, I didn't need to do anything elaborate. I used a large rectangle of white cotton fabric, folded about 1 inch along one edge that goes under my chin, attached some white grosgrain ties at each end and tied that on top of my head. I pulled it tight enough to fit snuggly under my chin. Then I put on the cap, which the veil is attached to on the top, and used bobbie pins to attach the wimple to the cap by my temples. The bottom was tucked inside my robe. It worked really well but has a tendency to loosen up after time and gets a little baggy under my chin. But overall, it looks good.
When I arrived at the Faire, a couple attendants who were parking us asked was I wearing a costume, or was I really a nun? I pointed out that nuns don't wear makeup or lipstick. Later a lady working in a booth told me she was an ex-nun. I asked her how I did, and she said "spot on". So I guess I did a good job on it.
I had a friend of mine take some photos of me in our encampment where our guild displays costumes we've made to the public. Even though this was taken on Halloween Eve, the skeletons are our year-round models for our Guild's costumes.