This is a photo diary of my costuming "travels"; where I've learned and struggled to make historical costumes for myself. They're not always pretty, but always fun, most of the time. And I want to share with others what I learn along the way. **You can find me on Facebook, https://www.facebook.com/Time-Traveling-in-Costume-640703499399817/ or have my posts delivered to your email by signing up at the lower part of the right column.**


About Me

My photo
HI, my name is Val. I'm a member of Costumer's Guild West in Los Angeles, Dean of 2018 & 2024 Costume College; Past President of the San Diego Costume Guild, and a representative of the San Diego History Center. I also put on historical fashion shows for various groups. I make my own historical costumes but don't sell any unless I get tired of one.The eras I've made so far are 1770 up to 1918. My favorite is the 1880s bustle.

Followers

Tuesday, August 31, 2010

1895 Pink Mary Moore traveling suit

Started Aug 13, finished Aug 26, 2010.
I had admired an 1895 painting of Mary Moore, and her pink suit. It’s a very elaborately decorated bolero jacket and skirt. I had plans on trying to either recreate it or use it as an inspiration for a similar gown.


When my costume guild and vintage dance group decided to go to a Toulouse Lautrec exhibit in the Museum of Art in Balboa Park, San Diego, I knew this would be perfect for it, as the date spanned 1880s to 1901. Others would be actually copying gowns from his paintings.
The fabric in the painting is probably a silk since it looks pretty soft, and it has a clover soutache design on the jacket front and down the sleeve arms. It also looks like it has something sparkly on them.
I ended up making more of a day dress out of this idea. I bought a dusty pink lightweight upholstery fabric on sale that had a good weight for making it. I used Butterick 5232 for the bolero style jacket, and Truly Victorian’s 291 for the walking skirt. I already had a lace insertion white blouse to use with it.


I chose the Butterick bolero pattern over TV’s similar one for ease of making, since I only had two weeks to finish it. And I don’t really like the big leg of mutton sleeves. The skirt was a fairly simple one to construct.
After sewing the bodice together, I sewed the collar to the outside. I did a bag lining out of ecru cotton and sewed it to the bodice. The sleeves were sewn in next. The first set I lined but they kept making the sleeves twist with my blouse on, and I remade them without lining.
I set the sleeves in with pleats but one sleeve kept twisting around again, and after the 5th time I finally got them to sit right. They still need something inside the sleeve cap, like a stiff tulle, to poof them up.


The jacket fit very nicely, but it kept flying open so I added some fabric bars across the front with some brass buttons. At some point, I plan to hand sew a similar soutache design around the jacket and sleeves like the painting, and possibly on the front of the skirt.
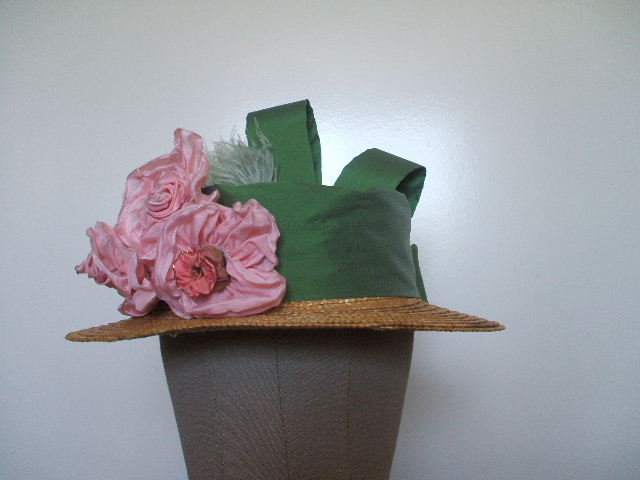
For my hat, I started with a plain straw boater, and used this picture as my inspiration.


I knew I wanted to add a pop of color, and since the combination of pink and green had been influencing me recently, it seemed the perfect color to add to it.
I used some green silk taffeta and wrapped it around the crown. I sewed three long tubes of the fabric and then slid a narrow strip of buckram inside each one. I folded them in half, and sewed them & a bow to the back of the hat. The buckram kept them all up at attention. I had three pink silk flowers I’d purchased a few years ago, and pinned those to the front.
Voila!


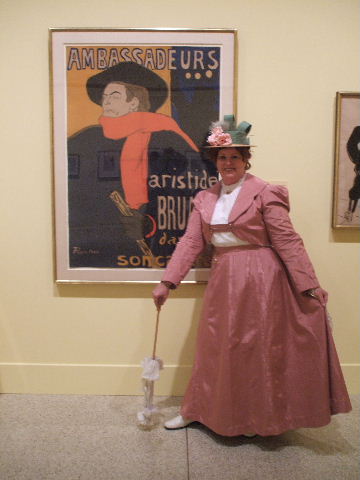
I was able to get lots of nice photos of me in this outfit this time. This was a group photo from the Toulouse Lautrec exhibit, & one of me in front of a well known poster by Lautrec.


We went to various posters & sketches, and copied the poses of Lautrec’s models.If you look at the painting in the background, you will see that we posed in front of them to recreate them. The attendees to the exhibit really enjoyed seeing that.


My favorite photo, taken by Jerry Abuan (http://jerryabuan.zenfolio.com/) was next to a sketch of opera singer, Louise Balthy. I was surprised that she had the same hat design as I did. You can just barely see the ribbon loops on the top but it was quite clear standing 10 inches away from it.


And another favorite photo by Jerry Abuan.


Wednesday, August 25, 2010

Edwardian Black and White Reception Gown

Started March 15 & completed July 28, 2010
I fell in love with a gorgeous Edwardian gown worn by Emma Thompson at her wedding reception in the Merchant-Ivory Production of Howard’s End about ten years ago. It wasn’t until last year that I felt confident enough that I could try and make it. I gave myself a year to plan it, find a pattern I could use, and the fabrics and laces.

I planned on using a black and an ivory silk taffeta, with multiple lace overlays. The pattern turned out to be the hardest. There is no pattern for this dress. I knew I would have to cobble one together, and fortunately I had just finished making a skirt from Butterick 4092 (skirt is high waisted). For the bodice, the closet thing I could find was Laughing Moon’s Titanic era dress.


I sent this question to Your Wardrobe Unlock’d, an online magazine:
"I'm attempting to "copy" an Edwardian black and white gown worn by Emma Thompson in Howard's End, which I've attached photos of. The skirt was no problem since there was already a Butterick pattern out that was similar. It's the bodice that's confusing me. Since I don't know how to grade or scale up patterns from a book, I'm at the mercy of pattern companies. And any coverage of this period of dress is sadly lacking.
The bodice appears to be in three layers, and the closest pattern I've found to mimic this is Laughing Moon's 1909-1913 Day & Evening Dress. I need help dissecting this bodice, and how to achieve this layered look. I wondered if I could possibly make it with a single layered bodice with the lacy under-blouse separate. The under-blouse might be easy but the over-blouse is confusing." *As of 8-24-10, I never received an answer*

I decided to make the bodice all one piece, and just attach sleeve bits to each other. To have the appearance of a higher-waisted skirted, I’m making a pleated cumberbund from the black silk taffeta to close in the back, possibly with more of the same buttons going down the skirt as decorations.
Video clips of the movie can be seen here: http://www.criterion.com/films/1515
Since I'd made the skirt pattern before, it went together quickly. I sewed some antique black glass buttons down the front panel of the skirt.

I made the bodice using the base pattern from Laughing Moon, then layered lace yardage over the front just to the center panel seams, & and sleeves. A black cuff of silk taffeta was added to the underside of the sleeves.

Then I started adding other lace trims to the bodice and sleeves. Each were hand sewn to the bodice. I attached strips of blk silk taffeta along the seams but brought it to a point in the front and back. Then layed the outside lace over it. Finding lace for the bodice trim has been the hardest part. The "white" taffeta is more ivory & all I could find was white or cream lace, no ivory, but I finally found a couple that matched the ivory pretty well. I ran one row of 3” wide lace down the front and the back. Another type of lace was sewn along the front insert of the bodice, and over the black sleeve cuffs. A third sleeve cuff, made from a silk chenille dotted fabric was sewn to the underside of the black cuff.

I made a cumberbund to go around the upper part of the waist with more black silk taffeta. I cut a 12” wide strip long enough to go around me, and did 1” pleats on one half of it, then folded it in half (inside out). I sewed it closed with an opening to turn it right side out & the pleats show to the front. This will go around my waist on the white bodice, and close in the back. I plan on using more of the black glass buttons on the back & front of it for decoration.


A millinery friend, Lynne Taylor, described the hat as black velveteen with ivory silk tafetta over the crown and swirled up into the poufs, narrow black feather on one side.


I used a black felt hat and covered the crown with a large circle of white silk taffeta. I sewed 3” wide tubes of the same fabric, opened them up and folded them into large poofs on my hat. The fabric had enough body that they stay up, and if they get crushed, they can be poofed right up again. I totally forgot I didn’t have a black feather on it when I saw photos of myself wearing it, and looked at the original again.


I wore this outfit at the Gala at Costume College on August 7, 2010. *Photos are courtesy of some of my friends*


1780s Teal Caraco- Finished!

Started May 2010/ Finished August 25, 2010
Due to “time management, I wasn’t able to finish both caracos as planned. Since I was further along on the teal jacket, I decided that was the one that would get finished first and worn at Costume College.
I sewed the lining in by machine except along bottom edge, which I sewed by hand. I made a pleated self fabric trim to go all along the edges and cuffs. I used a 3” wide strip of fabric & lightly ironed it in half along the length for a center to fold the sides into to have a finished edge on both sides. The pleats were made with a 1” wide metal ruler, pinned, then sewn down the middle. I decided to baste the pleats to my jacket in case I wanted to do something different later.


At the last minute I decided to make a pretty apron to go over the petticoat. Last year I’d bought some machine embroidered sheer silk at Home Fabrics in the Garment District, after finding it while shopping with Angela Burnley (of Burnley & Trowbridge) & Janea Whitacre (of Colonial Williamsburg). They both confirmed it was exactly the right material for fancy aprons. I just used the width of the fabric with a prefinished edge, added a waistband of 1” twill to the pleated waist, and sewed a tiny rolled hem on the bottom. Et Voila! I loved it! It added a nice icing to the cake.
On August 6, I wore it to the Ice Cream Social at Costume College, where we had an 18th Century theme. My only accessories were a double row of fresh water pearls, teardrop pearl earrings, and a small feathered peacock & peacock feathers in my hair.

Tuesday, July 20, 2010

Turning your blog into a book

A few months ago I noticed a link on my blogspot dashboard offering a way to turn my blog into a book, either soft- or hard-bound. It's not through a publisher, but a printer. I saved the link, thinking at some time I'd like to be able to have all my costume documentation printed out in hardcopy just in case blogspot ever crashed or lost all my data. It would also give me an opportunity to show others my work if they weren't able to see it online.
The printing website: http://blogspot.sharedbook.com/blog2print/googleblogger/index.html   gives you an opportunity to play with a prototype of the book up to a point. This gives you an idea what it would look like. Then if you log in, you can go further and play with it more. You can even get to your final book, and see how many pages your blog actually has, and what it will cost you, w/o any committment. It also saves your work so if you decide you don't want to go further at this time, it will be there waiting. No sales pitches.
If you decide to try the sample, please note---for the number of posts you want included, instead of the time span choice, click INCLUDE ALL if you want your entire journal to be included. I tried the time span, and just kept getting only three posts included in my sample.I don't know yet how to do specific dates but they have a very good helpline email & phone number.
My blog, up to a couple days ago, came to 55 pages. The first 20 pages cost $14.95, which is the minimum order, and additional pages are 35 cents each. My total cost was $27.55. I chose the soft-bound copy which is a laminated cover.
I sent in my order and received it in less than a week. I was really impressed by it. It's a well made, nice sturdy cover, and the colors are true to my photos.
The only downside I saw was the text and photos are put into a space saving format so sometimes the longer text shoved my photos down so you may be reading about a photo but it's on the next page. I think it kind of just followed how I had it in the blog. But the layout is very nicely done. It looks professional other than that. I remember seeing something while I was doing this online where I could have done some further editing but I'll save that for next time. It wasn't bad, and I'm not up for a book award.
And there will be a next time, as soon as I get enough posts to make another one.
This is my book:

Tuesday, July 13, 2010

Two more costume events

On July 5, the San Diego Vintage Dancers held a Ragtime Tea Dance on board the Berkeley Ferry in the San Diego Harbor. Even though I don't dance, I love Ragtime music, so I went to enjoy that with my friends.
I wore my 1918 blue and white outfit and wanted to wear a red ribbon on the neck in honor of Independance Day but couldn't find any in my stash.


I even got dragged out on the floor to dance a couple times.


*Photos were courtesy of Jerry Abuan*
My 1918 Armistice blouse got a couple admiring compliments, including two who thought it was vintage. Way to go me!
****************************************************************************


On July 9 I had a chance to wear my Purple Polonaise again, one of my favorites, at the Grand Opening of the Cosmopolitan Hotel in Old Town San Diego. They asked a couple costumers to come in period costume as eye-candy for the event. The period ran from early 1800s to 1872 when the original Old Town burned down. It was supposed to be evening dress, and since my 1870s was the ONLY evening dress I have at this point, well, there you go.
*Note to self- make MORE evening gowns.*
My friend, her husband, and I went together, and I think we had our photos taken more than anyone else there. And I'm reminded that I LOVE purple.


Monday, June 14, 2010

18th Century caracos (jacket)

Started May 2010
I hadn’t planned on making something new for 18th century just yet, but when an event at our upcoming Costume College came up, well, I just had to. After all, I couldn't wear the same thing as last season.
The event is actually the opening ceremonies for Costume College, and this year will be an Ice Cream Social with a request for people to wear their 18th C outfits that we might have made after last year’s 18th Century theme for the entire convention. A lot of classes were focused on that era.
I knew I wanted to make a caraco but I also wanted the skirt portion of it to be shorter. The longer length made my 5-5 height looked chopped off and stumpy. I used JP Ryan’s pattern, & I shortened the pattern by about 12”. I also plan to add the ruffle to the petticoat.

I had a hard time deciding what color of fabric to use, and saw a dark teal colored silk taffeta that would work. I also had a sage green and ivory embroidered silk that a friend had given me for making a pet en lair. But I opted to use it for a caraco also. Yes, once again, I am making two at a time. I’m hoping maybe they could use the same petticoat, and after asking for suggestions, ending up choosing an antique white. I’m not sure yet if that color will work with the green and ivory one, since the ivory is a little whiter.
So far I have the fabric bodices sewn together, and am currently sewing the linings together. I’m hoping to hand sew them into the bodices while I’m on a trip.


My plans for trimmings on the teal are a pleated ruffle all around the caraco’s edges, and on the sleeve ends. Maybe a bow in the center of the stomacher.
For the green and ivory one, I’m not sure. I’d like to use sections of the embroidery to emphasize it somehow.