This is a photo diary of my costuming "travels"; where I've learned and struggled to make historical costumes for myself. They're not always pretty, but always fun, most of the time. And I want to share with others what I learn along the way. **You can find me on Facebook, https://www.facebook.com/Time-Traveling-in-Costume-640703499399817/ or have my posts delivered to your email by signing up at the lower part of the right column.**


About Me

My photo
HI, my name is Val. I'm a member of Costumer's Guild West in Los Angeles, Dean of 2018 & 2024 Costume College; Past President of the San Diego Costume Guild, member of Orange County Costume Guild, and a representative of the San Diego History Center. I also put on historical fashion shows for various groups. I make my own historical costumes but don't sell any unless I get tired of one.The eras I've made so far are 1770 up to 1918. My favorite is the 1880s bustle.

Followers

Sunday, May 26, 2013

Have You Heard of CADD? I have it.

5-26-13
If you’re a costumer, you probably are very familiar with CADD or are already a member of the club.
C.A.D.D. is Costume Attention Deficit Disorder.  The main requirement is you are easily distracted by pretty-shiny-lacy-costumes-fabrics-patterns. A side effect is probably whiplash.

If you're a regular follower of my blog you probably already know my costume interests vary widely and not always at the same time. I lean towards the 1880s bustle period but bounce back to the 1830s or early 1900s at the drop of a hat; or as a squirrel runs by. Sometimes all at the same time too. I am a card carrying member of CADD.
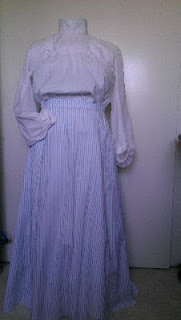
A few weeks ago while having a burst of creativity I cut out three skirts and blouses from the 1890 and 1905 period. Yes, at the same time.  Remember my “Assembly Line” method?  The skirts are basically all sewn the same way. They’re very wide and I cut all my patterns out on a cutting board on our bed.  I used Truly Victorian’s patterns for both, and their 1903 Plain blouse waist.  The 1890s is for my Seaside outfit I’ll be wearing to Costume College.  I’m thinking along these lines. 
I bought this blue & white striped cotton fabric years ago at Michael Levine’s in the LA Garment District. It was in the shirting section and had a nice weight to it, not a shirt weight at all.
At the same time I cut out three 1903 blouse waists from white figured cotton voile, white dotted Swiss cotton, and a purple floral silk voile, (which is for another outfit for CoCo).
I’m hoping one of the whites might work under my bodice for the 1890s since it’s mostly covered up. I didn’t want it plain so I dug out some crocheted lace from my stash to put on the neckline. I marked the fabric by ironing creases down the center and across to have lines to lay the lace on. I don’t know how to miter, so I used my cheater method of laying the vertical pieces down first, then the horizontal piece across them, turning the exposed edges under. Then I topstitched with a midsize stitch length across all sides. 
 

I repeated the lace around the neckline and sleeve cuffs, although I forgot I wanted to make this as three-quarter length sleeves but I can do that on another one I have cut out. J  I put a little bow on each corner of the lace square, and plan to use some vintage shell buttons I have from my Aunt Doris’ sewing box on it.
 
I guess I’d better check if I have a petticoat that will work under the 1890s skirt.
So that’s it. You got a sneak peek at one of the outfits I’m working on. 

Thursday, May 23, 2013

A Shortie Chemise

May 12, 2013
One of my favorite tools when making my costumes is to get inspiration from either extant clothing or ones other people have made. 
I’ve needed a square-necked chemise to go with a couple of my costumes that had square necks that I couldn’t wear a regular round neck chemise with. I mostly had to resort to one of my Regency ones that tied loosely and could hang down off my shoulders. But that’s about 100 years out of style. So what’s a girl to do?
Last weekend while attending Gaslight Gathering Steampunk & Victoriana convention, I went to a panel on Steampunk Travel after reading about the description my Facebook friend, Karin, who was on it, said about it. “Have you ever considered travel in the Victorian Age as it compares to today...or in the Steam Future? Bringing an antique travel trunk filled with history: what a Victorian/Steampunk should bring for travel, from antique dresses to underpinnings and accessories to display and amaze. Come travel with us!"
It was well worth going to it because Karin had some beautiful antique dresses and underpinnings with her that I tried to take photos of as much as I could. The drawers she reproduced with blue ribbons really caught my eye. Here’s some of her pretty eye candy. Some of these Karin had reproduced from the originals. 


One of the items that caught my attention was a short chemise that looked like just went to the hips. Unfortunately I didn’t get a photo of it. But I came home with a plan. I needed to make some more underpinnings. Later I found a photo of an extant short chemise that comfirmed this was workable.
I found one of my older petticoat patterns, Simplicity 7157, that had a nice square neckline.
I first thought to just shorten one of the long petticoats but then noticed the short “bodice” one on the right that was for a pair of combinations, and it looked much easier to make without all the Princess seams. So I copied the bodice portion, adding 4 inches to the bottom to make it longer. Instead of the buttoned front, I changed that by cutting it on the fold.
I had about two yards left of a white cotton voile with white designs on it that I’d used for a blouse, so I was able to cut two short chemises out of it instead of one longer one.
When I first tried it on, the front was too loose. It was ok that the whole chemise is loose but the neckline was very baggy. If I was going to do a drawstring neckline that would be fine. But I wanted it smooth so I could put some pretty trim on it. I made a 1 inch seam in the front fold and topstitched it. I also did French seams on the shoulders. After all the seams were done and I was satisfied with the fit, I did a staystitch just a little over 1/2 inch along the raw edges of the neckline and armholes. I used this to turn the edges under to hem them.
I sewed some lace from my stash on the neckline by turning under the top edge, laying it on top of the lace, then topstitching it. The bottom of the lace covered the raw edge. For the armholes and hem I just turned under the edges a quarter of an inch and machine stitched them.


I kept the neckline loose so I can pull it down more than it shows in the photo, which will work better with my square necklines on some of my dresses. I think now I have something that can be made when I only have a yd or so left of some of my white cottons. If I have enough I may make them a little longer. But I can always use more chemises.


Sunday, May 19, 2013

Do I Like Natural Form?


May 5, 2013
Another dress done and another fashion show over. This year’s Gaslight Gathering Steampunk & Victoriana convention in San Diego held its Fashion Show & Tea on Sunday where we dressed as “Ladies of Sports & Leisure”. It was a lot of fun. All the ladies picked a sport or leisure activity from the Regency, Victorian, or Edwardian era and put together a dress or outfit, along with the necessary accessories to demonstrate it. There were 18 of us, some wearing two outfits, and over the months went back and forth and traded with our themes. We had tennis, fencing, archery, equestrian, dancing, and many others.  We had twenty-four outfits modeled. I worked with Cindy, our manager and narrator, on a printed program to give to the guests with each model’s name and description for them to follow. There was a little teacup charm attached to it with a ribbon too.
 I wanted another chance to wear my 1905 Pink Floral gown and serving tea as a leisure activity was obvious for me. I planned on carrying a teapot and walk around the tables “pouring tea” as I modeled my dress. And then later I came across the photo of a lady photographer in the 1870s that inspired me to make a gown for it too. About a month before the event I switched my theme of serving tea to sewing, because THIS is what I do, and women have always done. How could I have forgotten that?
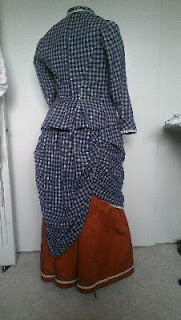
I only had to make one new outfit, the 1878 gown for the photographer. This was the Natural Form period, which I’ve never worn. I really like bustles and poofy skirts but I wanted to try something new. And it had the tailored look that my lady photographer had.
 My patterns & fabrics were shared in an earlier post but to reprise them, they were Truly Victorian’s 428- bodiced jacket, 324 long draped overskirt, and 221 for the skirt. This narrower silhouette of the late 1870s to early 1880s was called the Natural Form. They were without bustles and skirts draped around & showed the more natural form of the woman.


The jacket and overskirt were blue plaid cotton homespun, and burnt orange twill for the skirt. Later I found an ecru cotton crocheted trim to go on the jacket and skirt to tie them together.


Sewing the jacket together was fairly easy after having a mockup fitted to me at one of Shelley Peter’s sewing workshops. Getting over that hurdle has always slowed me down. This was also my second attempt at a lapel collar. I’m not sure if it was done the “correct” way but it looks good. I basted the collar to the jacket, and then sewed the facings over it. However since I wasn’t lining it and instead was doing facings along the edges, I ended up with a gap between the collar facings inside the jacket.


So after a chat w/ Heather at Truly Victorian, I just added a bit more fabric to close off the two facing edges. And no one will see it.
The sleeves only caused me to baste them in twice getting the excess fabric spread around the armhole properly. With it all constructed, I got to start adding my trims. I included a pocket on one side since “pockets” were all the rage at this time as decorative items, but I also needed to have somewhere to put my little preprinted photos that I would hand out during the fashion show. I used the ecru crocheted trim around the collar, the sleeve cuffs, the pocket, the bottom of my overskirt, and the bottom of my skirt to tie them all together. I used small dome-shaped navy blue plastic buttons I bought in the Garment District for the front closure and put extras on the pocket and cuffs.
 
Here is where I started to see some problems. I didn’t like the way the overskirt was hanging over the skirt, and it was caving in at the bottom. I made a new large ruffled petticoat that should have held the skirt out. Both the skirt & overskirt have ties in the sides underneath them and they’re supposed to be pulled to the back to get the narrow look. But I wasn’t getting it. After seeing some photos of me wearing it in the fashion show, I also didn’t like the limp look of the overskirt. And it haunted me during the entire time I was wearing it.


Instead of feeling like a graceful swan, I felt like a lump. Later I learned that I probably had it tied too tightly in back, and was also reminded about using the narrow plastic crinoline around the hem to hold it out. *Thank you for that reminder, Cindy! I’ve already sewn it in, and into another skirt I had similar problems with.  I definitely can see a difference*. The crinoline is found in the upholstery/curtain section in JoAnn’s fabric stores. Since my skirt was already hemmed and I couldn’t take it out because I’d sewn my crochet trim on top of it already, I just did a whip stitch on both sides. Cindy says she puts it inside her hem. Don’t you love it when we all share our special tricks?
I’m happy about my hat though! I used one of the last straw hat forms I’d bought from Truly Victorian years ago with the tilted up back.  I hand stitched a band of black taffeta around the brim, and also put a gathered circle inside the middle so it wouldn’t catch on my hair so much. I just love the frizzies I get on the top of my wigs from hats. *sarcasm*  I bought a couple flowers at Michaels in creamy gold color and burnt orange, plus a couple brown feathered plumes. I used large headed straight pins to hold everything in place while I was playing with all the trims.  I pinned a length of antique lace around the crown and brought the ends to the front crossing them over. After I got them to where I wanted them, I basted the lace on, then each flower and feather. I like to reuse hats so if the trim is basted on, I can just remove them later. I used two hatpins, one on either side pointing front and back to hold it on my head.


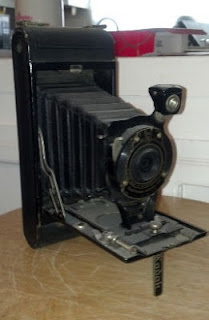
So I wore this outfit in the fashion show and carried an antique camera that our photographer, Jerry, loaned me to carry and “take photos” with. I carried a bunch of 3x5 size “photos” I’d printed of antique photos and as my part of modeling my dress as a photographer I walked around taking people’s photos and then handed them one of the photos from my pocket. It was a lot of fun rather than just walking around and displaying myself.


For my other outfit, demonstrating sewing, I wore my 1905 Pink Floral gown and carried a little SewHandy Singer mini sewing machine. I didn’t sew anything on it, just walked around cranking the handle. On the screen behind me you can see the antique photo displaying my “leisure” activity of sewing. Ha Ha!
 The day before the fashion show I also attended Gaslight and went to a couple classes. Instead of dressing in Steampunk this year, I decided to go with Victoriana, and wore my 1872 black polka dot dress that I got a lot of compliments on.  And this dress now has the same plastic crinoline sewn onto the hem so it won’t have the caved-in look anymore. 

My thanks to Jerry Abuan, and Kelley V. for the photos I used of theirs. 
Here are a series of videos taken of the fashion show by Marci Bretts. I was so happy to be able to see us all "in action". Thank you Marci! 

http://youtu.be/RoFBbIJExg4

http://youtu.be/Mtn9Dsn9NX4

http://youtu.be/zjDzdgaFd5g

http://youtu.be/2yLxnyg5vRM

http://youtu.be/th9PCqeQbi0


Friday, May 10, 2013

New Addition to the Family- A Singer Featherweight


May 10,2013
A couple months ago after once again lugging my very heavy Husqvarna sewing machine to another sewing workshop, I convinced myself that it was time to get one of the very light Singer Featherweight sewing machines. Many years ago when I was still in my quilting stage, and also going to sewing workshops, I’d admired those cute little black shiny machines that some of the other ladies brought. They only weigh 11 lbs, and the hinged extension table folded up for ease of storage.  But the $100 price tag was out of my wallet’s reach at the time      
The first one that really caught my eye was a red one on ebay. He was asking $600 for it. Not surprisingly it didn’t sell. Later I found out the machines were never produced in red. They only came in black, beige, and white. Any other color was a re-paint. But that didn’t keep me from drooling over the red one. Pink would be nice too. Oooh, a friend just shared a photo of a pink one she found.

 With the help of some friends, a couple promising ones popped up in stores and on ebay. But I was out of state at the time and I wanted to take my time. So now with a few more dollars in my wallet, and having it increased with some birthday present money from my Mom, I went on the hunt.  I even searched while I was with my Mom, and was shocked by the $400 prices I was seeing. Since I knew they could still be found for under $300, I kept looking.  In the meantime I started looking for information and history on these little beauties.  One of the best sources for information was on this Singer featherweight website. Singer Featherweight   They’re also known as SIMANCO (Singer Manufacturing Company)
I’m not really sure why some Featherweights are more desirable than others, as shown by how people are bidding on them on ebay. Obvious ones are in excellent condition, or from an original owner. And people seem to really want to know the serial number so they can tell what year it was made in that you can look up on the Singer website. Singer serial numbers   
You may also remember my earlier machine, the little baby Singer, also called the SewHandy, and I’m finding more information about those too.
 The Featherweight machines were manufactured in the US between 1933 to the mid-1960s. They also began producing them in Great Britain in 1947 at their Singer Kilbowie (Clydebank) plant in Scotland. They were extremely popular, selling 1.75 million. So this is why there’s so many out there. They’re great little work horses and not much can go wrong with them. The only parts that seem to wear out are the belt, needles, and light bulb. The easiest way to test them if they work is just sew something!
A few weeks ago my next door neighbor, MaryLou, called me and asked if I’d found my sewing machine. I told her I didn’t, and she said she was giving me hers and would be bringing it over shortly. !!!! What. What?!! Whoo Hoo!! 
This is the little beauty she brought over. The 221K white-green one! This is the primo one everyone wants. She’s the second owner and knowing her, it’s been well taken care of, right down to a little bag she made to hold the presser foot so it didn’t scratch the machine while it was in its case. The case was in great condition and is the original one but it was painted white. When she bought it the leather was peeling off. So her husband removed the leather and painted it white to match the machine. But it still has its green handle. It has a copy of the instruction manual, a book on Singer 221 Featherweights by Nancy Johnson-Srebro, some kind of presser foot, machine oil, bobbins and needles. I’m still looking around to see what kind of attachments it can use but I think the accessory presser foot is for gathering or pleating.


 This is what the case originally looked like. All the others were black.


I’m not sure where the serial number is. I’ve found a few numbers on it, but the bottom is covered and I don’t want to remove it just yet. Anyone that has any suggestions or answers, I’d welcome that.


A friend of mine, MaryJane, wrote to me about my machine: “I worked for Singer for several years and always wanted to own a Featherweight.  They just keep on sewing and sewing and are so reliable.  The green ones are especially sought after and the color is officially called Pale Turquoise.  Your neighbor must know that you will treasure this little beauty to give you such a valuable gift.  They are currently selling for up to $900 if in excellent condition.  This color of the Featherweight was made in Clydebank, Scotland and the belts on them are almost indestructible and the one you have probably has the original belt. If you are interested in learning more about your new addition, Nancy Johnson-Srebro wrote a whole book about the Machine entitled Featherweight 221: The Perfect Portable.  Singer also made a free arm version of the Featherweight, but these are extremely rare since they were made in England and not exported to the US at the time they were manufactured.” 
*************************************************************
If you’re interested in these machines, I found these bit of facts on each of these websites.
Originally launched in 1933 the Singer Featherweight model 221 was only made in the USA, until it finally stopped production there in 1957 after more than 1.75 million had been made. The similar Featherweight 221K was produced at the Singer plant in Kilbowie, Scotland from 1947 until the late 1960's after more than 350,000 had been produced.
By the early 1960's with sales of the classic black model dropping, the factory started to produce a new white model, the Featherweight 221K-7.
The white K7 variants ranged in colour from creamy white to ivory to ‘celery‘ or pale green-white. (Me- Also referred to as light turquoise).  221J tan models range from creamy beige to light brown. These are the only original colours produced, however in the US it is popular to respray them completely different colours with car paint!
Sew Muse  -----
Produced in Great Britain btn 1955-1964 in limited numbers by Singer in Kilbowie, Scotland.  
It was slightly lighter than the Black 221, having a shorter extension table, an internal toothed rubber belt linking the top and bottom gears and the later models had a full width foot controller.
Serial number on these machines is located underneath the machine. 
From this website:Possumjimandelizabeth.com    ------
The original drive belts on these machines were also white. It is acceptable to replace a drive with a new belt but the white belt should be saved in case you want to either display or sell the machine. The machine has a gold-colored paper with a red "S" medallion.
Pale turquoise Featherweights are quite different from the black and red ones seen above. White Featherweights are not nearly as fancy and the folding extension is much shorter. The machine is slightly lighter and quieter than a black model. These white machines are made in Great Britain. The serial number of this one is EV924169 indicating it was manufactured in 1964. We found it in Clarence, New York.
A number of attachments are available for Featherweights including buttonholers, zig-zaggers and walking feet.

  *This blog entry is dedicated to my friend, MaryLou, who gave me this beautiful work of art*