This is a photo diary of my costuming "travels"; where I've learned and struggled to make historical costumes for myself. They're not always pretty, but always fun, most of the time. And I want to share with others what I learn along the way. **You can find me on Facebook, https://www.facebook.com/Time-Traveling-in-Costume-640703499399817/ or have my posts delivered to your email by signing up at the lower part of the right column.**


About Me

My photo
HI, my name is Val. I'm a member of Costumer's Guild West in Los Angeles, Dean of 2018 & 2024 Costume College; Past President of the San Diego Costume Guild, and a representative of the San Diego History Center. I also put on historical fashion shows for various groups. I make my own historical costumes but don't sell any unless I get tired of one.The eras I've made so far are 1770 up to 1918. My favorite is the 1880s bustle.

Followers

Sunday, April 3, 2011

1860s brown bonnet

Yesterday while attending the Prado Civil War reenactment in Chino, CA, I was asked about the bonnet I was wearing and how I made it. After I told one person how I’d done part of it, I got home and found out I’d never finished writing it up on my blog. So, Mary, this is for you.
January 22, 2010
For my 1860s olive green gown I made to wear at the Riverside Dickens Fair, I wanted to use a straw bonnet with it, trimming it up inside the top of the brim, and some kind of fancy trim around the crown. This was my inspiration I used.

I wanted to have the high point at the top like a spoon bonnet instead of being rounded, so I placed a medium gauge millinery wire along the edge before I bound the edges. After it was sewn I bent it to the shape I wanted. *Test the strength of your wire to see if it will hold the shape*. First I sewed the millinery wire around the inside edge, using a wide zigzag stitch over it with my sewing machine. As long as you sew slowly, you shouldn’t have any problems. Then I pleated an antique white silk taffeta to go inside the bonnet, and pinned it in place to get the fit right. Line it up with the outside edges of the bonnet, with the excess down in the middle. You can trim off the excess. Make a round disk of the same lining fabric and turning the edges under, sew it on top of the raw edges at the bottom.


I machine-sewed a strip of the same fabric on the outside of the edge, then turned it over to the inside, and slipstitched it on by hand. I forgot to take a photo of the bonnet after I sewed and turned the edge over to finish the front. I slipstitched it to the inside lining.


I dug through my collection of millinery flowers that I find at antique shows and put a couple bits together for the upper brim. I basted these on. For the outside trim, I made a brown ribbon using a 4” wide strip of silk taffeta folded in half and sewn, closing off the ends at an angle, and leaving a bit open in the middle to turn it inside out. The finished width was 2”. Make it long enough to go around the top and then hang down on each side so you can tie it in a bow under your chin. I hand-tacked it through the straw frame, and decided I didn’t care that the stitches showed through on the inside & they wouldn’t show anyhow. *This could be done prior to lining it if you think of it in time.*


For the bavelot and bow on the back of the bonnet, I sewed more strips of the brown silk taffeta, similar to how I did the ribbon, but made the bavelot portion wider, about 8” which was folded in half. I hand-stitched these to the back of the bonnet along the lower edge. I made a pleated ribbon to go on top of the ribbon already sewn on by using a 4” strip & turning the edges under and towards the center so it had finished outside edges. The finished width was 2”. I machine-sewed down the center to hold them together. Then I tacked them down in the center through the bonnet frame.


For my side trims, I used some more of my millinery trims and sewed a sprig on each side and put small bows at the base of each one, this time using regular brown ribbon. At each point at the bottom of the bonnet, I sewed a narrow ribbon to tie under my chin, in addition to the regular bow to hold it in place better. Besides helping the bonnet holds its shape better, it also keeps the stress of your regular ribbon so it doesn’t untie as easily.


Here was the photo taken of me when I first wore it in Riverside 2010.

Friday, April 1, 2011

My album from Williamsburg


I didn't really want to put anything in my costume blog except writing about my costumes, but this time I'll make an exception. Because there's no way I could get all my photos in here.
I've uploaded all the photos from my week in W'burg to my online album: going to the Costume Accessories Symposium; visiting the Costume Accessories: Head to Toe exhibit at the Dewitt-Wallace museum; the muff making workshop; attending a private 18th c candlelight dinner at the King's Arms Tavern, and a private 18th c. musical presentation at the Raleigh Tavern. The last two I attended in costume, wearing my teal caraco but unfortunately having to wear an almost black wig since I left mine at home. My hair and wigs are more of a reddish light auburn. Oh well. The only decent photos I have of me so far were taken by Angela Burnley, so I thank you very much, Angela. This is what I was supposed to look like:

http://www.pbase.com/cinnamonhrts/williamsburg_2011

In the section with the photos from the Head to Toe exhibit at the Dewitt-Wallace, I left my sometimes blurry photos of the item's description to save me the typing.
Even though I went on private tours of costume collections at some museums, we were asked not to post photos of those online. However, I do plan on cropping bits and pieces of parts of them that I specifically liked and want to talk about, and incorporate those in my own costumes. But that's for later.
At the end of the second night of the two day conference that I attended, Janea Whitacre presented her program, All things Millinerial, with a wonderful "fashion show" that was the hit of the whole program. SO MUCH EYE CANDY! Most of the time the ladies were moving so it was hard to get photos from the stage that weren't too blurry but I think most came out. And we got to take closeups of them later. And boy, did I! To to the point of stalking one of them, a black Regency gown, that I think needs to be added to my wardrobe!
Please be so kind as to leave a comment there if you like. I'd love to know what you think, or that you enjoyed them. OR you can do it here.

Monday, March 28, 2011

1907 Afternoon Tea Gown from The Edwardian Modiste

March 28, 2011
A couple days ago I went to a small workshop to learn how to grade up patterns from the Frances Grimble book, The Edwardian Modiste (1905-09). http://www.lavoltapress.com/

I have two more of her books, The Voice of Fashion (styles from 1900-1906), and one of her newest, Directoire Revival Fashions (1888-89). Once I get the hang of this, I may invest in one or two of her other ones.


These books use an ingenious method of rulers cut to your size (the American System of Cutting rulers), which they recreated with vintage patterns. By following numbers marked on the pattern in the book, you use the rulers and mark the numbers on paper. Once those are done, it’s like a “connect the dots” game and you draw the cutting lines of your pattern. Even though this is supposedly cut to your size, it’s still highly recommended you make a muslin/toile to check the fitting. Also recommended is to pin the darts on while you’re wearing the muslin. Each book uses its own set of rulers, which are printed in the back of the book.
The gowns, suits, and underpinnings are like none available in the normal pattern companies, and I’m excited to make my first one. I chose a fairly simple pattern for my first attempt at this, a 1907 Afternoon Gown. It’s a kimono-type sleeve bodice and doesn’t require a lot of fitting. And the fabric I chose to use is a black with white polka dot polyester, which the instructor said was perfect for this. It will look cute with a white voile underblouse.

However, as we learned, all of these have a fitted underbodice which the outer bodice, the jumper, attaches to it which gives it its shape. So the first thing we did in class was to make our pattern for this. Once done, we cut out fabric for our muslin, and the instructor fitted those to us. It gave us a chance to learn and practice how to grade up the pattern.
While I was being fitted in my muslin, my instructor told me the upper portion of my bodice wasn’t fitting properly. I am very narrow in front from shoulder to shoulder, and short from my shoulder line to my bust line. It wasn’t a bad measurement or a mistake. I just had an unusual shape. So she drew lines on the muslin and told me to recut my pattern by tracing that onto it. I’m supposed to always use that upper portion of the pattern on any of patterns I grade up in the future. This was an “ah hah!” moment for me because this explained why I always have problems with the top portion of my bodices being too big, and sleeve caps hanging down too far, even further than those period correct ones. Instinctively I’ve been chopping off a couple inches of my shoulders whenever I put in sleeves. So I can use this information now for any patterns that I use.
Today I started grading the jumper for this gown but am already eyeballing this pretty bodice on a 1905 Dressy Reception Gown once I’m confident with the process. But if I need a refresher course I came across Jen Thompson's tutorial on using the grading system on her blog. http://www.festiveattyre.com/2012/01/pattern-drafting-with-apportioning.html

Friday, March 25, 2011

18th C. muff making workshop

March 16, 2011
Last week I attended the Costume Accessories Symposium(CAS) in Williamsburg, VA. At the end of the two day lecture series, I had signed up to take a muff making workshop put on by Janea Whitacre, the Mistress of Millinery & Mantua Maker at the Margaret Hunter Millinery Shop in Colonial Williamsburg.
Our class of 15 got to see a variety of sample muffs made by the ladies of the Shop, including some lovely mitts and a workbag.


Isn't that pink one for a little girl just precious?
Janea explained that we had an option of making a single muff, OR making a separate stuffed linen bag that could have an interchangeable outer cover. I think we all chose the second option.

We were given many choices of colors of either silk satin or silk taffeta fabrics to make our muffs with. I chose a dark sage green silk satin, and after looking over the various trims, I used a simple variable green & cream trim that I would make a swirly pattern with on my fabric. Then I picked a pink ribbon flower trim to cut the flowers off and sew onto the trims. Janea came over and looked at it, and suggested I do a double row of the trim, turning it into a lattice, and put the flowers inside the squares. I thought at first I shouldn’t use so much of their trim but she was very generous with what I was using.

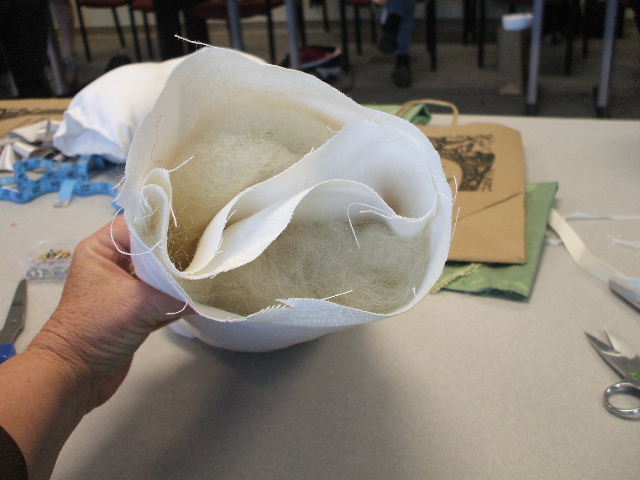
Everything was handsewn. Once we hemmed one side of the cover, we folded the sides in to form channels for the ribbon closures on the sides. We left it open so we could sew the trims on first. We then made the inner linen pocket by sewing a long tube, then turning it inside out but only half way so there was a pocket to stuff & a hole through the middle for your hands. We used real lambs wool to stuff it with.


On my side of the room, we all started sewing our outside covers. On the other side of the room, my friend started sewing her inside lining.
I started sewing my trims on the outside sleeve and sewed one row zigzagging one direction. Once that was sewn, I started another row going the other direction.
This shows how it will look once closed down the middle and put over the lining muff. This also shows the true color.

By the end of class, a few people were close to being done. It’s a fairly easy project that can be carried around to work on. And since the cover is interchangeable, I can already imagine other covers I want to make.


After I flew back home to San Diego, I was really enthusiastic about finishing my muff. But of course things kept interrupting me, and it took a week to finally finish it. I never got far along enough during the class to get the finishing instructions so I had to wing it the best I could. After sewing 28 ribbon flowers on the squares, I sewed 24 tiny crystal pearls, that I purchased here locally in a bead shop, in the other squares.

I turned the raw edges on the long sides of the muff and stitched those together to close the muff. I was finally able to put my ribbons through the side channels to draw it closed. After sewing the opening closed on my inner linen muff, I was able to stuff it into the finished outside silk cover. The inner muff didn’t have enough stuffing so it’s not as full as I’d like it but at some point I may get some batting to fill it out. I had chosen this narrow ribbon in class for my drawstring, as opposed to the wider ones, but now that I have it in, I think I’ll get some of the wider ribbon and replace it.

And here we have the final muff. Since I can easily replace the outside green silk cover with other covers, I’m going to be thinking of a less fancy one to make next.

My thanks to Janea and the ladies of the Margaret Hunter Millinery Shop for making this such a fun class.

Saturday, March 12, 2011

Costume Accessories Symposium in Williamsburg

I'm currently attending this wonderful symposium at Colonial Williamsburg, VA for the week, and have already met a lot of great ladies, including a couple I've only "talked" to online.
The first night I was here about 30 of us (fellow costumers) met for dinner at the King's Arms Tavern in the historic area dressed in our best 18th century costume. We were upstairs in a candle-lit room with all the ladies and gentlemen enjoying fabulous meals.
I wore my teal caraco, which I was so happy to be able to wear again. I had a wig mishap by leaving mine at home but fortunately found a modern wig shop while in Norfolk, and bought a curly neck length wig that I was able to do a decent replacement for the evening.
Afterwards we walked across the street to gather in the Raleigh Tavern to listen to a private 3 piece chamber ensemble, again in a candle-lit room. I loved the pianoforte music.
We were invited after that for dessert and wine at the Red Brick Inn, a beautiful and orginal bed & breakfast owned by one of our costumers. I can't recommend that place enough if you need a place to stay and feel part of everything. It's the oldest B&B in CW.
Today began the first part of our week, a tour of museum costume collections and historical homes in Richmond. We were given special access to the storage rooms and got up close to many original pieces of clothing and accessories. And we were allowed to take photos. :)
Tomorrow is a day of rest, with a meet and greet in the evening, and then the symposium starts on Monday to Tuesday. On Wednesday I'll be going on a Behind the Scenes tour of the Head to Toe exhibit at the Dewitt-Wallace Museum, and then take an 18th century muff making workshop in the afternoon.
Sorry I have no photos to share yet. I'm not able to download them from my camera while I'm here.

Tuesday, February 8, 2011

Four of my gowns, all in one.

This last weekend, I and a couple of our costume guild members took part in a small fashion show by the Women’s History Museum in San Diego. The show was for the DAR (Daughters of the American Revolution) in nearby La Jolla. Even though the museum often shows a progression in time of the costumes being worn, I thought we should focus on the 1700s during the Revolution.
I volunteered my friend, Cindy to join me in modeling 4 of my gowns. Three were from the 1770s, the fourth was 1795. We had to make some adjustments to my gowns to fit her. The 1795 open robe was much easier to adjust but the 1770s polonaise Anglaise wasn’t. So it wasn’t as good a fit as I’d like. But we still looked nice and we felt like Pretty Princesses.
The audience of ladies from the club weren’t too familiar with the clothing but we did get a couple intelligent questions about what we were wearing and some wanted to know how long it took to make them. One question about what was paste jewelry has prompted me to want to find out more about it since my knowledge was limited to it being the “rhinestone” of the era.
I wore my 1770s Red Floral Caraco first. This is the one I had shortened the skirt portion and added self fabric pleated trim around the neckline and sleeves. I didn't get my new linen sleeve flounces done in time but no one noticed them missing.

We were in a medium sized room so the ladies got a close look at everything.

Cindy came out wearing my 1770s polonaise, The Pumpkin. It looked so pretty on her, and now she wants to make one.

Next was my 1770s Teal Caraco. When I first walked out, I suddenly realized I’d left the embroidered silk apron in the dressing room. And the clasp on my necklace had broken, so I had thrown on my freshwater pearl necklace. Where was my maid?!

Cindy came out wearing my 1795 periwinkle blue open robe over a white gown with gold trimmings around the hem. That gown looks gorgeous on everyone! When she was done, I returned with the apron on, and did another impromptu showing of it. The apron is the icing on my gown.

This was my favorite photo EVER.

It was hard having to change out of our pretty clothes and back into jeans, but it was a fun day.

Thank you to Jerry Abuan http://jerryabuan.zenfolio.com/ for such beautiful photos of the day.