This is a photo diary of my costuming "travels"; where I've learned and struggled to make historical costumes for myself. They're not always pretty, but always fun, most of the time. And I want to share with others what I learn along the way. **You can find me on Facebook, https://www.facebook.com/Time-Traveling-in-Costume-640703499399817/ or have my posts delivered to your email by signing up at the lower part of the right column.**


About Me

My photo
HI, my name is Val. I'm a member of Costumer's Guild West in Los Angeles, Dean of 2018 & 2024 Costume College; Past President of the San Diego Costume Guild, and a representative of the San Diego History Center. I also put on historical fashion shows for various groups. I make my own historical costumes but don't sell any unless I get tired of one.The eras I've made so far are 1770 up to 1918. My favorite is the 1880s bustle.

Followers

Sunday, August 24, 2014

Further Inspirations & Progress on my Autumn Bustle

Last time I shared my Autumn bustle I was starting to sew it all together, and adjusting the Frankencostumed bodice and bustle. After sewing the extra pattern piece on the bustle, I decided I liked the poof it was doing in the center back when I put it on over my lobster bustle. I also decided the two sashes I’d cut out wouldn’t be enough to make a difference. So I set those aside. More on that later.

Next I unstitched the vestee and tried the copper collar lapels I wanted to put on it that I’d cut out from TV466 Alexandra bodice.  I only sewed one side on so I could see how it looked but unfortunately the vest portion (from TV463 French Vest) is wider than the one on the Alexandra and the lapels were ending up under my armpits. So I took out the stitching again and put it back together without them. But darn, it still wants a contrasting collar there.
I let my brain think on it overnight and came up with a shorter narrower version of the collar where it would just be only on the area above my bustline. Perfect! So I'm going to try that now. Then the neckline collar and the sleeves and cuffs are up next. 
And now I’m back to the bustle again. I lowered some of the pleats on the sides so it wasn’t up so high but could only go down so far before it became shapeless. So this is the final version of that. Not too much difference from the first one but it did go down four inches. 
Except it still needs something. I’m not a fan of fringe or braid but with this being a heavier fabric I can’t do my usual pleated trim. But then this photo gave me some ideas. It was from my album of how women wore watches, and her gown is kind of similar to mine. Her panels down the sides of her skirt are the same as her vest insert. I don’t have enough fabric for that. But I do have the four unfinished sashes of my floral brocade. I don’t think just one would make much of a statement but if I back them with some leftover bronze taffeta, I can have two for each side. 
And I’m going to do my first outside pocket for my watch on this just like she has!
I would love to do some pleats along the hem of my skirt but I have no more of that fabric either. So it will have to be all business down below, and party up on top. Back to work!


Friday, August 22, 2014

My Fall Inspiration and Going Back to My Costume Beginnings

Last Summer I started an 1880s bustle outfit that I wanted to use multiple tones of Autumn colors. After pulling out various colors I started sewing it and just wasn’t happy with it. It looked lifeless. The brown skirt was blah and didn’t seem to blend, and the light brown moleskin I used for the vestee was drab. I think that’s why it got put in a bag and stuck back on the shelf. But I also wanted to start a Xmas plaid dress so that was more exciting.

In the last week I’ve started feeling the call of Autumn colors again and pulled it off the shelf and put it on my dress form with the copper colored taffeta I was going to use for the apron. Bleh. It’s still not going to work.
I ripped out the vestee to start over; took off the brown taffeta skirt, and looked in my fabric stash for inspiration. I came across an upholstery weight burnt-orange floral I’d bought during my first trip to the Garment District back in 2003. Now looking at it, it reminds me of Victorian Orientalism. I draped it over the bodice and copper apron, and it came alive! But the brown skirt had to go. So I started draping more fabric over my dress form.
The copper taffeta wants to be the skirt. So I didn’t argue with it. Since it was already cut out for the apron, I had to carefully plan how to cut a skirt out of it plus two yards I still had leftover. I was going to try using the first Truly Victorian skirt pattern I’d ever bought, #208. I used it for the first dress I made to wear to Costume College in 2003 without having a clue what I was doing. I had some help from a Civil War reenactor, who offered to sew the skirt for me, but I ended up with a full circular skirt according to CW standards. Oh well, live and learn.  But when I laid out my fabric for it, I didn’t have enough. I really needed to use the apron and ties from it though with my limited fabric. So the apron pieces from Skirt A were cut out from the orange floral.
I pulled out my two other skirt patterns, TV#201 and 221, and did have enough fabric to make 201.
At this point I needed to make up my mind how to go from here because once I started cutting, there was no going back. I only had 3 yards of the orange floral fabric too. So I drew out my ideas on paper and then draped them over my dressform. The copper will become the skirt.  The orange floral brocade will be the vest insert and collar, and the apron.
 
 The bronzey-orange will remain the main part of the bodice and the sleeves, with the copper repeated on the cuffs, and lapels on the bodice. I have ideas of doing more to the cuffs but won’t know until most of this is constructed so I can stand back and look at it.
My previous bodice had been cut from TV 463 French Vest and I’m reusing that but I also loved the lapel collar and collar on the new TV466 Alexandra bodice. I asked Heather from TV if I could use that without any alterations, and she said yes. So that will work fine with my plan.
These are some of my inspiration ideas. I wanted more “stuff” on the front of the bodice. I’m really liking that bow coming down from the waist in the front on the second photo.


I bought these glass buttons last March up in Washington while I was at the Victorian Festival, and at the time they had an orange-ish tint. But now they almost look purple-ish black but I think they still might work. 
Now the fun begins. Here is the mostly sewn photo, where I’m still playing with the bustle.I think I may let down some of the pleats on the sides.
 
 I accidentally cut out all three pattern pieces of the apron for both Views A & B, so instead of tossing the third piece, I’ve decided to add that in back to make the bustle even more poofy. Right now the extra piece is sewn on the left side. The right doesn’t have it.I’m not sure if the sashes are going to work yet. So there’s a lot of stitching and unstitching as my Frankencostume grows.

 ~~Val~~

More White Stuff- an Edwardian Petticoat

After buying my 7 yards of white 100% cotton at JoAnn’s with a 50% off coupon I swore I would work on my Edwardian petticoat until it was done. I can’t say I’ve had blinders on because my Autumn Bustle is visible in my peripheral vision, and I’ve been collecting some ideas for it. I think by later today I can put what I already had started of it on my dressform and start playing with it; finally.

I bought way too much cotton. I bought the wider 108” cotton this time instead of the 36” wide which shrunk to 33”. The pattern called for 7 yards of 45” wide, which after shrinking may not have been enough. What I bought apparently is the really wide stuff for backing quilts, and I only used about 2 1/2 yds of it. So now I have lots more for, what? more chemises?
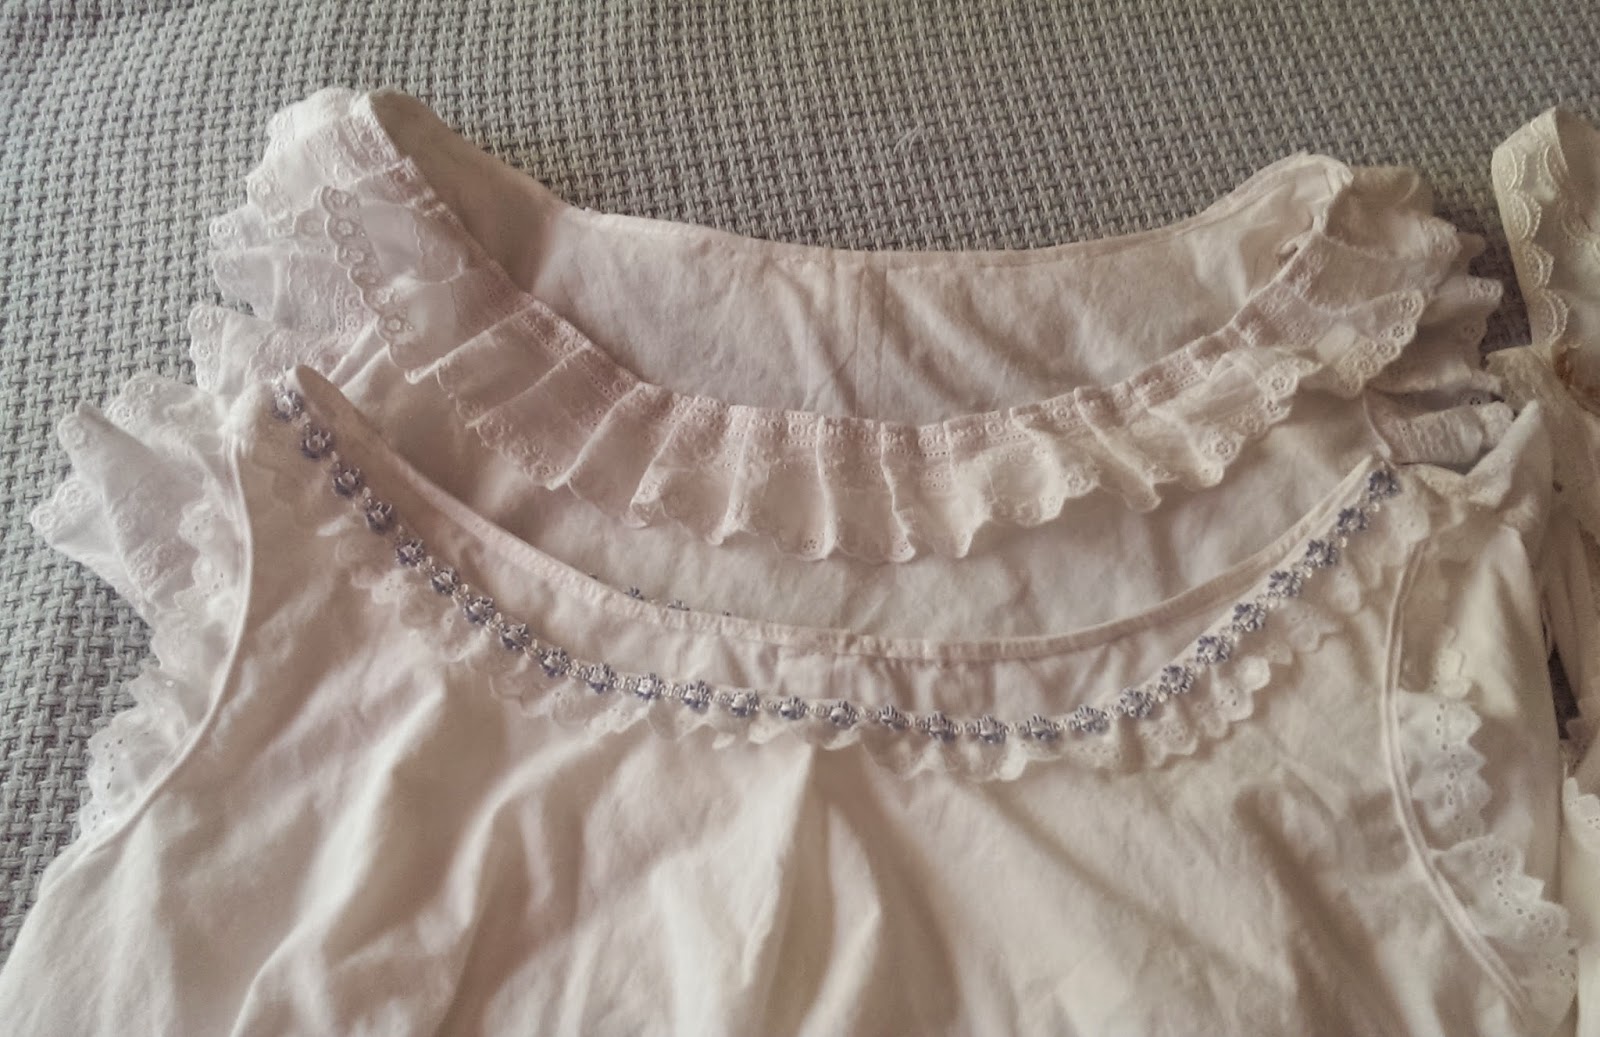
As of today I’ve spent 3 days working on my petticoat. Why so long? I’m flat-felling all the seam allowances and this thing is loooooong. I’ve been sitting and pinning them while watching hours of recorded programs that had backed up. Then I’m turning over the edges of the neckline and armholes to finish them instead of using bias tape, and then doing the same for the hem. I sewed a very simple embroidered lace on the neckline but because of the curve of it, the lace wants to turn up on the sides. Oh well, it’s going to be under my dresses.
I made the largest size on the pattern, size 20. According to the pattern, that would be about 2 inches too narrow for my waist and hip measurements. But I remembered a couple people said it ran large on them. Simplicity has you do 5/8” seams. I now follow the 1/2” theory and it fit me fine, except in the bust area. I’m a little more deficit in that size range. But I sewed up all the seams and when it came time to do the front closure it all lined up nicely and I just folded the excess of the bust part back on an angle a bit and removed that excess fabric, and then folded the edges under about one inch. So now I have a nice straight line down the front.  
I put in nine tiny Mother of Pearl buttons from my Aunt Doris’ sewing collection, and then sewed it closed the rest of the way down to the bottom.
Other than the ruffles at the bottom, it’s done.
After tearing 6 lengths of obscenely long strips to make 2 or 3 rows of ruffles, and turning under the edges on the first tier layer that will go on it, I’ve had to cave in and leave it for evening handwork while watching more TV. It will get done. But Autumn is calling. I spent 4 months working on all black, and now all this white. I need some gorgeous Fall color. 

Ahh! Doesn't that feel refreshing? 
And here’s a sneak peek at what I’m working on now.

~~Val~~

Saturday, August 16, 2014

FINALLY MADE THOSE MUCH NEEDED CHEMISES

The last thing I said before I left for Costume College was I really needed to make more chemises. It was also the last thing I said before I went there in 2013, and probably 2012. But at that time I did make two new ones but out of a too-thin cotton that just about got shredded when I hooked up my corset. And that’s what I was still wearing this year. For shame.
Normally when I get back from CoCo I’m still riding on a “sew all the things” –mode, and I take advantage of that to try and get something else done before it dies out in about a month.  This time I stuck to my guns and bought some 100% cotton muslin to cut out four and sew them.
I have lots of patterns for chemises but none had the deeper neckline I need for some of my square neck bodices. I tried an earlier time period pattern that was suggested but it was so loosey-goosey I felt it was going to fall off me any second. I’m going to take in a big front and back seam in the center of that one so as not to waste some good material.

I realized anything that I used would have to be altered some way and when I pulled out this Simplicity 7157 for an Edwardian petticoat, I saw the neckline I wanted.
The petticoat had to be postponed because it takes 7 yards of 45” wide fabric, and my poor muslin I bought at JoAnn’s is a measly 36”. And I need chemises more than a petticoat. But its next!
I planned on just using the top half of the bodice and extending it down into an A-line for my length but as I’m writing this, I just realized I had pulled out the pattern pieces for the combinations and it has a more slightly rounded neckline. But hey, it works! Its still lower than some of the others I tried.
 The length I needed was 36” from my shoulder to the bottom so I just tore 36” lengths of the fabric and it didn’t require a lot of extra cutting. Instead of having a front seam, I cut that edge on the fold.
As much as I love those pretty frilly chemises, I'd rather spend my time on the outside dresses. And I wanted to make these as quickly and simply as I could because all white gets a little boring. So they will have no sleeves, and I’m just turning the edges of the neckline and armholes under to hem them. I cut out four and zipped up all the side shoulder seams.
Some of my friends said to add some different laces so I could tell the difference between them and not end up wearing the same one on the same day. So I pulled out my lace stash and found bits and pieces that I could use but would also not be scratchy. One of the cotton eyelets was pretty wide and it was badly gathered but it had been cheap. So I cut off the gathered edge and turned it under, then pleated it to the neckline. It also gave kind of a cuff on the armholes.

 I finished these today and I find I’m still in “white mode”. I haven’t gone back to buy more muslin as I was waiting for another sale, and I see it’s on sale again today. In the meantime my “Squirrel” has been attracted by Wearing History’s Edwardian blouse pattern, and I want to do three-quarter length sleeves. 
 I’ve wanted a white blouse to wear with two of my Truly Victorian Edwardian skirts. The purple floral one is done, just no photos of it. I've also wanted to make a solid dark color skirt too. 

 While digging through my lace stash I came across a long piece of embroidered cotton that was given to me that would be wonderful to use on that blouse. I think it would look great going down the center, and then the center portion used down my sleeves. Or maybe the whole width with some cotton added. 
As long as my Sewing Mojo keeps going I’m taking advantage of it. At least I have no major projects due for the next four months.
                                                                                ~~Val~~

My Wardrobe at Costume College PART TWO


   My 1837 Persimmon dress I wore at the Costume College Red Carpet and Gala was one of my favorite and most popular gown. But I’ll explain later where it also went wrong.
   When I first started making this gown I wanted to copy a fashion print right down to all the trims and accessories. The last two things I did on it was the long band down the front with the graduating size bows, and the sleeves. I procrastinated on both of these until the last two weeks. When I don’t quite know how to do something I let it sit hoping that a light bulb goes off. The band was mostly something I knew would take a lot of time and I had to make a bunch of self-fabric bows starting at one size near the top and gradually getting a big bigger at the bottom. I sewed long tubes of the fabric and looped them into flat bows. It took some math getting them the right size, and gradually enlarging them, and spacing them evenly. I tried one at the neckline but I didn’t like how it looked. I still have the small bow I made just in case sometime I want it there.
   I tried looking around for metallic-type buttons with a green stone in the middle to put in the center of the bows with no luck and finally gave in out of desperation at one fabric store with some that had a plastic gold frame with a faux marblized center. Now that’s desperate. The package says they’re 24K gold plated. Yeah, right. (They’re in a bag w/ the receipt waiting to go back for a refund.)
   But just before I got home, that light bulb went off and I thought MICHAEL’S!  They have lots of beads and glass stones so maybe I could find something there. The first row I walked into there was jewelry and some pre-made bracelets. And I found perfection. Three packages ON CLEARANCE of a bracelet made of REAL METAL jointed frames and orange stones that matched my dress fabric. Each frame was attached to the next by elastic and I cut those apart and was able to use the little holes to loosely attach them to the bows. That’s for when I need to take them off to wash or iron my dress. 
   I kept staring at those sleeves on the painting, wishing my Sewing Faires would magically appear and make them. They scared me. A week before CoCo, that hadn’t happened. The sleeves were a different style than my pattern, which I’d already cut out anyhow. And there wasn’t any way to alter them. That’s not quite in my skill set yet. Someday I may be able to do those, or find a pattern I can use. So it was either walk away or come up with an alternate plan.
   The alternate plan was to go ahead and use the already cut out sleeves following the pattern design. And I’m so glad I did. I had some horrible cuts and bruises on my forearm that would have showed and I would have needed to wear gloves. With the long sleeves that extend over my hands, those weren’t needed.
I had been planning on making a turban to match the picture too but as the months got closer, I was still working on my dresses, and decided I didn’t need that stress. So I again called on my friend Cat, and gave her the fabric I found, along with some photos to follow. I think she did a smash-up job on it, right down to the tassels on the side. It felt really awkward at first with how big it was, but it grew on me, and I owned it.

   I wore my peach coral necklace my hubby had bought me while we were on vacation in Kauai, and carried my gold silk reticule I bought a few years ago from a friend, Jenny-Rose.
Now here’s what didn’t work. I have narrow shoulders and even though I had made my muslin to fit me, these shoulders still like to ride up on me. And when you sit down, it’s really noticable. Also see the center front of my lace that’s poking up and slightly curving in? That’s the boning. The pattern does call for a bone in the center and I’ll bet it said to stop just below the bust. But in my rush to finish my dresses, I missed that memo. So I have little wings on the side shoulders and a poof on my chest.
   When I asked two other friends who were also wearing 1830s they confirmed the bone stops there. At least this is an easy fix, and apparently I need to go back to all three of them and do some repair work. But I managed to stand as often as possible and pulled it down so most of the evening my dress behaved itself and I had a good time.
I even ran across another friend who almost matched me but had traveled to another time period. Jennifer wore her similar colored dress the day before but a friend has offered to Photoshop her into our photo so we’re all together. It’s a Pumpkin Patch!
 
                                                             ~~Val~~


Wednesday, August 13, 2014

My Wardrobe at Costume College PART ONE

   A week has passed since I got home from Costume College; most things are unpacked and put away. It took me two days to get all my photos weeded out, cropped, and uploaded to my online album. So now that I’ve gathered a few photos of me wearing my costumes, I can write my blogs about them. I wore five costumes, and my primary color this year was black. Unfortunately they don’t actually photograph well so the better ones are from home on my dress form.
 This is my photo album from the convention. Costume College 2014  

    I ended up trying not to kill myself and finish another gown, so I did a repeat of my Regency Red/White/Blue outfit and so did two of my friends. I wore two dresses on Friday; the Regency during the day, and my 1873 Dia de los Muertos mourning gown for our Murder of Crows theme that evening at the Ice Cream Social. On Saturday I wore my 1837 Midnight Mourning during the day and to teach my Watch class but so far only have one photo of me in it and none from my class. That evening I wore my 1837 Persimmon dress on the Red Carpet and for our UnGala Dinner at the hotel restaurant. On our final day I had a workshop in the morning where I had to fit myself for an Edwardian belt so I chose to wear my street clothes and later changed into my 1910 Black Ascot dress for the Sunday Tea, “Ladies Day at the Ascot Racecourse”. By that time it actually felt good just to put modern clothes on when we went to the Garment District the next day to shop for, you guessed it, MORE FABRIC.
   So to start with Friday, both of these dresses have been shown here before, so nothing new to write about them. But here are some photos. I added some more pleated blue ribbon along the top of my Regency bonnet but with my head up it’s hard to see. For my 1873 mourning, I wore an antique black Bebe bonnet (these are ones that are small and just fit on the back of your head) that only comes out on rare occasions and added my lace veil to it. It was nice for a change not to stress over getting something made.  And the good thing was, neither had been worn there before. 
 

   My black 1837 Midnight Mourning gown was finished in plenty of time but I left making the belt during the final week. It was made from two inch wide black velvet ribbon and I attached an antique belt buckle to it. I planned to tucked my watch into it but it kept sliding through. So a last minute addition was a small self-fabric pocket sewn to the dress that would be under the belt. 
   I couldn’t find any documentation of how the ladies kept their watches from sliding through so this seemed logical to me. Just in the last couple days while discussing watches on one Facebook group, one lady said she had an antique belt that had a watch pocket sewn to the back and is going to find it and share the photo of it. That’s what I did on my other belt for my Cranberry 1837 dress. So that’s awesome my brain is thinking the right way.
   This is my completed dress at home. I tried making a fichu out of a sheer polyester but it kept sliding against the cotton fabric and up around my neck. While at CoCo I asked a few knowledgeable people who suggested cotton mull. So we bought some in the Garment District for future use. 
 

   For my lace cap I called in my friend Cat ( aka Hatmaker Extraordinaire),
Minerva Manx on Etsy  for help in making that. We used the two paintings I had for inspiration, and she told me to wear it towards the back of my head.
 

   I used a stiff embroidered polyester I found at JoAnn’s that looked similar to the painting. It had enough body that it could almost stay up by itself. While she was testing the pattern she also made one in cotton for me that came in real handy wearing with my Regency bonnet.
 

   My wig was styled by Wig Creations by Conni, and it was her first time doing this time period. She mainly does wigs for cancer patients and for the La Jolla Playhouse. With me bringing in all kinds of requests for different time periods she’s having a great time doing them. I had her copy the hair style of the Lady in Black that I copied my dress from. She had tight curls up around her temples. I’ve been making an album up for her of many different time periods now for a reference guide. I think next up is an Edwardian Gibson Girl style because for some reason that’s one I’ve never had.

  So far this is the only photo I’ve found of me wearing my gown.  You can see my long watch chain hanging down from my neck and my watch tucked into it’s little pocket under my belt. And notice Cindy’s lace cap under her bonnet? That’s the white cotton one Cat also made for me.

   Just a note on my Watch class: as I mentioned I have no photos taken during my class because I was so busy I forgot to hand my camera to someone.  So this is what I have to share is my display case that I brought to show my watch chain collection.

 

   The night before I left for Costume College, I received my grandfather’s pocket watch that my Mom had just found three days earlier and shipped it down quickly for me to bring. This watch had been missing for a number of years and she accidently found it while going through some of my Dad’s things he had squirreled away. See? Squirrels run in the family. The watch was made in 1909, and it had my grandmother’s photo from 1911 in it. It was a lot of fun sharing it with the attendees in my class, and they spent a lot of time gathered around my table looking at everything I brought.  I had a lot of competition for classes that afternoon so it wasn’t as well attended as I’d hoped but afterwards students in the adjoining classes came in saying how sorry they couldn’t attend and would I repeat it next year. By all means I will send in my proposal and just may get that chance again. As I’ve said, it’s a little known bit of accessory women wore and quite a few of them did. I’m all about THE ACCESSORIES!  You need to decorate the cake!


     For my further adventures, I’m going to write another entry so this doesn’t get too long.
                                                                ~~Val~~