This is a photo diary of my costuming "travels"; where I've learned and struggled to make historical costumes for myself. They're not always pretty, but always fun, most of the time. And I want to share with others what I learn along the way. **You can find me on Facebook, https://www.facebook.com/Time-Traveling-in-Costume-640703499399817/ or have my posts delivered to your email by signing up at the lower part of the right column.**


About Me

My photo
HI, my name is Val. I'm a member of Costumer's Guild West in Los Angeles, Dean of 2018 & 2024 Costume College; Past President of the San Diego Costume Guild, and a representative of the San Diego History Center. I also put on historical fashion shows for various groups. I make my own historical costumes but don't sell any unless I get tired of one.The eras I've made so far are 1770 up to 1918. My favorite is the 1880s bustle.

Followers

Monday, July 30, 2012

Costume College 2012 starts this Thursday

And there will be lots and lots of pictures, and lots of beautiful costumes, and oh my! Four days of costumey goodness and classes. There will also be a Costume Exhibit Room, and a Caught on Camera photo display I'm doing there. If you're unfamiliar with Costume College, or CoCo, this is their link. Costume College

I have 5 costumes I plan to wear over the 4 days, and have two in the Costume Exhibit Room. I will be teaching a class on my Bloomer gown project (the patterns finally came in, YAY!), and hosting the Sunday Fantasy Tea, "The Golden Age of Hollywood Movie Awards". It will be like the Academy Awards but with a slight twist.
I usually take about 200 photos of everyone there since its so much fun to see what others have made. I'll be posting all those in my online album, and not here, so when I get back and upload them, I'll tell all about the convention and post the link to my photos.
I wished I could be dressed like this but I'm working on it.

Saturday, July 21, 2012

1903 Corset Cover- Truly Victorian TVE 02


Started July 8/ Finished July 18, 2012
This really shouldn’t take a normal person ten days to sew. However, I am the “Queen of Not Understanding Pattern Directions”, and I come by that title honestly.
I was kind of holding back sewing on mine until my friend who was making her’s could pass on a few hints as she was sewing it. I heard a few Arghs from her but she still managed to get it made in a fairly short period of time. And it’s a small item of clothing too.
 I had a very lightweight 100% cotton to make mine from, and at Heather McNaughton’s confirmation. I was able to use some pre-gathered wide eyelet lace for the front. I think that saved me a good chunk of time.
My first stumble: attaching the ruffle to the front facing. Instructions have you sewing ruffles to the facing (think of it as a yoke) and flipping it over which leaves a raw edge. Without copying all the instructions, basically you have the lace hanging loose in the front, and after sewing the second part of the facing to the front facing, your entire neckline is finished, kind of like a bag-lining.


Here is where I got confused; sewing the right sides to the wrong side, then flipping it all over. I put a label w/ a W to show the wrong sides of the ruffle/facing and the front placket onto the wrong side of the bodice. If you stare at this long enough your brain will finally have an aha moment. 
 You will then flip the lace & facing portion over to the front so you have created a two sided yoke with the lace hanging from it.
Second stumble: the back facing piece. I’m still not sure I have this right. But my favorite saying is I fudge it.  The directions have you iron one edge of the facing, then pin it right side to the wrong side of the back bodice then stitch the top edges together. This leaves the ironed edge facing up. Except when I flipped it over to the right side, it was just hanging loose. Fudging was to topstitch it AFTER the shoulder seams were done. My friend and I compared ours later, and her’s was not like that but we haven’t figured out how either of us did it.
 Sewing the shoulder seams was basically opening up both sides of the front and back facings, sewing them as one piece, then folding it back over to close it. After that I did my top stitching of the hanging back facing on the outside of the back bodice.  I cut a couple 2” wide bias strips of my fabric and made short facings on the armholes which are still open at this point. Then you do your side seams.
Two important things to remember:
1. The directions point out you should have at least 2-3” of your ruffle hanging out past the sides so it will catch in the side seams. I would recommend 4” because when mine was all sewn and ready to sew side seams together, because of the fluffiness of my lace I had to really stretch it to get it into the side seams. Just a thought.
 2. The directions also say to finish the front edge by the placket and have it back 1/2" from the front edge, which I did. Except the right side w/ buttonholes crossed over that left side where I placed my buttons still got covered up by the lace so I would recommend setting the left side of your ruffle back an inch. 
And here is the finished product. It’s not over my corset so I had to fluff up the bust to fill it out. I think once on, the yoke will be lower on my bust line than it is here. 

And of course we must share foopahs. While trimming off the excess lace ruffle after I sewed the side seams I managed to also clip a little hole on the side of the front facing. But I fixed that little puppy up with some Fray Check. And as I mentioned, my lace didn’t quite stretch completely into the side seam on one side, so there’s a teensy half inch that didn’t make it. But I don’t expect anyone to be looking under my armpit. This is also why I don’t make costumes for other folks. Unless you like that kind of stuff. But it’s good enough for me. I call it a learning experience. 


Thursday, July 5, 2012

1903 Pink Voile gown


Started May 6, 2012/Finished July 3, 2012
This dress makes me happy. I should change the title to The Happy Pink Voile. The fabric is a cotton voile with bands of flowers and leaves on it. I purchased it a few years ago at Fabrics & Fabrics in the LA Garment District for $3.99 yd. It had to be lined with white cotton. I had other plans for it at the time I bought it but it was perfect for this dress.
The patterns I used were Truly Victorian’s #TVE 22, 1905 Circular Skirt & #TVE 41, 1903 Plain Waist/blouse.


This dress is made to be worn with TV’s S-bend corset but I’ve seen it worn without, and I think it could work with just having a fluffy corset cover under the blouse, and a small bum pad at the back of the skirt.
When I started cutting the fabric for this dress, I wasn’t sure if I wanted to have the band of fabric going around the skirt, and decided to wait until I had it sewn to make that decision. Because of the designs on the fabric, I decided it didn’t need that extra bit of interest. It’s quite pretty all by itself. It did get a little bit of lace on the collar and a solid pink silk taffeta Medici belt to add more color.
This entire outfit was a breeze to make. There’s not as much fitting on the bodice/waist required since it’s loose and flowing. As mentioned in my earlier post of “You Learn Something New Every Day” http://timetravelingincostume.blogspot.com/2012/06/you-can-learn-something-new-every-day.html I talked about my method of doing the closure first, then the side seams for a better fit. I just added a footnote to that today:   ** from Jennifer Rosbrugh of Historicalsewing.com---“When you're fitting your muslin, take into account that your flatlining/lining plus any bones if used, will take up some of the fabric causing it to be a bit smaller.”**
This applies to my method of doing the bodice closure first. At this point you should already have the flatlining (or possibly lining) done, but if you will also have bones & they’re not sewn it yet, take that into account.**  This continues to add to my “learning something new every day”.
The skirt, other than being one big piece of pattern and fabric to handle, was very easy to sew. I cut mine on the bias by opening the fabric up to its full width and folding it in half lengthwise. Once again without even thinking of matching stripes I cut out the skirt and magically I ended up with chevron stripes on the front and back. I think its sheer luck, and they’re not exact but this is not the first time the sewing fairies have graced me with this. This also made the decision for me not to do any other trimming on the skirt because even my other idea of doing a ruffle around the bottom would disrupt the pretty patterns it’s made. I didn’t do it this time, but my next skirt will have its closure done first too.
The blouse/waist was also very easy to sew. I flatlined all the pieces with white cotton, and as mentioned in my previous post, sewed the shoulders together first. Then I finished the back closure to the point where all it needed was buttons and buttonholes. These could have been done at this time. When I fitted it on me, I just safety pinned the back closed. Then I put it on inside out and by looking in a mirror, pinned the sides closed. It still came out with the half inch seam allowance, so my pattern fitting was pretty much spot on. I unpinned the neck line just enough to slip it over my head, then machine basted the sides and tried it on again, this time right side out. It was a good fit. I was so excited; I had to tell the world! So, all my costume friends and social groups have been spammed thoroughly. I can hardly wait to try this on a front opening bodice because I’ve gone round and round on getting an even front closure with no luck.  
The sleeves were funny and full at the cuffs, and they hang down a bit. The cuff has an extended overlap and the pattern showed two buttons on it. When I asked Heather about it, she said she thought it needed two buttons so that was good enough for me.

 The pattern gives you three neckline choices, just a round narrow edged neck, a pointed stock and a round stock collar. I was stalled, and couldn’t decide which I wanted. I cut out the round stock one and sewed it like I normally would have, and planned to sew it directly to the blouse. But the directions weren’t heading the same way I was. Good thing I stalled because when I saw Heather’s I noticed it wasn’t really attached to her blouse. And apparently I didn’t know what a stock collar was either. It’s a detachable collar. Her’s was attached at the front and back. But she said yes, I could just sew the collar directly to the blouse. Since I’m familiar with that, and I love to fudge, that’s how it was sewn on. I wanted to sew some lace on the blouse but every piece that I tried to sew in a curve across the front of the bodice just wouldn’t lay flat. So the collar got the only piece of lacey trim. I tacked it along the top and bottom points. It overlaps my buttons in the back but I’m able to still get to get to them through the lace openings. I used plain flat pearl buttons with a shank.

 Some of the fashion plates and photos of extant gowns showed a belt being worn which really adds to the finished look in my opinion. I originally wanted to have a nice big rhinestone buckle on mine that is strictly decorative but when I made the belt, I forgot about that and made one end pointed which wouldn’t work with a buckle on it. I made it using the same pattern I’d used on another gown, Timeless Stitches #525. I used a piece of buckram in the center to keep it stiff.


So now was my first chance to try it on with my s-bend corset and its little rump pad to see what effect it had on my posture. Unfortunately I forgot to have someone lace me into the corset so it would fit me each time with some adjustments. So the bottom of the corset where it sits over my bum pad is really loose and I’m not getting the little bump in the back.
 I’ve been thinking on what kind of hat to wear with this and found this ad for 1904-1906 Summer hats.
 I realized I could re-purpose another hat I'd made of white tape lace placemats I made for my 1900 La Belle Époque gown. My cat, Chloe, contributed to this hat by knocking down a bag of vintage millinery flowers I had on a top shelf, and when I picked it up I saw a large pink velvet rose with leaves that I'd found at a vintage show. So I set the hat on my head in different positions and found the best spot to add the rose.


 A couple of my friends have commented that they always see me in costume wigs, so they don’t see the real me. So here is half of the real me, short hair and all.



Thursday, June 28, 2012

Storing & Identifying Your Hat Collection


June 28, 2012
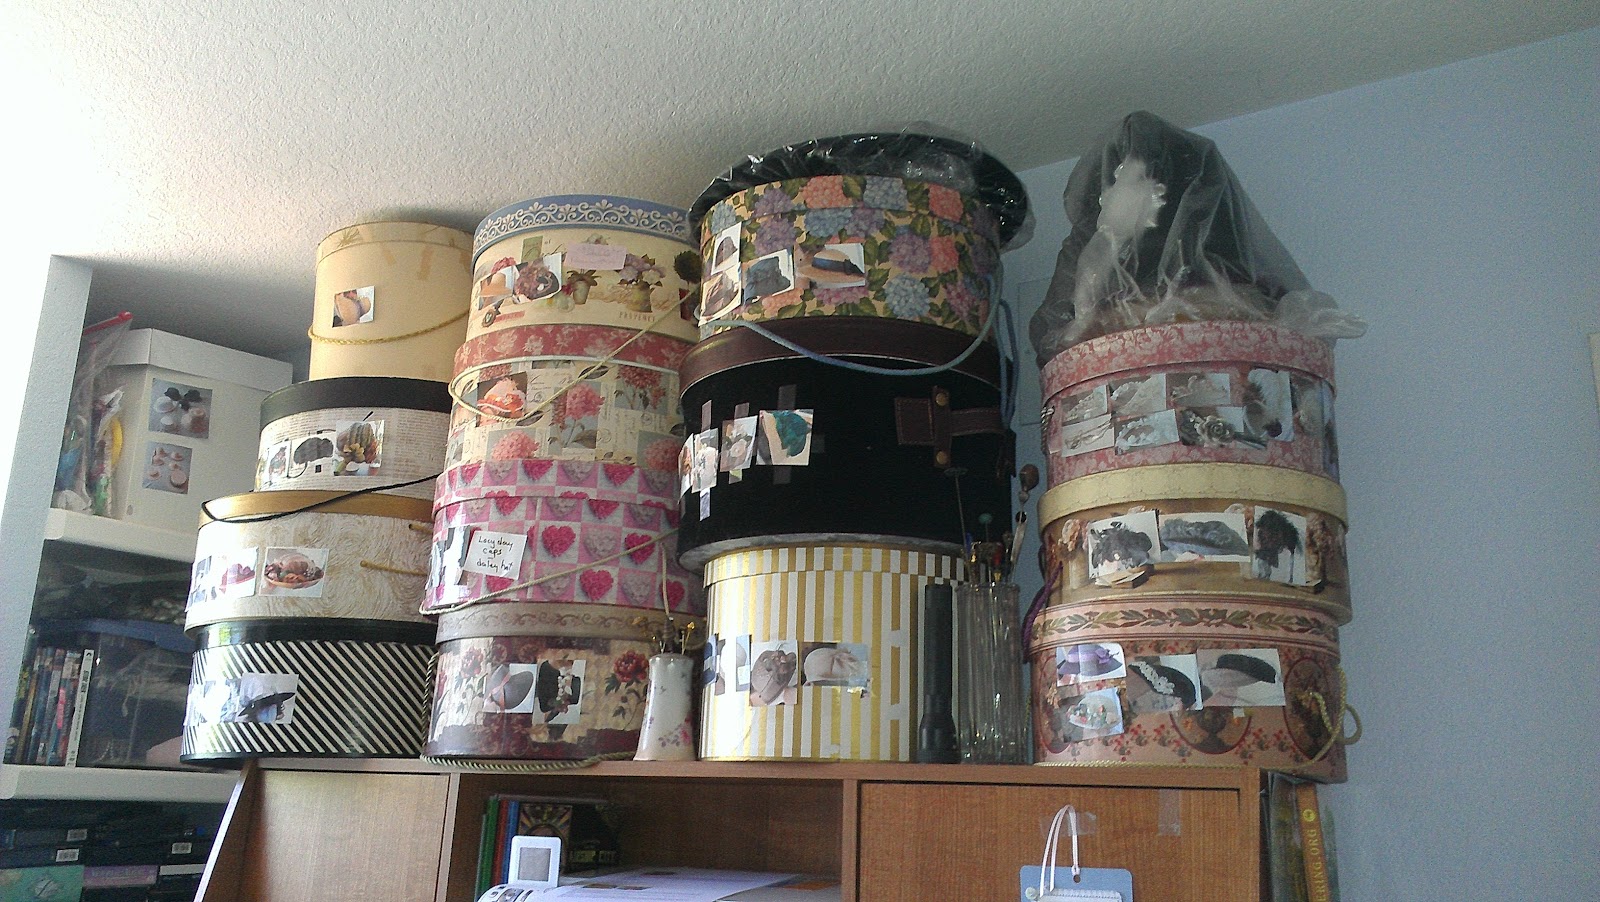
Once again my blog entry comes from a conversation I started on Facebook, as I complained that my tower of unstored hats had come crashing down. These are ones that I don’t have hat boxes for them yet. Other friends commiserated with me, and gave suggestions. I do have a method to my madness, just not enough boxes to contain them. So here we have proof of my OCD with costume hats. Each of these boxes have small photos of the hats inside them. It’s hard to see but there’s a tall glass vase between the first row that I have my extra long hat pins in. It held many more than those cute little hat pin holders you can buy.


 That’s not all of them but they’re reached the ceiling already. There’s still the short stack of hats behind me, and a square hat box that is temporary housing since it’s not very strong. It’s similar to that white one up the upper shelf on the left. That one contains a bunch of blank straws, derbies, and a top hat.  Surprise to me that in that box I found some already reshaped small straw hats I had and could have saved me some time when I had to run around looking for regular straw hats and then steam and reshape them. *sigh*
After reading an article on organizing your stash, one of the suggestions was to make a list of hats in each hat box and tape it to the box. Except it took me too long to read, and that list changed sometimes where I was scribbling all over it. For my hats I came up with the idea of attaching photos of each hat to the box with just bits of Scotch tape so if I moved the hat to another box, the photo went with it. The photos are mostly about 3x3 inches. I have a photo album in my computer of all my costume hats. Most of them were just taken by holding them in front of my camera but some were taken with me wearing them. I just printed the photo and cut off the portion I needed. I use a Word document and Insert my photos onto it, then print it out and cut them to the size I want. 


They don’t have to be fancy, just clear enough that from about 4 feet away you can see them right away on the boxes. I have about 76 hats, and that includes tiaras, day caps and little hair ornaments.
**ETA--at the request of one of my readers, I downloaded photos of most of my hats onto my Pinterest board. I left off the hat blanks, tiaras and day caps.     http://pinterest.com/timetravels/  **
I wrote an earlier post about organizing my pattern collection into a small notebook I can carry with me when fabric shopping. http://timetravelingincostume.blogspot.com/2011/05/diy-pattern-organizer.html

Tuesday, June 26, 2012

You can learn something new every day


June 26, 2012
Just sharing some Pearls of Wisdom here.
I repeatedly have said to myself and others, that I learn something new every day, even when I thought I knew everything. Case in point: sewing. Oh, that’s right. You who know me know the problems I have in understanding patterns and directions. I can understand far more when I have an actual gown in front of me and see how its sewn, rather than reading the directions on how to do it.
Right now I have two gowns I’m working on for Costume College; one is my 1905 voile gown, and the other is my “Secret Squirrel” project, which came to a roaring stop the other day when the directions weren’t the same as what my dress was doing. How many times has that happened? More on that foopah later.
I’ve been going along merrily sewing my Truly Victorian 1905 circular skirt and blouse/waist with no problems. And I might have continued that way if I hadn’t had the chance to socialize with Heather & Laura McNaughton of Truly Victorian last Sunday. My friend Cat and I were attending an open house & ice cream social at the Heritage House in Riverside, Ca. I was joined by other friends in costume, mostly 1890s-1908, and supporting our friend, Tonya, who’s a docent at this beautiful 1890s historic home. Besides having some yummy hand-cranked ice cream, it was a beautiful place for photos and I can’t tell you how many times we were stopped and asked by people to have their photo taken with us.


Heather & Laura showed up, both dressed in their TVE 1905 blouse & skirts, with Laura wearing the circular skirt like I’m making, and Heather wearing her trumpet skirt. Seeing these skirts in person really shows you how beautiful they are made up with fabric. I was fascinated by the back of Heather’s skirt enough that I took a close-up of it. *Sorry Heather* But look how pretty the pleating is at the bottom of the closure. It’s kind of closed up in the photo but when she walked, it spread out like a fan and looked so feminine and graceful. I’m already thinking of when I’ll have time to make one of these skirts too.

 Then I started looking closer at her blouse and noticed her high necked collar. She said it was shorter than the original because she doesn’t like it that high. I can so relate to that, so I too am going to shorten mine. I was using the round Stock Collar. Then I was surprised when I saw her collar was only attached in the front, what I could see, by her brooch. She said it’s a Stock Collar, which means it can be removed easily for washing or changing out. I’d heard of Stock Collars on men but had no idea what that really meant or that women wore them. She did say you CAN sew the collar directly to the blouse, which was what I was going to do as I was merrily sewing along. So that was my first new learning thing of the day.
Later in the day we all headed back to their beautiful little 1913 house and sat around talking patterns and sewing; even the guys.


 I started asking Heather questions about the different things I’d made or worn from their patterns, and then asked why my corset kept riding up from my waist. She said the hips were too tight. I said I tightened mine to try and flatten my stomach but she explained that Victorian corsets are meant to be hour glass shapes, so it's only tightened at the waist, and looser at the hip and bust. I was wearing an 1890s skirt but I should have been wearing an Edwardian one to keep my tummy flat. That was an eye opener! I think I’m going to try this same outfit with my TV 1903 corset next. So that was my second new learning thing of the day.
My third new learning thing was going to be a separate post altogether but I’ve decided to include these all in one. A short while ago *someone* (I can't remember who) suggested when I make the bodice, to mark and finish the closure first, then do the side seams to get a better fit. I was used to following the pattern and doing the shoulder and side seams first then finish the bodice closure last. I would struggle to get the closure lined up. Often it had to be closed over farther on the top than the bust, and more at the midriff. And sometimes it wasn’t big enough to even close. So out came the seam ripper after most of the bodice had already been finished. They don't call me Mrs Ripper for nothing! So with this method I would sew the shoulder seams, and fold the edges of the closure and finish it to where it was ready to have its buttonholes, or however I would close it, done. My first try at this was with the TVE 41 1903 blouse/waist I'm working on.
 I closed the placket with safety pins, put it on inside out, and then marked the sides on me with pins. I un-safety pinned the neck enough to slide it off me. This made it so much easier, especially since this one closes in the back. Other than taking it in a tad bit more after taking it off, it fit and closed beautifully the first time.
After looking at the photo I’d taken of the back of Heather’s skirt, I had another “ah hah!” moment. I could do the same method with the skirt closure. With previous bustle gowns, I’ve been happy that they had bustles and peplums going over my closures on the skirt because my plackets aren’t pretty. And that’s because of the same problem. I thought it fit when I put the waistband on but I think all the thread you use to sew it with makes it bulkier and takes up any excess you might have had.
Don’t believe that, huh? That’s all I can come up with.
I now have a sign hanging over my computer that says, “Mark closures FIRST on patterns”. It’s right next to “10 am, START SEWING”. I should change that to 3pm because that’s the time I start feeling like sewing. 
And I would like to publicly thank whomever it was that gave me this suggestion to do the closures first. *kisses*
**Here's an additional tip from Jennifer Rosbrugh of Historicalsewing.com: When you're fitting your muslin, take into account that your flatlining/lining plus any bones if used, will take up some of the fabric causing it to be a bit smaller. This applies to my method of doing the front closure first. At this point you should already have the flatlining (or possibly lining) done, but if you will also have bones, take that into account.**


Wednesday, June 20, 2012

A Review of my Bloomer Workshop


June 20, 2012
This month’s issue of CGW’s Squeals newsletter came out with a very nice review of my recent workshop: Amelia and her Shocking Bloomers, that I presented to CGW in April. It was written by Joy Flasher (thank you, Joy!), a member of CGW, who attended the workshop. Here is her review, and I hope you get a chance to see my presentation in person at Costume College in August this year.
AMELIA AND HER SHOCKING BLOOMERS WORKSHOP
Presented by Valarie ****
Written by Joy Flasher
On April 6, 2010 CGW members met in Buena Park at the home of Elizabeth McCash—thank you, Elizabeth, for hosting--for the first ever presentation of Valarie ****’s workshop “Amelia and Her Shocking Bloomers”.  Valarie, Val to those who know her, is from San Diego.
This writer will try not to lessen the anticipation of those who will attend this workshop at Costume College but I will give you highlights that will be sure to whet your appetite for more knowledge on the topic of Amelia Bloomer and her fabulous outfit.
Val’s presentation was a delightful detour from the usual Dress Reform lectures.  While she included some wonderful and interesting history of the Dress Reform movement Val’s primary focus was on the woman and the clothing that influenced Amelia, and how future garments were influenced by the bloomer style.


Cat Frazier, also from San Diego, modeled a gown from the late 1850’s, which would have been worn with multiple petticoats to achieve the desired silhouette.  Val pointed out the potential and real problems women of that era faced wearing all those petticoats, most of them health related.  Val wore her latest bloomer gown creation for the presentation and had her first bloomer gown on display for everyone to view.
Val’s quest to learn more about the bloomer gown began over a year ago in January 2011 when a costuming friend and mentor gave her a large stash of Civil War costume patterns.  While going through the patterns Val came across a Past Pattern for an 1851 Bloomer costume, which had been produced by Saundra Ros Altman in 1997.  However, the pattern was not completed and never marketed.  So, Val began her search to learn all she could about the pattern but, more importantly, about the bloomer gown that was the inspiration for Saundra’s original pattern.
Val found that the Past Pattern bloomer costume had actually been based on a garment that was part of San Diego Historical Society’s collection.  She was able to get an appointment with the SDHS to view the original bloomer gown that had been worn by San Diego resident Mary Thurston Stickney in 1851.  Mary Stickney was influenced by a newspaper article she read about the bloomer outfit.  How fantastic is that, to be able to get up close and personal with an extant garment you’re researching.  She made the most of her visit with Mary Stickney’s gown by documenting the type of fabrics used as well as construction details.  And, she was able to get some great pictures of this fabulous bloomer outfit. 
During the months that followed Val’s research continued.  When it came to researching this topic Val did not limit her resources to the internet and local historical societies.  Some of her research included contact with different historical societies in New York where the women’s reform movement began.
Val’s research also brought her in contact with Saundra Ros Altman, the producer of the original bloomer pattern.  Saundra’s renewed interest in the bloomer pattern meant that it would eventually be available to the public, and she credits Val in her acknowledgments in the pattern.  Val has been in contact with Saundra regularly to keep us all updated with the pattern’s progress.  As of the date of the workshop the patterns were almost ready.
Val’s presentation is a wonderful compilation of photographs, fashion plates and history, and it is clear that she put a lot time into the research and creation of this terrific workshop.  It is not to be missed!  Those who attend at Costume College will not be disappointed.
Thank you, Val, for a wonderful presentation of the history of Amelia Bloomer’s bloomers.
**Note: A last minute surprise from Val—she got permission from The Doll Reader to reprint their Amelia paper doll pages from 1985 and she will include them with her handout at Costume College.

Saturday, June 16, 2012

Using Pinterest as a costume research tool


June 16, 2012
Last night my friend Cindy convinced me to start up a Pinterest board to hold all my photos for my costume research. The most important reason would be to save them if my computer crashed and I lost everything. Since this has happened twice in the past, and my albums are bursting at the seams, it seemed a logical step. I honestly did try to save them to a disk periodically but they got too big for the disks. I also printed them on paper and kept them in notebooks. Both of those ideas are about 3 years behind and the idea of saving more of them, this time to a thumb drive, was very overwhelming.
Recently I heard a little blurb on the news about the Cloud where you could upload your photos and save them. I’m slightly familiar with the Cloud, since I know that’s where my books on my Kindle are saved. But I wasn’t able to find out how to even get started on it. So for right now, Pinterest seems an easy start.
Except being easy doesn’t mean quick, especially when I probably have over 5000 photos saved. I thought I had even more but remembered many of these are duplicated when I’m working on specific gowns and I copy them all to the folder for that gown.
Pinterest doesn’t seem to have written instructions on how to set one up. In fact it’s very mysterious where you have to have an invitation from someone to “join” it. Cindy was very patient with me for an hour it took me to set mine up and figure out how to just get started. It reminds me of Facebook where everything is so cryptic. It didn’t surprise me that it has some connections to FB. At least mine did.
After finally getting my first photo, and my first follower, Cindy, uploaded, I went to bed. Except it took me over an hour to get to sleep because my brain was still trying to figure this thing out. First thing this morning I began setting up albums on Pinterest and uploading some photos. So far I’ve only got 4 albums and about 20 photos uploaded to each. I have so many more but wanted to get at least get it going.
In my introduction, I started to explain my purpose of my collection of photos, but they limit the number of words you can upload. So basically I find and save photos from the internet and many off of ebay of gowns and accessories that appeal to me, or to educate me on the styles of each time period. Sometimes it’s just a collar or a lapel, a hat or the entire dress. I also save photos showing fabrics of the time, either from catalogs or extant gowns, in hopes that it educates my eye in picking fabrics when I shop.
I’ve been collecting these photos for almost 10 years, and most of them I never recorded where I found them. My most important criteria was the year. But some of them are just generic showing the 1800s, etc. Because I’ve learned how to recognize the years better, I’ve been able to correct those dates now. But I’m sure many are still wrong. I’ve been lazy looking through them.  So enjoy what I have so far. There’s much more to come.   http://pinterest.com/timetravels/