


When our
mini-themed costume group started up for the Friday Night Social at CoCo, “Casino
Royale -Our Favorite Spies”, our group decided to go as the Ladies of the
Pinkerton Detective Agency. After the
organizers of this theme, Joyce & Kristen, did some research on what the
ladies were wearing for the Agency in the 1890s, they designed a “uniform” for
all of us to copy. And copy we did; we were all twins! We all purchased
red/burgundy velvet or whatever anyone could find, and a dark grey fabric for
our skirts. We all bought the Pinkerton badge sets available on ebay and split them among us. I decided to be easy on myself and ordered a white 90s
blouse from Wild West Mercantile.


We had a
variety of choices to make our vests, and many of us tried using the crossover
vest from Truly Victorian’s riding habit jacket, but many found the lapel and
collar was too bulky, so removed that and just made it a center buttoned vest. The
back tails were also cut off straight. The walking skirt was Truly Victorian
291.


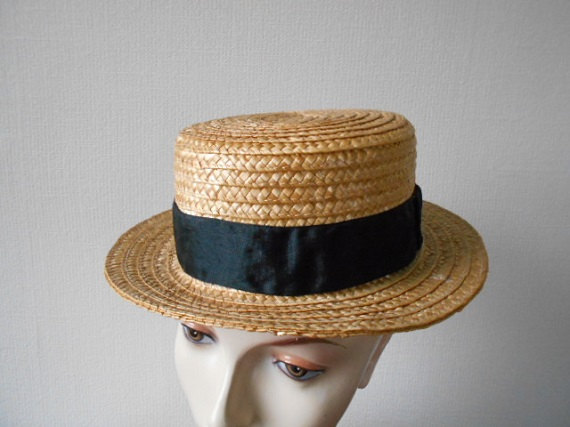
We were all
going to wear boater hats, and I had just bought an antique one off ebay from
England. They’re not easy to find but later Joyce found some at Party City for
$9, and they worked pretty good for the others. We all tied a black ribbon
around our necks for a bowtie. And of course, you know me, I added a watch
pocket and wore my watch and chain with it.

Because
of the simple skirt, a white 90s shirtwaist, and vest, it was an easy outfit to
make, and this got finished about one week before CoCo. I was feeling pretty
flush by now. Just some last minute things to do, like buttons and buttonholes
on a couple other skirts and shirtwaists. *Did you notice I jinxed myself? Right after I announced I was done with everything, the Wednesday night before I was leaving for CoCo, I tried my two skirts on to see what petticoats would work best with them, and both skirts were two inches too long in the front! I had pinned them up on my dressform, which is supposed to be set to my height with the short heels I wear. But I think the last time I had to take it to a fashion presentation, it got readjusted and grew a bit. So I was up until midnight fixing the one, and then to midnight the next night at Costume College fixing the other. Don't EVER say you're finished, or you will jinx yourself.*


**Here is an additional photo taken by Jeanette M.
 I decided to
make two other similar outfits to wear, one during the day when I taught my
class, and another for the Sunday Tea, using the same patterns. But I zinged
them up a bit.
I decided to
make two other similar outfits to wear, one during the day when I taught my
class, and another for the Sunday Tea, using the same patterns. But I zinged
them up a bit.

The patterns
I used were Truly Victorian TV E494 for the shirtwaist, and the TV walking
skirt. The shirtwaist is extremely easy to make, and I wrote about making my
first one while I was visiting my Mom in WA on this blog entry. http://timetravelingincostume.blogspot.com/2017/04/1894-scissors-shirtwaist.html

Last
year after shopping in the Garment District, I saw this black and white cotton
fabric with scissors at Michael Levine’s, and knew it had to be a 90s
shirtwaist. I made a black gabardine cotton walking skirt to go with it, and
made a black silk taffeta corselet belt from Truly Victorian TV 492 to wear also. I’ve seen a black leather belt in photos of the ladies wearing the shirtwaists
so would like to find something like that for it later. Or I may make it a
little narrower.


It turned
out to be my favorite one of the weekend, & got a lot of compliments. I
managed to ham it up when I was able to get my hands on a pair of scissors too.


I was really
at a loss of what to wear for the Sunday Tea, “Tea at the End of the Universe”,
celebrating vintage science fiction. I wanted to wear my usual historical dress
so was going to go with another 1890s outfit. But Cindy suggested making the
shirtwaist from a science fiction fabric, and we chose The Jetsons, still one
of my favorite cartoons from the ‘60s.


I’m still
waiting for those push-button kitchens, and maybe one to make fabric?

So,
accessories were needed for this. I decided I wanted antenna like “My Favorite
Martian”, another 60s TV show, but had no luck finding some. I thought I would
have to buy two car antennas and attach them somehow to a headband. Or make
something like this. That was my backup
plan if nothing else worked.


Then just
before the 4th of July, I was shopping at Party City, and saw the “wall
of wild color party accessories”. Rows of hats/wigs/plates, all matching colors
of yellow, lime green, orange, red, purple, royal blue, and hot pink. I saw a
hot pink wig and a light bulb went off! That wig would match one of the colors
in my fabric, AND I wouldn’t have to even think about what wig to wear. And it
was only $14. While looking at their catalog for other things I saw a glitter
ball antenna headband, but sadly they were out of those. They claim it’s a
Xmas/New Year’s only item. L So, I hot-footed it over to a costume store in
another nearby town, and got one, the last one, with a couple sequins missing
(hard life) but I could fix those. Et voila!


So now my
mish-mash of costume needed a purse. I was on a roll. I first thought of making
one, using an old handbag from a thrift store, and covering it like a book from
a favorite SciFi book. After some thinking, I wanted it to look like the Tardis,
the time traveling police box from Doctor Who. When I started thinking about
this, it was just before the 4th of July, and I was starting to feel
the crunch of getting everything done.


So,
I again wanted to make it easy on myself, and just did a little searching on
the internet for a Tardis purse. Yes, they have those! Except it would be
coming from China, and wouldn’t be here until AFTER Costume College. Then Cindy
found the exact purse on Amazon, and it could be here in two days for the same
price. I ordered it the day before 4th of July, and it arrived the
day after. It was $35 and some of the reviews said they loved it, it was bigger
on the inside ;) and well made. Others said some of the color peeled off, or
the zipper separated. I decided to be very careful with it, as I needed it perfect for one day and didn’t want it to explode on me. Good thing I did, because by the
end of the day, yes, the zipper did separate. So Amazon got my review about
that. It’s a cute purse but needs work.


I wore my
whole outfit with the black skirt I’d made, and the same corselet. I had a lot
of fun wearing it to classes on Sunday morning, as this is not something I
normally dress in. I ran into a Smurf; my guest teacher, Jez Roth; and the
Doctor.


The
wig wasn’t behaving as nicely as it did the first time I wore it. It felt
stringy, and I think it needs a better haircut to shorten it a bit. It was a
lot cooler than a full wig though. I saw
someone else wearing a similar one and she had cut it in a nice bob. How do you
take a $14 hot pink wig to a hairdresser and ask if they can style it, without
laughing? With your Jetson’s blouse and antenna on, that’s how.

The last day at Costume College on Monday, I did my shopping for my costume fabrics in the Garment District for next year, since I already knew what my theme for the year was, "Dressing the Royals", and I had plans for what I wanted to make. But we all know that gets thrown to the wind when you hit all the fabric stores. I came home with more than what was on my list. My plans do include multiple fabric cutting of the same pattern but none will look the same when they're done.
Hope to see you there next year!
****Val****


