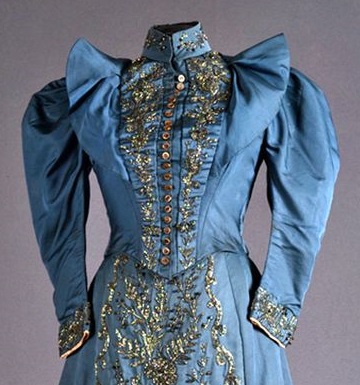
This was something I was able to sew very quickly to wear to the Port Townsend Victorian Heritage Festival for 2017.
The 1890s have become a new passion for me. Besides it being
a very quick and fairly easy pattern to make, it doesn’t require a lot of under-supports
that make it hard to travel or move around. I had the two Truly Victorian
patterns, #494 -1894 shirtwaist & #291 -1898 skirt for a while, but hadn’t
made the shirtwaist yet. After I saw it on two of my friends, I knew it would
look good, even though the sleeves in the pattern photo looked “scary”.


So, my favorite part began: researching from various sites
of ideas for fabric colors/patterns, different ways to trim the bodice and
skirt, hats, purses, and of course hair. Except the hair never happened. I ran out
of time before I had to leave town and wear the dress.
Pinterest has become my go-to site now for photos of extant
clothing, and I especially love it when the item is dated, although you still
have to be wary of that since even museums get it wrong sometimes. Besides getting
ideas for fabric to look for, I picked some of my favorite parts of the dresses
for adding a trim to the shirtwaist, and I knew they liked bright colors. I
liked the contrasting bow you often see on the back of the collar but later saw
it was near the end of the 90s, and my dress would be around 1894.
For the past year, each time I went to the Garment/Fabric
District in Los Angeles, I was keeping my eye out for fabrics that said 90s to
me. Finally, this one popped out at me. It was a deep chocolate brown with
aqua, dark brown, light brown and cream polka dots embroidered on it, for $3 a
yard. Granted it was a curtain fabric, and I had to line it in cotton, but to
my eye it was perfect. I happened to have an 8” wide strip of aqua silk taffeta
that matched the one dot perfectly, and I had to squeeeeeeeze out bits of it to
make my lapels that I finally put on the front of my shirtwaist. I was limited
in the width of the lapels by the width of this scrap of fabric. So sad. I’d
hoped I’d have enough to do the neck bow but sadly didn’t. However later when I
saw that was for a late 90s dress, I didn’t feel so bad. The sleeve shape for
that year was different too.
Since I’d made the skirt before, that went together very
quickly. I did a separate lining for it in brown cotton and just attached it at
the waist with a separate hem. It’s very satisfying to have that hanging on my dress
form so quickly. Except then I had a minor disaster. I had been ironing this
fabric with no problem on high steam.
The following day after I sewed the pocket in, I turned on the iron, and
before it had a chance to get really hot, I set the iron on it, and partially
melted an iron-size spot right at the top of the waist. Eep! Why the heck does
polyester melt at a low temperature, and not a high temperature?!! In a couple
places the fabric had separated so in desperation and a temporary repair, I put
Fray-Check on them, and hoped it would be good enough for now. I still have
lots of extra fabric. *More on that later in the story.*
I played with the pattern and decided to do the blouse
attached directly to the peplum method, without the belt insert. I didn’t plan
on wearing the peplum out over the skirt as I’ve seen some do. I also didn’t
have to do a lot of fitting on it because it just gets gathered into the peplum and it’s a loose-fitting shirtwaist. That’s one thing that makes
this go together quickly. And it’s front buttoning, so yay!
Here’s a note once you start laying out your pattern pieces.
The back piece says CUT 2 ON FOLD. You only need ONE.
And when you cut out the humongous sleeves, unless you have
60” wide fabric, you will have to open up your yardage, then fold that end to
end, rather than selvedge to selvedge, and cut two that way. So don’t short yourself
fabric. The pattern calls for 3 7/8 yds. Just get 4. Make it easy on yourself, just
in case you make a mistake, or want to do more stuff with it, as in self fabric
trims.
The sleeves call for a netting lining to help hold out all
the floofiness. I tried doing this one other time and only lined them halfway
but the ends kept wanting to roll up. This time I cut two layers of the wide netting, not
the fine tulle stuff, top stitched it to the back of my sleeve fabric, then my
layer of cotton lining, and sewed the sleeves together. I used a pair of thread
nippers and trimmed off any of the netting I could get to inside the seams
because you don’t want that stuff sticking out. It’s scratchy! But the beauty
it gives those floofy sleeves is amazing. Later this year I’m hoping to take a
class to make sleeve supports for these and my 1830s dresses, but in the meantime,
this works. And netting is cheap too. Since it’s so wide, I bought one yard and
was able to cut all four layers out of it.
I flatlined everything with brown cotton, then sewed my
front plackets on first to the shirtwaist so they were lined up nicely. Then I
pinned my side seams on me so they were roughly fitted and sewed them. I sewed
the gathers on the body, and on the peplum, after sewing it together, then
pulled them in to fit each other. Voila! Next up was the collar, which I just
did the standing collar, not a high one because I have a short neck and high
necks aren’t so attractive on me. Or maybe I’m not so attractive in them. This
then gave me the opportunity to work on my lapels. I drew a pattern as wide as
I could, cut it out of the aqua fabric, and lined the back with brown fabric to
save on the aqua. I really would have loved to have really wide lapels but it
wasn’t to be. Since this is handstitched on, maybe at some later date when I
find more aqua taffeta I can remake them. Later I relocated the lapels to be
part of the front plackets and liked that better. And the sleeves got attached!
Yay, it’s almost done!
One of my research photos showed some decorative buttons on
the front and off I went in search of pretty buttons on etsy. I wanted dome
shaped ones and came across these that were plastic but looked like glass and
they were brown. They contrasted nicely on the aqua.
With only a week left to finish this before leaving out of
town where I’d be wearing it, I panicked a bit on how to get my grommets in for
lacing in the back. Since it was my birthday, and I knew this wasn’t the only
corselet, or corset for that matter, that I’d need a grommet setter for, I told
hubby he was buying me one for my birthday. I bought it online from a company
up in Los Angeles, Gold Star Tool, surprisingly near the Garment District. It was
also recommended to me by a few others.
https://goldstartool.com/Grommet-and-Snap-Press/ I bought the $69 one with one die set. If all
you need is the small 00 size grommets that most of us use for corsets, that’s
all you need. The photo with the arrows shows you the two die bits it comes
with. You don’t need a cutter one because if you’re a costume maker, you know
you never cut the fabric. You simply separate the threads with an awl and
spread it to hold the grommets.
The easiest thing I had for lacing mine was brown ribbon. I
made it a bit long but it makes a pretty bow in back.
And finally, the accessories. I used an antique purse with a
chatelaine I had to hang It from my waist, just like I saw in some 1890s
photos. *Remember the earlier Fray-Check needed on my skirt? I think I’m going
to have to Fray-Check all the dots on this fabric, because my purse and my
sleeve both rubbed against those dots and frayed them. So, I have a big project
coming up and probably need to buy a bigger bottle of Fray-Check.
For
my hat, I pulled out a boater with a black band I had, covered the crown with
cream taffeta and added stuff. I saw lots of big bows, feathers, and many with
a buckle or brooch in front.
So again, out of my fabric stash came this cream taffeta. The
flowers came from Michael’s. The buckle was a cheap metal one off etsy, and the
scruffy brown feathers came from a Paris flea market that I bought from while
in Paris a few years ago.
I cut a circle of taffeta slightly larger than the crown and
roughly basted it over the top. Then I folded over a wider piece to go around
the sides and roughly basted that on. I reuse my hats often so that makes it
easier to retrim them. I made large
loops of the taffeta to put on the front.
I basted all my trims on, THREE TIMES! until I was happy
with it. That’s one good reason why basting them on is good.
See the bar pin on this lady’s collar, and the comb on the
back of her hair? I did wear one of my bar pins with this, and bought a
celluloid hair comb for the next time.
Everything was finished in time for my trip to Washington
state and for the Port Townsend Victorian Festival that I met up with my
friends from SITU, and the Puget Sound Costume Guild. We walked around town and had tea at the Commander's Beach House. *I also put on the fashion
show there this year. More on that in another post.*
Back home this young lady has been patiently waiting for me
to get back to work on my next project, which I already have started. Yes, it’s
another 1890s blouse!
~~~Val~~~