This is a photo diary of my costuming "travels"; where I've learned and struggled to make historical costumes for myself. They're not always pretty, but always fun, most of the time. And I want to share with others what I learn along the way. **You can find me on Facebook, https://www.facebook.com/Time-Traveling-in-Costume-640703499399817/ or have my posts delivered to your email by signing up at the lower part of the right column.**


About Me

My photo
HI, my name is Val. I'm a member of Costumer's Guild West in Los Angeles, Dean of 2018 & 2024 Costume College; Past President of the San Diego Costume Guild, and a representative of the San Diego History Center. I also put on historical fashion shows for various groups. I make my own historical costumes but don't sell any unless I get tired of one.The eras I've made so far are 1770 up to 1918. My favorite is the 1880s bustle.

Followers

Wednesday, November 7, 2012

A Week of Mourning Ensembles


Oct 31 & Nov 2, 2012
What started out as a vacation turned into an opportunity to dress up in costume. Our friends Jerry and Cindy joined hubby and I on a trip to S. Lake Tahoe, CA, last week, and Cindy suggested since we weren’t far from Virginia City, NV, that we should go there and bring our Victorian mourning costumes to do a photo shoot in the cemetery. On top of that, we could go on a ghost tour. And to top it further, it was on Halloween. I brought my 1850s mourning gown, and Cindy brought her newly made 1870s gown. We lucked out that it was chilly that day, and the threat of rain melted away.
Virginia City is a preserved mining town of the Old West that was much larger than I imagined. This is a postcard I bought that has a better position to show the main street but there was about two more streets and this was pretty long. There were quite a few original saloons, restaurants, and shops, many of which were claimed to be haunted. The wooden plank sidewalk dipped up & down like a roller coaster ride. We even found out later that under that sidewalk was a tunnel that the Chinese were forced to use as their walkway instead of with the public.

When we arrived in Virginia City, the first thing we did was head over to the cemetery, which includes four separate ones. The largest was a Mason’s; another was for Volunteer Firemen. Our friend, Carolyn,  who lives nearby joined us for the photo shoot by Jerry. The majority of these photos were taken by him. http://jerryabuan.zenfolio.com/ And true to the story of it being the most haunted cemetery, one of Jerry’s cameras suddenly refused to work.


Afterwards we walked back down the hill and headed back to town. There were a lot of steep hills and this gives you an idea of the landscape. We walked away with a lot of cemetery dirt on our hems, and later discovered we took some home inside our hems.
 We walked around town and found some great spots for Jerry to take photos. Yep, we hit the Bucket of Blood Saloon.  


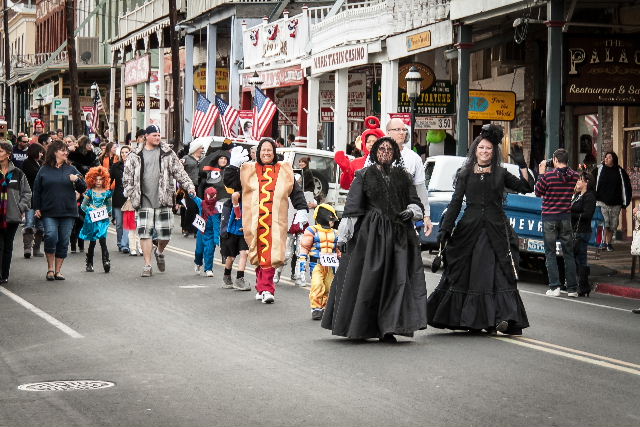
When we walked into the Visitors Center, they admired our costumes and asked if we’d be in the town’s Halloween parade later that day. We said sure, as long as it was over in time for us to go on our ghost tour. So we filled out the application, and at first I just wrote my name but Cindy said no, we need a title. She immediately said The Black Widows! We headed back up the street to drop off our application at the starting point, and things moved to a crawl. The organizers were running late and we were worried we’d either not be able to stay around, or had to step out of line in time to make our tour. Finally things got going, and lots of kids showed up with their parents to be in the parade. There was a group of large dogs all painted in dog hair coloring and dressed as Teletubbies, along with some Catrinas from Dia de los Muertos. The Three Little Pigs and the Big Bad Wolf were there, along with lots of cute kids. I tried to get photos of them but they didn’t stand still long enough.


Finally the Sheriff stopped the traffic in the street and we were ready. We were put at the front of the line behind the banner so we’d be able to make our tour in time. Cindy and I started clowning around and yelling, “Are there any single men available? Are there any single victims….uh, men left in this town?” We got a lot of laughs and really enjoyed ourselves. You can see some of the cute kids in line behind us.


Just as we were finishing, our guys started hustling us along to get over to the Silver Queen Hotel for the ghost tour. We were the only ones in costume and Cindy got picked to carry one of the electronic meters to register any ghostly emissions. *None recorded* And our photos were taken by the ghost investigators on the tour, The Northern Nevada Ghost Hunters www.nngh.net, to see if any images showed up. This one was taken by Jerry but I’ve asked if they would share theirs with us. We saw some really neat buildings, heard lots of interesting stories, and learned some history of the town. And got to see one of the haunted historical houses. I think this was the most interesting Halloween I’ve even spent.

If you'd like to read about how Cindy made her mourning gown, go check out her blog! The Broke Costumer
**************************************************************** 
Friday, Nov 2
 Two days later we had all arrived home and Cindy and I were scrambling to get our mourning costumes cleaned and back in order to wear it this evening for the Dia de los Muertos celebration in Old Town San Diego. This would be the third year since the celebration started in Old Town that our costume guild would lead the Candlelight Procession from Old Town to the El Campo Santos Cemetery.
While I was taking out my hem at home to raise it up a bit I found I had brought quite a bit of grey dirt back with me from the cemetery in Virginia City. I thought it interesting that tonight I would again be walking around in a cemetery and would be sharing the dirt with some from V. City.
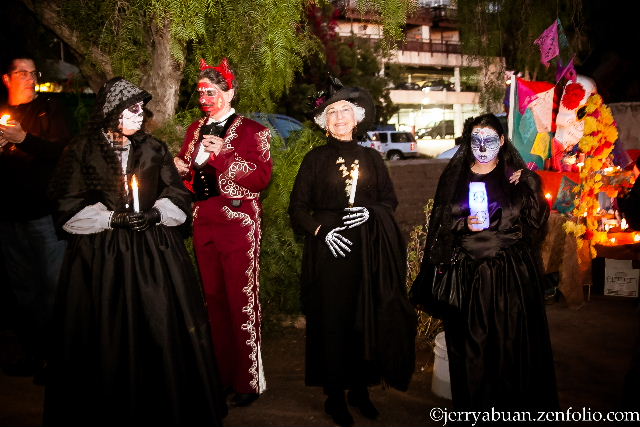
I decided this year to paint my own Catrina face and had practiced a bit but nothing prepared me for how hard it was to paint my entire face. I couldn’t get the white liquid makeup to cover smoothly and worst of all, without my glasses on, I couldn’t even tell when my brush was touching my skin until sometimes it was too late. After washing it off twice, and almost giving up, and I steamed ahead and decided no matter what, I would finish and wear it. I consoled myself that most of the time I’d be wearing my veil, and it would be pretty dark by the time the Candlelight Procession started, which I and our costume guild were going to lead again this year. 
 
Our members started gathering on the steps of the Cosmopolitan Hotel prior to the Procession in the town square. Of course we immediately began having our photos taken by the public, and with them, which is what it’s all about folks! We eventually had 22 of our members show up. We finally had to take our bows and go get in line to start the Procession. This year they had this beautiful canopy to lead us by. Last year 2000 people showed up to walk in the Procession. This year it was supposed to at least double that.


It was kind of funny following the canopy because they weaved around a bit and when we finally hit the main street with its divided line so we had a straight line to follow.
Once we were at the cemetery the canopy was raised over the gateway and I was the first to walk through. Unfortunately there was a crowd of photographers just inside that started taking my photo and it kind of stalled us for a minute. This year our guild members stood around the back gate with our candles to show the other attendees where the exit was. It seemed to help correct the bottleneck from the previous years of only having the front gate to exit from. We again became part of many people’s photographs.


 At the end of the evening, we trudged back to the Cosmo to try and find someplace for dinner in the area, but found most places had 1-2 hrs wait time. That was kind of expected so we all went different directions to track something done. But not before we again became part of many photo ops on the steps of the Cosmo. So we sat listening to our tummies growling for half an hour before we took our final bows. I later drove through In & Out Burgers for dinner, and they said I was the fifth person to come through with their face painted.
 Again my thanks to Jerry Abuan for all these beautiful photos. To see all the rest of his, please go to his website. http://jerryabuan.zenfolio.com/p766112071


Tuesday, November 6, 2012

Back to the '50s; the 1950s

Oct 20, 2012

I have consistently said I didn’t want to wear anything later than the decade I was born in. Or dress like my mother. I want to wear the graceful long skirts and corsets. But the past two years I have missed out on the ‘50s Bash at the Corvette Diner with our guild. Since I don’t want to, or have time to, make something from the 50s, I’d been on a vintage hunt for the last 3 months. With the help of my friends, Cindy & Cat, we scoured flea markets, thrift stores & vintage shops for a dress and all its accessories. I lucked out on a 1950s vintage dress at Frock You in San Diego during one of their sales and only paid $35 for this. It has a self-fabric one inch wide belt and is made of cotton. Read= washable.
                                      
I first wanted to add red accessories. I found some red shoes on sale at an antique shop for $10, a pair of red button earrings for $5, and then made an investment of an antique Bakelite bracelet.  But finding a hat was harder.
                

Soon after I bought the red shoes with its narrow heel, I ended up having Achilles tendonitis. So wearing them was out of the question. My friend, Cindy, convinced me to make it dressier and said I needed white accessories. So after finding this pretty white floral hat at a flea market, I was encouraged.  It makes me think it’s easier to start with the hat and then find accessories second.
I saw a white square basket purse I could use but was convinced it could be found cheaper. I also bought a pair of white-on-white embroidered gloves that belonged to the seller’s grandmother. I told her that her grandmother would be going to a lot of costumed events with me. I couldn’t find any shoes that I could comfortably wear and after being shown a vintage shoe ad for 1950s that had a 40s-style shoe, I bought a pair of dance shoes from dancestore.com .  But even though it was two months after my injury I wasn’t able to wear them very long, so I reverted to a pair of white flats I have. I have yet to find a purse but I’m not sure the 50s are in my future unless it’s next year at the 50s Bash.


I put what I had together and took some test photos, mostly to see how it all looked. I added a pearl necklace, clustered pearl earrings I bought in WA for $4, and a cheap pearl bracelet. I tried wearing a curly wig I had with it but felt it was a little long and full. I didn’t want to cut it either. *See the little neck straps in the second photo? That’s part of the trim made of self fabric ending with a bow on the front.*

   
 I started searching for photos of models and movie stars of the 50s for hairstyle and makeup ideas. My favorite was these two short haired ones, one being of Audrey Hepburn, a very classy lady. I decided my own short hair would be fine. And I got a good idea of how to do my makeup. My first impulse was to wear bright red lipstick. I’m dying to do that. But it was recommended for my skin tone and hair color that a pinkish-red was proper. Darn.


                          So this is my first attempt at 1950s Makeup Style.
After our lunch at the Corvette Diner, they asked if we all could do a fashion show for the other customers. Being show-offs, we agreed. It was at this point that I realized flat shoes would have been better, but I made it through.
 Later we did a fashion shoot outside with Cat's vintage truck and glammed it up.  By this time I had put on my little red sweater and I was handed a pair of sunglasses and white purse for the photo. Oh Lordy, I look like my great-aunt Esther again!


Saturday, October 13, 2012

Versatile Blogger Award

I got a surprise post today that I had been awarded the Versatile Blogger Award by laluebonnet of Teacups Among the Fabric blog  Thank you! I'm honored that my blog was noticed and felt it deserved this recognition.
I'm not sure what it all entails but I am required to share a bit of myself. The rules of the award are that you must:
  • Thank and link back to the person who nominated you.
  • Paste the award to your blog.
  • Tell 7 things about yourself.
  • Nominate 15 other blogs. 
1. My mom tells me I loved dressing up in costume when I was a little girl, and not just at Halloween. But I do remember a gorilla suit she made for me at Halloween when I was about 6, and that's not my favorite memory. My favorite was the I Dream of Jeannie outfit. And a pilgrim. 
2. My mom sewed most of my dresses and I wanted to sew too. I remember not liking my sewing classes but apparently it stuck and I can sew. But I was impatient at how long it took to make anything. 
3. I was extremely shy and decided since I like to read, I wanted to be a librarian where I could hide in the library. 
4. I went on a ride-along in a police car at age 15 and that changed my whole life. Now I wanted to be a police officer.I began volunteering at our police department and eventually was hired. I retired 28 years later.  
5. I lived in the same small city I was born in until I was 24. I still live in the same county 30 years later. 
6. I got interested in wearing historical clothes about 10 years ago, and discovered those were harder to make than modern clothes. 
7. I've spent the last five years since I retired working on making my costumes better and am able to spend more time wearing them now. And I love to write about them. 

My Nominees are:
1. The Fashionable Past   Katherine & I both met during our first attendance of Costume College, and she likes writing about her costumes too and sharing how to make them. 
2. A Frolic through Time.   ZipZip is again another costumer who likes to share how she makes her own gowns. 
3. Adventurers of a Costumer  Lindsey is another blogger who shares her historical research. 
4. The Broke Costumer  Cindy is my friend and I'm so happy she shares how she makes her costumes with less money, since this can be an expensive habit. 
5. All the Pretty Dresses  Isabella finds all these pretty dresses on ebay, etc, and gives some great historical information on them, & whether they're correctly ID'd or not. Great fun to read and learn! 
6. History in my Wardrobe Aylwen lives the dream of costumers; she's a costumed dance instructor, makes costumes for herself and others, and gets to travel to other countries doing all that! She lives in Australia so that's a lot of air miles. 
7. Louise Penny This has nothing to do with costumes. Louise is a Canadian mystery author, and I first discovered her books on Inspector Gamache while traveling through Quebec. I was hooked after the first one. Her posts described the beautiful area she lives in, so it brings back memories of that trip. Her first book was Still Life. 
8. Natalie Garbett-Maker of Historical Clothing and Costumes I met Natalie last year at the Costume Symposium in Colonial Williamsburg and we became friends on Facebook. I've followed all her fabulous costumes she makes and wears in Paris and thereabouts. What a life! 
9. Nancy's Daily Dish  I got interested in English transferware dishes, and Nancy has such pretty stuff. 
10. Lady Carolyn Carolyn is another costumer I met at Costume College and she lives a costumed life too. She does presentations at different locations and on cruise ships sharing her historical clothing and the stories behind them. Need a partner, Carolyn? 
11.Maggie's Costume Wardrobe  I met Maggie on LiveJournal where we both used to write about our costume adventures. You may already know her from her Costumer's Guide to the Movies website where she comes up with all those FABULOUS photos of costumes in the movies. 
12. Wearing History  Lauren is another costume friend of mine and besides being very generous in sharing how she makes her costumes,  and very humble about them, she has become an enterprising business lady with her vintage pattern reproductions, Wearing History. 
Part of the rules don't require you to describe why you picked your favorite blogs, but you can see a pattern there, where most of mine like to share what they've learned with others. And, well, as you can see, I like to write. 

Sunday, September 30, 2012

Little Girls Civil War Dresses


Started March /Finished Oct 2012
I first started making these Civil War dresses last March on my handcrank sewing machine at a reenactment. I was asked to make some for a sutler’s booth to sell them. I only got as far as sewing the skirts and growth tucks with all the questioning from the public I was getting. And I was enjoying that. But once home I had big girl clothes to make and they were set aside.
In September I made a trip up to Washington to visit my Mom for two weeks, and knowing I was going to have some down time I thought this would be great to finish them. So I brought the three with me I’d been working on. I was using Simplicity 4737 and was also going to try Elizabeth Stewart Clark’s pattern #250 (1850-65).  After questioning a few Civil War reenactor parents, I found their preference for sleeves are the pagoda style.


 I found a couple fabrics for $3 a yard at Walmart that I thought might work, and then started looking online for photos of extant dresses and photographs of little girls to see what fabric designs would work too. I wished I’d done that first because my first two fabrics aren’t bad but they remind me a little more of 1850 but it’s not impossible that they would have been used that long.


I loved some of the adorable photos of little girls I found, many on ebay. I didn’t even think of using plaids until after seeing some of them. And polka dots work too. I saved pictures of the fabrics of extant gowns too and most were tiny little floral prints, not unlike what we see in the stores today.


While I was visiting my Mom I checked at their Walmart and found these two blue fabrics on the clearance shelf. If they had more I probably would have bought some for me but they had barely enough for a little girl dress.
The first three fabrics were cut out of the Simplicity pattern, and the brown out of the ESC pattern. Having no children of my own, I have no clue what sizes are for what ages, so I’m dependant on what the pattern told me. I even stopped one lady in an antique mall with her daughter and asked her age so I could get an idea of what size she might wear. I tried very hard not to look like I was stalking them.  I did find this skirt length chart that I thought might be handy that shows the ages and the length it should be.           
 Of course I cut and sewed these on my “assembly line method”, and as I made them I found some shortcuts and a way to use less of the fashion fabric. Both bodices required you to cut out two and allowed enough fabric for that. After doing two of them, I thought that was wasteful and from there I started cutting the lining out of a plain less expensive muslin I had. Also the waistband requires cutting two, one for the outside, & one inside that you slipstitch on top of the outside one. It’s not much fabric but the time saved of not putting it on the inside was worth it. I was told the sleeves on this run short so I added 2 inches to the length plus it has the growth tucks that can be let out. The skirts also had two growth tucks on them.
The Elizabeth S. Clark pattern is made a little differently. The patterns aren't really sized and you sew it to fit your little girl. Without having any measurements to fit it to I had to make it the largest size it came with. Supposedly you gather the neckline in to fit the child and I didn’t realize that until after I’d already sewed the lining to it. So I just took a couple tucks in the neck. It has a very wide neckline and I’m hoping this is enough to keep it up on the child’s shoulders. I only cut out one dress from this pattern and had planned on doing long sleeves on all the dresses but I ended up not having enough for this pattern and made the short sleeve version instead. This pattern requires more fabric than the Simplicity one.  I’m really liking the Simplicity pattern more and more. After making one dress from each pattern, I've decided Simplicity is a better choice for me. 
After sewing the bodice front and back pieces together at the side seams and shoulders, I repeated it with the lining. Then I sewed the bodice and the lining right sides together, & flipped it right side out after trimming the neckline. I topstitched along the neckline very closely to the edge and it has the appearance of piping. The bodice was pinned to the waistband, matching notches, and I pleated the excess between them. I pleated the sleeves into the armholes rather than gathering them to have less bulk. Then I pinned the skirt to the lower part of the waistband, again pleating it to fit. On both the top and bottom of the waistband I topstitched them close to the seam lines. I machine-sewed buttonholes on the back and used some shell buttons I bought by the pound in a button store in Los Angeles Garment District, called Trim 2000 Plus, on Maple Ave.
The hardest part of making these I think are the growth pleats. I haven’t found a quick way to do that yet. They need to be measured, marked and pinned, then pressed & topstitched after the side seams on the skirt & sleeves are sewn because the tucks need to be able to be let down if needed, and if they’re in the side seams, that won’t work. It’s tedious and need to be measured to make them even. I’m working on that aspect.
 I can’t say how long it took me to make each one because a couple were started on my handcrank machine, and a couple started at a later date. But since I’ve made these, they will go faster now. I had trouble finding some fabrics that would work at my $3 and under price range when I first started looking but since I started these, I found a few more fabrics that will work. I even saw a cute little girl’s fancy dress that I think could be made using some leftover plaid silk taffeta I have.


Saturday, September 1, 2012

My re-creation of an 1851 Bloomer gown, PART 2


Started Jan 2011/ Completed April 2012
May 2011
In March I began sending out emails to different historical societies and museums, mainly on the East coast, asking if any of them had documents or extant Bloomer outfits. My focus was on the area of Seneca Falls, NY because this was where the Women’s Rights Movement started and where Amelia Bloomer was first documented wearing the Bloomers. I had many responses telling me they had the underwear type bloomers and sporting costumes but these were from a later period. I tried different historical societies that were suggested, but without much luck. In May I had a response from the Ohio State University pointing me to the Seneca Falls Historical Society, who had an extant gown in their museum. The Costume Collections Manager at SFHS sent me a woodcut photo of Amelia Bloomer, and I later purchased a copy they had of Ameila Bloomer’s newspaper, The Lily. She then forwarded my email to Courtland County Historical Society, and to Pamela Poulin, Professor Emerita, at John Hopkins University. Pamela had actually portrayed Amelia Bloomer and wrote an entire treatise on her. Pamela was very helpful with lots of information on Amelia and the dress reform movement but also said I needed to go to the original source of the Bloomer gown, Elizabeth Smith Miller. Miller was the first woman to start wearing a bloomer gown after seeing some women in the Oneida Community, a local religious sect, wearing men’s pants under shorter dresses while they worked.

Miller created her own version with the full pants known as Turkish trousers.


 It was at one of the Women’s Rights Conference that Amelia was introduced by Elizabeth Cady Stanton  to her cousin Elizabeth Smith Miller, who was wearing her bloomers. Amelia adopted the same dress after that, and it was the newspapers who reported Amelia wearing the pants, and named them Bloomers.
Pamela made suggestions of more museums to contact, and to go back to the ones in Iowa, where Amelia eventually lived out her life. I told her I was focusing more on the dress story than Amelia but that she would be a focus in my story.
Pamela also introduced me to Jody Luce, of Peterboro, NY, who portrays Elizabeth Smith Miller, and actually lives in Miller’s historical house. Jody and I began a lively conversation back and forth on the costumes, and she shared more information and photos of Miller with me. Jody helps run an annual fund raising tea each year in September for their historical society, and always wears her costumes for it.

The Courtland County Historical Society sent me copies of newspaper clippings of a beautiful all black bloomer costume they had on display that was covered in embroidered designs. It was thought to be only one of two gowns in the country.
At some point in my conversations between the different historical societies it was mentioned that one of Amelia’s Lily newspapers had information on making a bloomer gown but we haven’t been able to find it. The two museums claiming to have the ONLY Bloomer gown known to be in a collection were very excited to learn of other’s and of the one in the San Diego collection.
I was also emailing back and forth with Saundra Altman of Past Patterns sharing some information and encouraging her to finish the pattern in time so I could bring some to Costume College the following August. The best she was able to get me was a copy of the partially completed one but it had a cover photo so I was finally able to see what it looked like. When Saundra mentioned there was a family photo of the original gown being worn by its owner in a book, I contacted our SD History Museum, and found out they carried the book for sale in their giftshop. I raced on over there and bought the rather pricey book, but the treasure was worth it! There she was, Anna Stickney, on the right, wearing the original gown before it was altered to a Bloomer gown. I just about yelped in the store when I saw it, and the neat thing was even though the photo was black and white, I now knew it was an avocado green.

With much of this information in hand, I was able to finish my copy of the San Diego gown and I wore it to Costume College with my friends in August of 2011. My post on making it is this entry. http://timetravelingincostume.blogspot.com/2011/08/1850s-bloomer-gown.html  I shared some information on the pattern and got a list of names of people who were interested in purchasing it when it was completed. My accessories that I wore with it are similar to those shown in photos of other Bloomer ladies; the flat hat and a watch chain. I also wore a wig with two gold bows in the back. *Remember this when you see the final cover art on the pattern.* When I first wore the green one I added a gold sash similar to one that Amelia wore.
I wore my gown a few more times in fashion shows both in CA & WA, and the Suffrage Parade in Balboa Park, San Diego. By this time the gown was starting to show some stains, and the fabric doesn’t wash well. It’s also very hot to wear in our southern climate, so I began planning a second one, this time in cotton. I chose to make it in the style of Mary Stickney’s sister’s gown in the photograph, with a v-neck. My post about this dress is in this previous entry. http://timetravelingincostume.blogspot.com/2012/04/1851-brown-cotton-bloomer-gown.html 
I continued going back and forth with Saundra getting different dates she would have the pattern completed, and finally to set a date for April in 2012, when she promised them by March, so I could do a presentation on it for Costumer’s Guild West in Los Angeles. But Saundra only sent me three copies of the pattern but still incomplete in it’s directions. Saundra also told me I would be the only one they could purchase the pattern from at this time, and it wouldn’t be on her website.
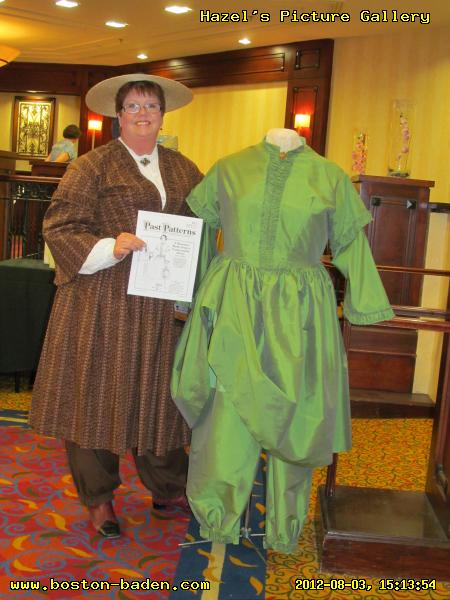
I wore my new brown Bloomer outfit for my lecture and displayed the green copy on my dressform. My presentation on it went smoothly and I was very excited over the great response I had for it. I had a lot of fun when I was finally able to reveal the very unusual part of this gown: that the Bloomers on this particular gown are actually SPLIT DRAWERS. In all my conversations with other museums and historical societies, the ones they had were more like men’s pants that were pulled up and buttoned at the waist.      My entry on that lecture is here. http://timetravelingincostume.blogspot.com/2012/04/my-lecture-on-re-creating-1851-bloomer.html  I sold those three copies of the pattern I had with the promise of sending the completed directions to them when they were done.
Now that I had my first presentation under my belt, I felt I was ready to do my class at Costume College in August. I really began pushing Saundra to finish the pattern, which she had decided to redesign the cover art and had more historical documentation to add to it. By the time I was finally able to purchase 18 copies to bring to my class, the price had gone up $10. I had hoped to buy more than that but it was too much money for me to put up front all at once. And I wanted to see how they would sell. Saundra had acknowledged me in her pattern instruction booklet, so I went through all the patterns and signed my name next to it.
I was a little disappointed in the change of the cover art because I thought the first one was so cute but Saundra wanted to show the original gown and that the pattern was also for the full length too. *Notice the hair style on the new addition to the artwork? Remember how I wore my hair when I wore my gown?*


 It turns out that the excitement I shared in my class at Costume College infected everyone there and they were lined up in the front of the room to purchase them. All but four of the extra large ones were sold. More on my class can be read in this entry. http://timetravelingincostume.blogspot.com/2012/08/the-wearing-of-costumes-aka-costume_13.html      Since being home I’ve had two of the remaining patterns put on hold so now I feel comfortable ordering a few more. I’m booked to present my class on September 22 for the San Diego Costume Guild, along with Jody Regan’s The Harvey Girls presentation. We decided to join together and do a Costume History Lecture and Lunch. And on January 28, 2013 I’ve been booked to do my presentation for the San Diego History Museum, and was told the Costume Society will be there. Eeek!
ETA: This was my presentation at SDHC      http://timetravelingincostume.blogspot.com/2013/02/my-presentation-at-san-diego-history.html
One of the fashion shows I was in wearing this in Old Town San Diego.   http://timetravelingincostume.blogspot.com/2013/08/women-of-west-fashion-show-in-old-town.html


My re-creation of an 1851 Bloomer gown PART 1


Started Jan 2011
Shortly after Costume College in August 2010, a group of us started talking about what we were going to make for the following year to wear. One of our Guild members suggested Bloomer costumes, and four of us decided to go with that. So we collected a few photos of fashion prints for some ideas, and I even came across a color print of one in an antique shop in Las Vegas that I bought. It had originally come out of a fashion magazine but I was unable to tell which one. The illustration is by Nathaniel Currier in 1851.                                                   

And this was Amelia Bloomer.             

At the time I really liked the colors on these two fashion prints with the dark pink or maroon, and the more I looked at them, I realized I could use pretty much any historical bodice and skirt pattern I had and just shorten the skirt.


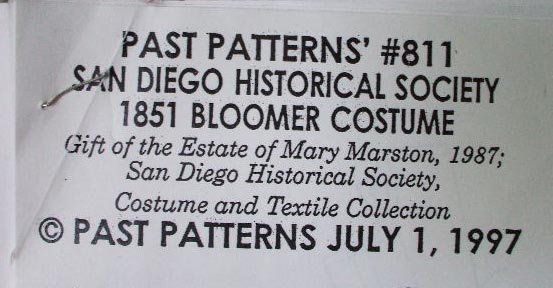
 Shortly after that I “inherited” a large stash of Civil War costume patterns from a friend, Mary Swanson, who was downsizing her collection. In it I found a Past Patterns issue for an 1851 Bloomer costume. It had been produced for the San Diego Historical Society, based on an extant gown in their collection that was a gift of the Mary Marston Estate in 1987. Most of us in San Diego are very familiar with the Marston House in Balboa Park, and I’ve even attended fund raising teas in costume there.
I was really excited about finding this but the original envelope was missing, and there was only a line drawing of the bodice in the pattern directions. So I couldn’t really tell what it looked like. 


I contacted a friend who is a docent at the Marston House, Gabe Selek, who hooked me up with Tammie Bennett at the SDHC Costume Collection Department. She told me the pattern had been made off the costume in their collection by Past Patterns in 1997 and they no longer had a pattern. She said the pattern probably had been sold in an “attic sale”.  She said the gown was very fragile but had been conserved.  The only photo she was able to find was one taken while the costume was on tour at the MET. It wasn’t a very good photo as it was taken during the set-up there.  The costume had been researched by Amy Simon, former SDHC Curator of Costumes & Textiles, and she had also supervised the pattern project.

 I was thrilled that now I knew what color the extant gown was and I decided I wanted to copy it. I also decided at that moment that I wanted to propose a class on Amelia Bloomer and her Shocking Bloomers at the 2011 Costume College.  I hoped to have the outfit done in time for it, and my three friends hoped to have theirs done also. Since Amelia was a strong believer in women’s rights and temperance, and last year some of the College attendees had started a suffragist costume theme, I thought this would fit right in since they planned to continue it this year.
I searched on the internet for the pattern but found nothing. Nothing! It’s like it didn’t even exist. But the pattern had the PP copyright stamp on it. So I contacted Saundra Altman, owner of Past Patterns, and told her what I had. She said the pattern had been made especially for the SDHS and was never issued to the public. In fact she hadn’t even written the directions for the Bloomer pants. I told her what I was attempting to do, and she got excited about pulling out the pattern and finishing it to put on the market. We’re hoping it’s in time for my class. She thinks she has photos she took of the extant gown and is still looking for all the documentation. But she said she’d send the pdf instructions for the Bloomers so I could finish it. I told her I’d also like to have the patterns for sale in my class, either by bringing them from her, or maybe she could come herself. No decision has been made on that at this point.
My friend who gave me the pattern had already cut her size out from the center of all the pattern pieces, so I painstakingly taped them all back together again, which took an hour. Then I traced a copy off of it in my size, which took another hour. I had all the pattern pieces: the jacket, the short skirt, and the pants.
I asked Tammie at SDHS more questions about the costume, and was told it was green silk taffeta, and most of the parts that didn’t show were made of linen and polished cotton. This even included a short portion of the sleeve under the sleeve jockeys, and the entire portion of the Bloomers that were under the skirt. They said the outfit had been dated by Edward Maeder, former Curator of Costumes & Textiles at LACMA. He believed the gown was made from the dates 1848-1850, and converted to the Bloomers about 1850-1851. He had determined that the outfit originally had been a full length gown and had been cut down, and the portion of the skirt cut off was used to make the Bloomers. Tammie mentioned a quote from an article in the California History magazine, 1982, “Bloomerism Comes to California”, that in a letter it said the aunt of Anna Marston was seen wearing them when she arrived in California in 1851.
I lucked out in that I already had 7 yards of a avocado green silk taffeta very similar to the extant gown, and started cutting out the pattern in a muslin to fit me. The directions are fairly simple but detailed, and so far I haven’t had any problems understanding it;  until I got to the sleeves. It had so many pieces and some seemed repetitious of each other, until I realized half of the sleeve on the top was separate because that portion was cut from a different fabric, like polished cotton, and not the fashion fabric. It has a sleeve jockey that covers that portion and you wouldn’t see under it. Ingenious! It saves a piece of silk. Similarly the top part of the Bloomer pants is made also with polished cotton, and the bottom of the silk taffeta, since the top would be covered by the overskirt. It was the same as other period sewing techniques of just doing ruffles on a skirt in the fashion fabric, and the skirt base was a cotton. I decided since I had plenty of my silk taffeta there was no need to be conservative, so I cut the sleeve as one piece without doing a cotton cap. This will probably be the only change I’ll be doing from the original.
When I started sewing the bodice together I noticed the back was all one piece. There weren’t any side back seams, or darts. And when I put it on it hung straight down my back and was kind of sticking out at the bottom. Right off this felt wrong since all the other patterns I’ve used of this period do have some kind of seam in the back to fit it closer to me. So now I’m waiting to see if either Saundra has better photos showing the back, or if Tammie is able to get me an appointment to come and see the extant gown. Things move slowly.
On March 2, I had an appointment with Tammie to view the Bloomer outfit, and hopefully take photos of it. I’m so excited I’m already dressed and ready to go two hours before my appointment.  The offices of the San Diego Historical Center are in Balboa Park, downstairs of the Model Railroad Museum and Museum of Photographic Arts.
My visit to the Costume Collection was both exciting and surprising. The archival room is full of tall shelves containing many many boxes of preserved clothing and accessories. There were photos on the front of each box showing what was in them, and there are some beautiful ones. It’s a shame no one can see them.
Tammie had the Bloomer gown spread out on the table with tissue paper. There were rolls of tissue and archival paper between folds of fabric and supporting the body of the gown. There was no visible tears in the fabric but she said it was weak.
 I was first surprised by the color. The photo that I’d been sent showed it to be a grasshopper green. In actuality it’s a dark avocado or hunter green color. But when photographed, it shows lighter. The gown is silk taffeta with a linen lining, and glazed cotton was used for the top part of the Bloomers. Without touching the glazed cotton, it looked like crinkled leather.
I was really interested in seeing the darts and any boning used, and if there were any seams or darts on the back of the bodice, since the pattern didn’t show any. Without them, it didn’t fit my back very well. Other than what appeared to be a pull in the fabric, there are no seams in the back. The two front darts had boning, and one side of the front closure had a bone that only went to under the bust line. There weren’t any on the side seams.
It’s a very narrow back, and overall it looks like the wearer was under 5 ft 4” tall. So she was a slender small woman. There was a lot of piecing on the sleeve arms and even in the front bodice next to the darts.
The trimming on the gown was a graduating narrow pleat from the neckline down the front closure where it narrowed out. There were also pleats on the sleeve jockey and the cuffs. There was piping on the sleeve cap and shoulder seam. It closed in front with hooks and eyes.
Tammie said they have no documentation that the outfit was ever worn. It was originally a full length gown, and the skirt was cut off short to 26”, and that portion was used to make the bottom half of the Bloomers. The top half was made of glazed cotton. As Tammie was showing me the Bloomers I noticed the front opening of the pants with buttons but when she opened them I had the surprise of my eyes. These were split drawers! It was two separate legs and they were attached to a waistband. I had expected something like men’s pants and closed at the crotch. I started wondering if this was the norm because all the photos and fashion prints I’ve seen never show the pants themselves. They were always covered by a skirt. If this is what they were, I can imagine how shocking these were because these ladies were wearing their underpinnings exposed.
I’ve been searching online for any other extant Bloomer costumes in collections but so far haven’t come across any. This leads me to believe that SDHC may have the only one in a collection.
5-31-11
Over the last month I started construction of the bodice. I flatlined it with 100% cotton.  It’s fairly easy to construct,  and while doing it, I learned how to do piping along the seam lines of the armhole, neckline,  & bottom of the bodice.  The self trim is a narrow ruching down the front closure on both sides, which narrows in at the bottom, around the sleeve jockey and the sleeve cuff. It was made by turning a 1/4 inch under on both sides of the strip of fabric, then a gathering stitch on the sides. It was gathered and in photos, it looks like pleating.
At this time I only have the pattern directions for the bodice, and as I completed it, I realized it also didn’t include the skirt directions, which is attached to the bodice. The skirt has a pocket on one side, and a watch pocket on the other. The pattern pieces show where these go but not really how they were done. The pocket was made with cotton but had two strips of the silk taffeta to face it with. I ended up just using my own knowledge and figured out ways to sew them in; aka, “fudging it”.  I sewed the 7 skirt panels together,  and now I get to start the cartridge pleating on it.
For the last two weeks I sent out emails to different historical societies and museum collections trying to find extant Bloomer gowns. I finally started getting some responses from the area around Seneca Falls, NY, which is where the women’s movement and dress reform was focused. Those contacts have been referring me to other places when they can, and am still waiting for responses to those. One contact, a Professor Emerita of John Hopkins University, Pamela Poulin, Ph. D., has studied Amelia Bloomer extensively, and even portrayed her in costume. Those costumes were loaned to her, and she doesn’t have any photos of her in them. But she highly recommended I should go to the museum there, and I could even stay with her while I was visiting. She also told me to purchase copies of The Lily that Amelia published that had descriptions of the Bloomer gowns, and how to make them. I sent an email off to the Seneca Falls history museum immediately.
                                              Go to Part 2