This is a photo diary of my costuming "travels"; where I've learned and struggled to make historical costumes for myself. They're not always pretty, but always fun, most of the time. And I want to share with others what I learn along the way. **You can find me on Facebook, https://www.facebook.com/Time-Traveling-in-Costume-640703499399817/ or have my posts delivered to your email by signing up at the lower part of the right column.**


About Me

My photo
HI, my name is Val. I'm a member of Costumer's Guild West in Los Angeles, Dean of 2018 & 2024 Costume College; Past President of the San Diego Costume Guild, and a representative of the San Diego History Center. I also put on historical fashion shows for various groups. I make my own historical costumes but don't sell any unless I get tired of one.The eras I've made so far are 1770 up to 1918. My favorite is the 1880s bustle.

Followers

Tuesday, February 23, 2016

Salvaging a Disintegrating Bonnet

 With four days left until Dickens, my purple dress is done minus a button or so. But over the weekend I found out the temperature that day was predicted to be 88d, although it has since dropped to 83d but still, wearing a dark purple faux silk taffeta dress? Since I don’t behave very well when it’s hot, I stayed awake one night dreading wearing it and becoming a sodden mess by the time the fashion show began.

 So a decision was made that I would wear my blue and white cotton lawn dress during the day, and changing into the purple dress for the fashion show. Good thing is at least it won’t get wrinkled.
 But I never got around to finishing a bonnet for it. I was just wearing a lacy day cap with it. And the bonnet I was working on I loaned out to a friend who is also going to Dickens. So I dug through the bonnet stash of unfinished forms, and came up with this one I’d bought off a street corner in the LA Garment District. Probably paid about $3.50 for it.
 My plan was to remove the black grosgrain ribbon and replace it with white, and add some white ribbons with blue floral trims. I bought a stalk of multiple blue flowers at Michaels, and cut it up into parts, then arranged three parts and tied them together, later adding some hot glue to hold them in position.
 This was going to have to be a quick and dirty bonnet. I normally hand-tack my trims because I can remove them easily later to do a different color or design. But because of time constraints and being cheapo, I was using hot glue.
It went downhill from there.
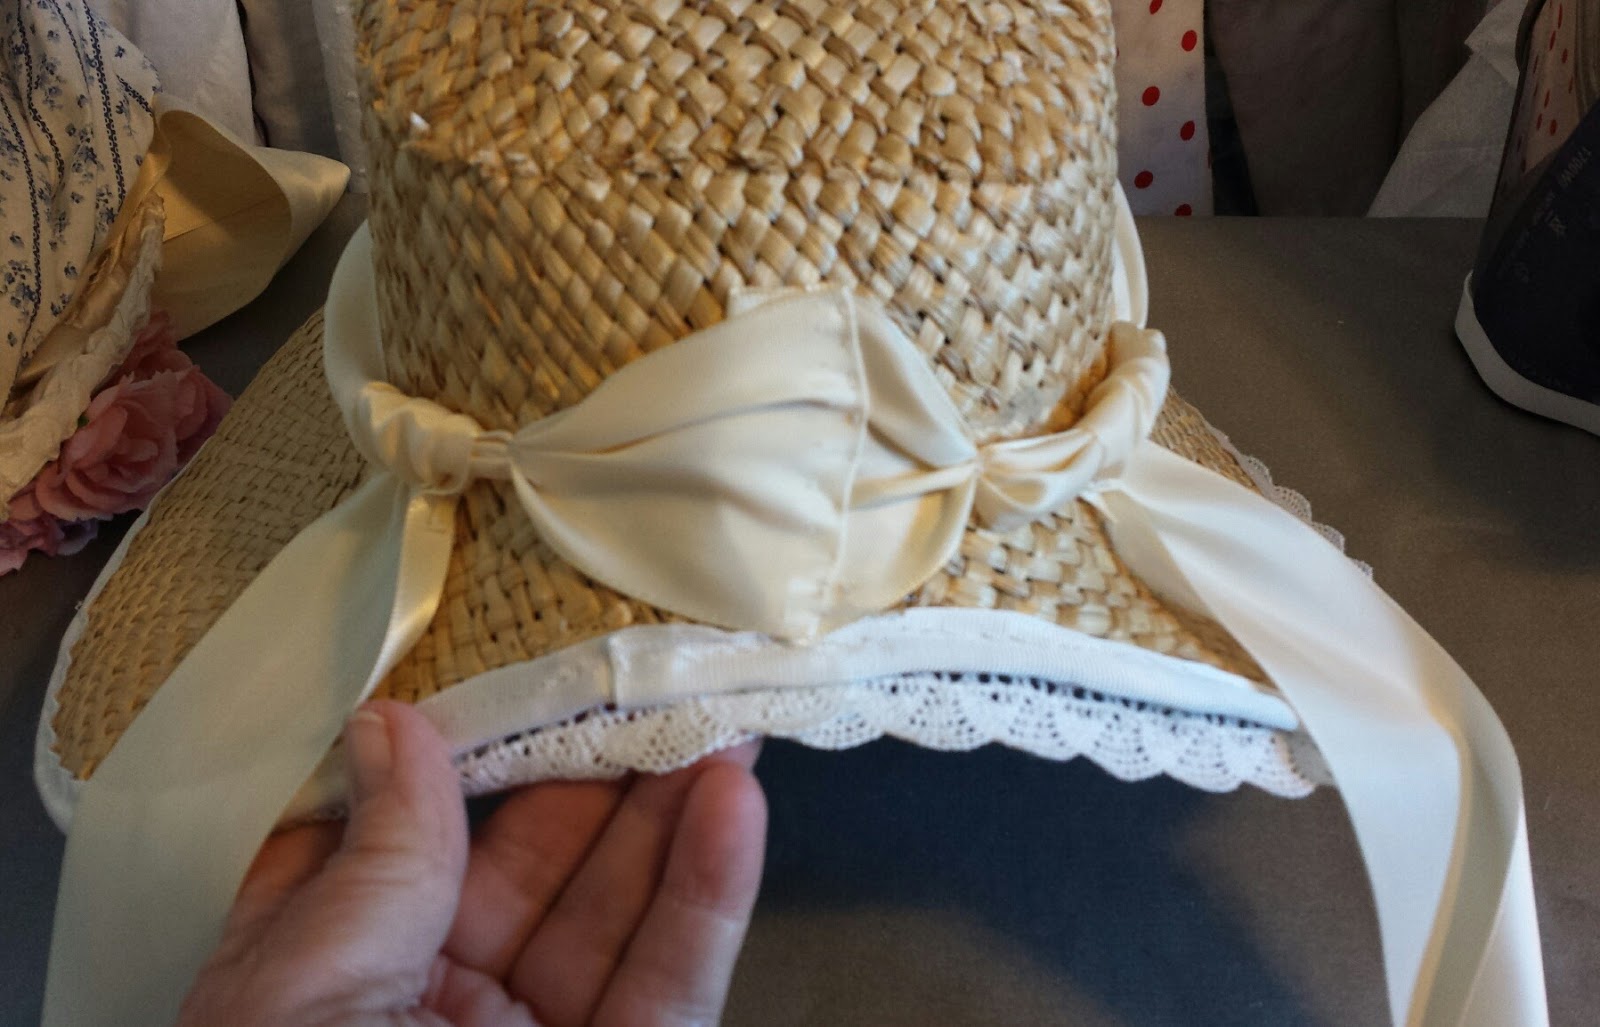
I began to remove the grosgrain around the brim edge and the bonnet literally began to disintegrate before my eyes. It did have a very thin piece of plastic “wire” sewn around the brim, thank goodness for that. But even it wasn’t being held on very well. The loosely woven straw had nothing left to hold it together. It was dry and brittle, and pieces were falling on my lap. First thing I did was grab my bottle of Stiffy liquid and pour liberally around the edges and on the lower back edge of the crown which pretty much had disappeared into a pile of little bits. After that finally dried. I tried to machine sewn the white grosgrain ribbon around the edge. But it was too brittle and any bending would cause it to break. Plan B: hand-baste the ribbon on. It looked pretty rough. I did a little touching up with hot glue to the edges so it would lay flat and stay attached. Then to cover the inside of the ribbon I glued some cotton crochet lace edging on.
 So far so good.  Except then I remembered WHY I quit using hot glue years ago. Unknown to many budding hat trimmers, in Southern California (and elsewhere when it gets hot), hot glue softens and melts when you’re outside standing in the heat. So there you have that pretty flower hanging down in front of your face, with lace drooping on the sides. And remember it’s going to be hot that day and I will be outside. *insert sad face* So on top of hot gluing, I now had to hand-tack everything.
I looked at some 1860s bonnets on Pinterest for some ideas of trimming, and came up with doing some gathered loops around the crown. I tied it in bunches with thread, and then tacked it to the bonnet. No glue.
 The back portion was a disintegrating hole so I had to use some creative covering of it.  I need to add a bavelot aka curtain along the back but still need to dig through my stash fabric for something for it.

 The flower clusters were hot glued, then tacked with thread. I repeated the same cluster on the other side at a slightly different angle.

 So a word of warning: if you see a bonnet near the corner of 9th and Maple for $3.50, keep walking.

                                                             ~~Val~~


Wednesday, February 17, 2016

Need help finding a pattern?

This is a reprint from an article I wrote for Squeals magazine put out by Costumers Guild West in Los Angeles.
   Do you have a fashion print or photo you’re trying to find a pattern to make it with? Are you new to historical costuming and have no idea what patterns are available out there, or where to find them? Or do you just want to see clothing already made from them to see what the pattern will look like?
I have a group just for you on Facebook.

   It’s called HISTORICAL SEWING PATTERN REVIEWS. I started it in 2012 and have over 4000 members. My group is different from GBACG’s Great Pattern Review in that it allows you to ask questions, see completed outfits, and has a large variety of experiences with the different patterns, both good and bad. We can refer you to websites to purchase patterns but I don’t allow sales or self-promotion.
   We mainly ask for reviews of patterns, with a photo of said pattern or what you made from it, and tell us your experience with it, and any problems. We’ve even had the owners of pattern companies who are on the group benefit from any problems experienced so they can make corrections. Anyone can add a review at any time, even if others have done one because we all have different experiences with different parts, and then we get to see your end result. The more the merrier! Many of the ladies just ask general questions, like where to find a specific pattern that they can use and how hard is it to make. But all questions need to be pattern related, although I do allow fabric questions and suggestions since that does come under the making of the outfit, but not specific sewing help. There are other groups for that.
   For example, I recently asked for help to find a bodice pattern to make this fashion print. I was given multiple pattern suggestions from which to make it, and even parts from other patterns to add to it.     

   There are many members who come in very new to historical costuming. I keep this to “historical” but not always historically accurate, and don’t abide by criticisms or suggestions of accuracy unless the member asks. The time period I have is from Medieval to about 1930 but usually point out the specific groups that are available to the time periods.  I don’t allow cosplay, SciFi/fantasy, or Steampunk photos or references but many of them use these patterns for their outfits, so it’s still helpful to them. There is a preponderance of Truly Victorian and Laughing Moon patterns being used on the group, and most members making 1700-1900 costume, but other pattern companies are suggested, and I’ve even come across new ones I didn’t know about.
   We've shared new patterns that have come out and anxiously await to hear the first person who tries it about their experience with it. 
There is not a searchable file but there is a search box that you can type in the pattern company, or its pattern number and it pulls up any posts made about it. Or just use general terms, like Regency or petticoats

   I have Files with lists of other costume or sewing groups or guilds that anyone can add their group to. 
   Every Friday-Sunday I have a Friday Fashion Show with a specific theme I pick, and we just share a photo of what we’ve made, sometimes with some information about it. This keeps the general show and tell to a minimum. There is also a File kept with links to all the previous fashion shows too. 
   This is the direct link to my Facebook group. Please ask to join, and don't add your friends. THEY must ask to join themselves. https://www.facebook.com/groups/370047653021278/  

Tuesday, February 9, 2016

A PLEATED TABLIER

I’m still working on my 1853 purple dress but *Real Life* has prevented me from doing much, and now I have that “blasted cold” that everyone in the US seems to be sharing. So I only have short bursts of energy but at least I can sit and do handwork.

A third portion of my dress, the tablier, is finally done. I had to draw a pattern for it, using the width of my skirt under it as guidance but not quite as full since I was only going to do some pleating on its own waistband. It’s a separate piece from the skirt, worn like the later bustle overskirts. Since it’s a fashion plate, I’ve no idea how they expected it to be done so I used my “artistic license” to come up with my own version.

I planned to make it out of four panels, with the curved section being the seamed parts. I cut two pieces out of muslin and gave it a try.  My first pattern was waaay too long, so I folded up the edges to a better length. I also made sure it was wide enough to meet in the front center and the sides. Then I cut the four panels and test pleated them over my hoop and petticoats. It still needs another fuller ruffled petticoat but first things first.

I was looking forward to making the pleated trim that goes around the edges and first was going to just hand pleat them. I cut out and ironed 6 inch wide lengths of my fabric, turning the sides in.
In retrospect, it didn’t need that much turned under but I didn’t want fuzzy edges popping out. It didn’t require any finishing and was the lazy way. I probably could have just turned a narrow edges under and sewn them because the final velvet ribbon trim would cover that. Oh well, live and learn.  It did give it a nice weight though.
I remembered my Quick Pleaters I’d purchased last year at Costume College and got to use those for the first time. I have the small set and used the 1/2 inch size one. They’re available here on Amazon. http://www.amazon.com/Quick-Pleater-Mini-Set-Include/dp/B00II8V7NK
They’re a bit thick so once you pull it out of the pleat, it’s a tiny bit bigger but it’s so nice to have consistently same width pleats.

This site has an instruction video using it on the lower right.  http://www.jodeesinc.com/products/quick-pleater . They show it being pleated at the same time you’re sewing. My preference is to pleat and pin, iron, then sew.  
After all my pleating was done, I sewed half inch black velvet ribbon along both sides, sewing just on the inside since the outside edges would be sewn to the tablier. What I didn’t take into account was they were straight, the tablier was curved, so I couldn’t sew them flat onto the tablier. I sewed it on the outside edges then tacked it at various points of the inside edges. That seemed to work, although I received numerous suggestions of other ways to do it that would require a lot of ripping and redesigning. Fudging won.

And I tried it over the skirt, which is just bunched up under it since I haven’t finished it’s cartridge pleating.
For a bit of distraction I dug through my antique jewelry stash and came up with a brooch for the lace collar.
Since I have very little energy to do much I decided now was a good time to finish cartridge pleating my skirt. And Chloe decided it was also lap time. So we both benefited. Next step will be figuring out those sleeves. 

                                                                        ~~Val~~
                                 

Wednesday, January 27, 2016

BLACK POINT D’ESPRIT LACE VEST

Still working on my 1853 Purple Fashion Print dress for next month’s Riverside Dickens Fest fashion show, and now for the Port Townsend (WA) Victorian Festival fashion show in March. It started coming together rather quickly, especially after I *finally* got the enthusiasm to put on my corset to try on the bodice to mark the button holes and see how my black lace point d’esprit overlay would look.

At the sewing workshop with Shelley P. last month, she had taken a really close look at my fashion print I was copying and noticed some black ruffles down the center front of the bodice, and around the armholes. Good eyes, Shelley! She determined it was a lace overlay of point d’esprit lace. To make it easy for me, she had some in her stock. 


Once I had my bodice sewn, sans the sleeves which will probably come last, my fingers felt itchy to start working on the lace. I figured the easiest thing to do was make it a vest, and not attached, so it could be removed and not worn if I didn’t want to. I used my same bodice pattern, but pinned the front darts in on the pattern before cutting it out. On all seams I only used a 1/4 inch seam allowance except for the shoulders. This gave me a bit of looseness instead of a tight fit.
**If you didn’t catch my edit on my previous post where I added that my lace collar had arrived from France, you can see it here. It’s not as large as I’d like, but it works.**
I cut 3 inch wide strips of the lace using a large ruler and white chalk to draw my lines on it to cut. The lace yardage was folded in half and wanted to shift. So I pinned the edges, and as each line was marked, added a couple more pins to keep it in line. After all strips were cut, I folded each in half lengthwise and ironed them. I sewed down the two raw edges 1/4 inch in to stabilize it, and then machine gathered it down the same line. I sewed the strips to the armholes lining the raw edge to the raw edge of them, and then folding it under to the inside and topstitched it all together. A lot of stitching on top of stitching but it made it nice and firm, and not stiff. For the front closure I turned under the edges of it then sewed the ruffles onto it, turning it under again, then topstitched it. On the neckline, I just turned under the edges and stitched, and along the bottom, turned the edges under to create a channel which I will run a 1/8 inch black ribbon through and tie it closed in the front. I plan on putting tiny black snaps in a few places down the front just to hold it closed. 
 Now that that’s out of the way, back to cartridge pleating the skirt. And start tracing out a pattern to make my tablier because I’m dying to try doing the trim on that.

 
                                                                   ~~Val~~

Thursday, January 14, 2016

Copying a Dress from a Fashion Plate

In 2014 I was so inspired by a fashion plate of an 1837 dress that I immediately went into gear to make it for the next month. Crazy, huh? Of course not. We’re all crazy around here.

I was only able to copy the main points of it but not the sleeves as that’s still a bit beyond my skill level. But in the end I was really happy with it and put another notch in my costume belt. 

I have an entire album devoted to dresses I want to make, and in looking through them, I see a recurring theme—BIG TRIMS. Things that stand out, not tiny little details. I want them to be seen, and not hide in the background. I tend to like fiddley things that require hand-sewn details. I guess I like pink too. This is only four of them. I’m not giving all my secret plans out. 


We ALL know these dresses aren’t real; they’re “fashion prints” so the artist can draw whatever they like even if not humanly possible to make it, and look like that. And that includes the women’s bodies, corseted or not. So I have to take into consideration that that may not look so good on me. But they were smart because the exaggerated designs- big sleeves, big shoulders, big skirts and bustles, all went into making us “appear” smaller. Smart Victorians!
So here I am starting a new year and a new dress from an 1853 fashion plate that I want to wear next month at the Riverside Dickens Festival, and in the fashion show there. At first glance it made my jaw drop, literally. And hey, purple! I need more purple in my wardrobe. It didn’t appear too complicated but more details started presenting themselves to me when we looked closer at it.  
 I had started planning it about a month ago, just figuring out my pattern for the bodice (going to use Truly Victorian 446 for it) and tearing the skirt lengths out while at a sewing workshop. Next weekend I will again go to one and this time will get some sewing done. At the last one, Shelley Peters looked closely at the print and began pointing out tiny details that I hadn’t noticed, like the black point d’esprit lace that overlays the bodice. She showed me the lines of it along the sides of the bodice, down the front, on the sleeve caps and the cuffs. Wow, I never saw that! And she just happened to have that fabric so I bought some from her.

In looking closely at the skirt and overlaying tablier, we determined that the skirt is separate and the tablier lays over the top of the skirt, due to the heavier folds of fabric just under the tablier. That will make it much easier to construct. And btw, I just learned that word tablier. Now you know it too.
And look, fiddly ruching and black velvet trims around the edges! My kind of thing! 
The sleeves are my nemesis but it might be something I can fake by sewing little ruffs on top of a straight sleeve. I very much doubt I’ll make those white puffs coming out from slits in the sleeves. That’s a bit much, and no one ever said you should make it an exact copy. I think there’s a rule about that somewhere.
I went searching on Etsy for a similar lace collar and came up with this vintage one for $20, and it’s coming from France with free shipping, no less. Now I just need to find some matching lace to use on my cuffs. I bet I have some in my stash but I need to see how white this is when it arrives.

EDITED TO ADD: my collar from France arrived yesterday and it's beautiful. A good solid whte, a little shorter that I'd hoped but perfect to use. 

When I started planning this I also wanted to make the bonnet in the picture. It’s rather pale and not immediately noticeable on the table behind the model until you blow it up. I thought I would have plenty of time to make one (best laid plans). But I only have 1 ½ months until it’s needed, and knowing how slow I’m sewing, that’s not going to happen. Unless the sewing birds show up one night.
But luck was with me over the holidays. I found out Shelley Peters (of Kansas Mercantile & Historical Sewing Workshops) had some shirred bonnets for sale and she brought her wares over to my house for me to shop from when she was out my way. And there it was, an antique white bonnet that I could use for this.

The color of the flowers on it obviously won’t work for this, so I’ll be looking for some pink ones, and a nice soft pink ribbon to put some loops on the outside.
 Next I’ll have to decide soon what to do with the hair. A wig, obviously, and I considered long curls either on the sides or towards the back (that’s Louise May Alcott in 1855). But with the lace framing my face, those may not show. I do like the side braids on the second photo, and those are easy to fake. I’ll have to see how I can strategically place some roses there. Not sure a lady of a certain age would be that frilly, but I’m not going as an old hag.

We’ve been catching up on a lot of recorded programs on TV lately instead of sewing but if I can just get Chloe away from the TV and back to the cutting table, I can make some progress on this.

~~Val~~